As 2020 comes to a close, I know many of you are ever so grateful. It has been a doozy of a year on many fronts. It seems surreal that this year is in fact finally ending, but I guess I don't share the "yeah it over" feeling. It does not seem as though the coming days in 2021 will really be all that different from what we've become accustomed.
Many people on facebook have commented that they miss seeing my blog posts. I truly was a bit shocked this morning when I opened it (after resetting passwords because I'd forgotten them over the many dormant months) to find my last post from May. Oh my...yes it is definitely overdue. Many of my photos and ideas do get shared on facebook so I had not really given ignoring the blog too much thought. But now I get it...you all just must miss my cynical and curmudgeonly anecdotes :-) Kidding...
After removing the 2020 (go figure, wouldn't you know THAT is the actual number) of photos from my phone I will share some of the many great quilts I have been blessed to work on this year (since May). I know what is here does not represent EVERY quilt I did. If I left your's out, it was not intentional. I take photos of many, but definitely not ALL of the quilts I quilt. I appreciate each and every one that is sent to me. Please know that.
This is one of the many quilts I did for Jean last year. She makes the most beautiful, romantic quilts. This was one of my favorites. Going on memory, but I believe that this has a wool batting. It has nice loft underneath the quilting.
The cross-hatching is a bit fussy to quilt, but it looks so pretty on the finished quilt.
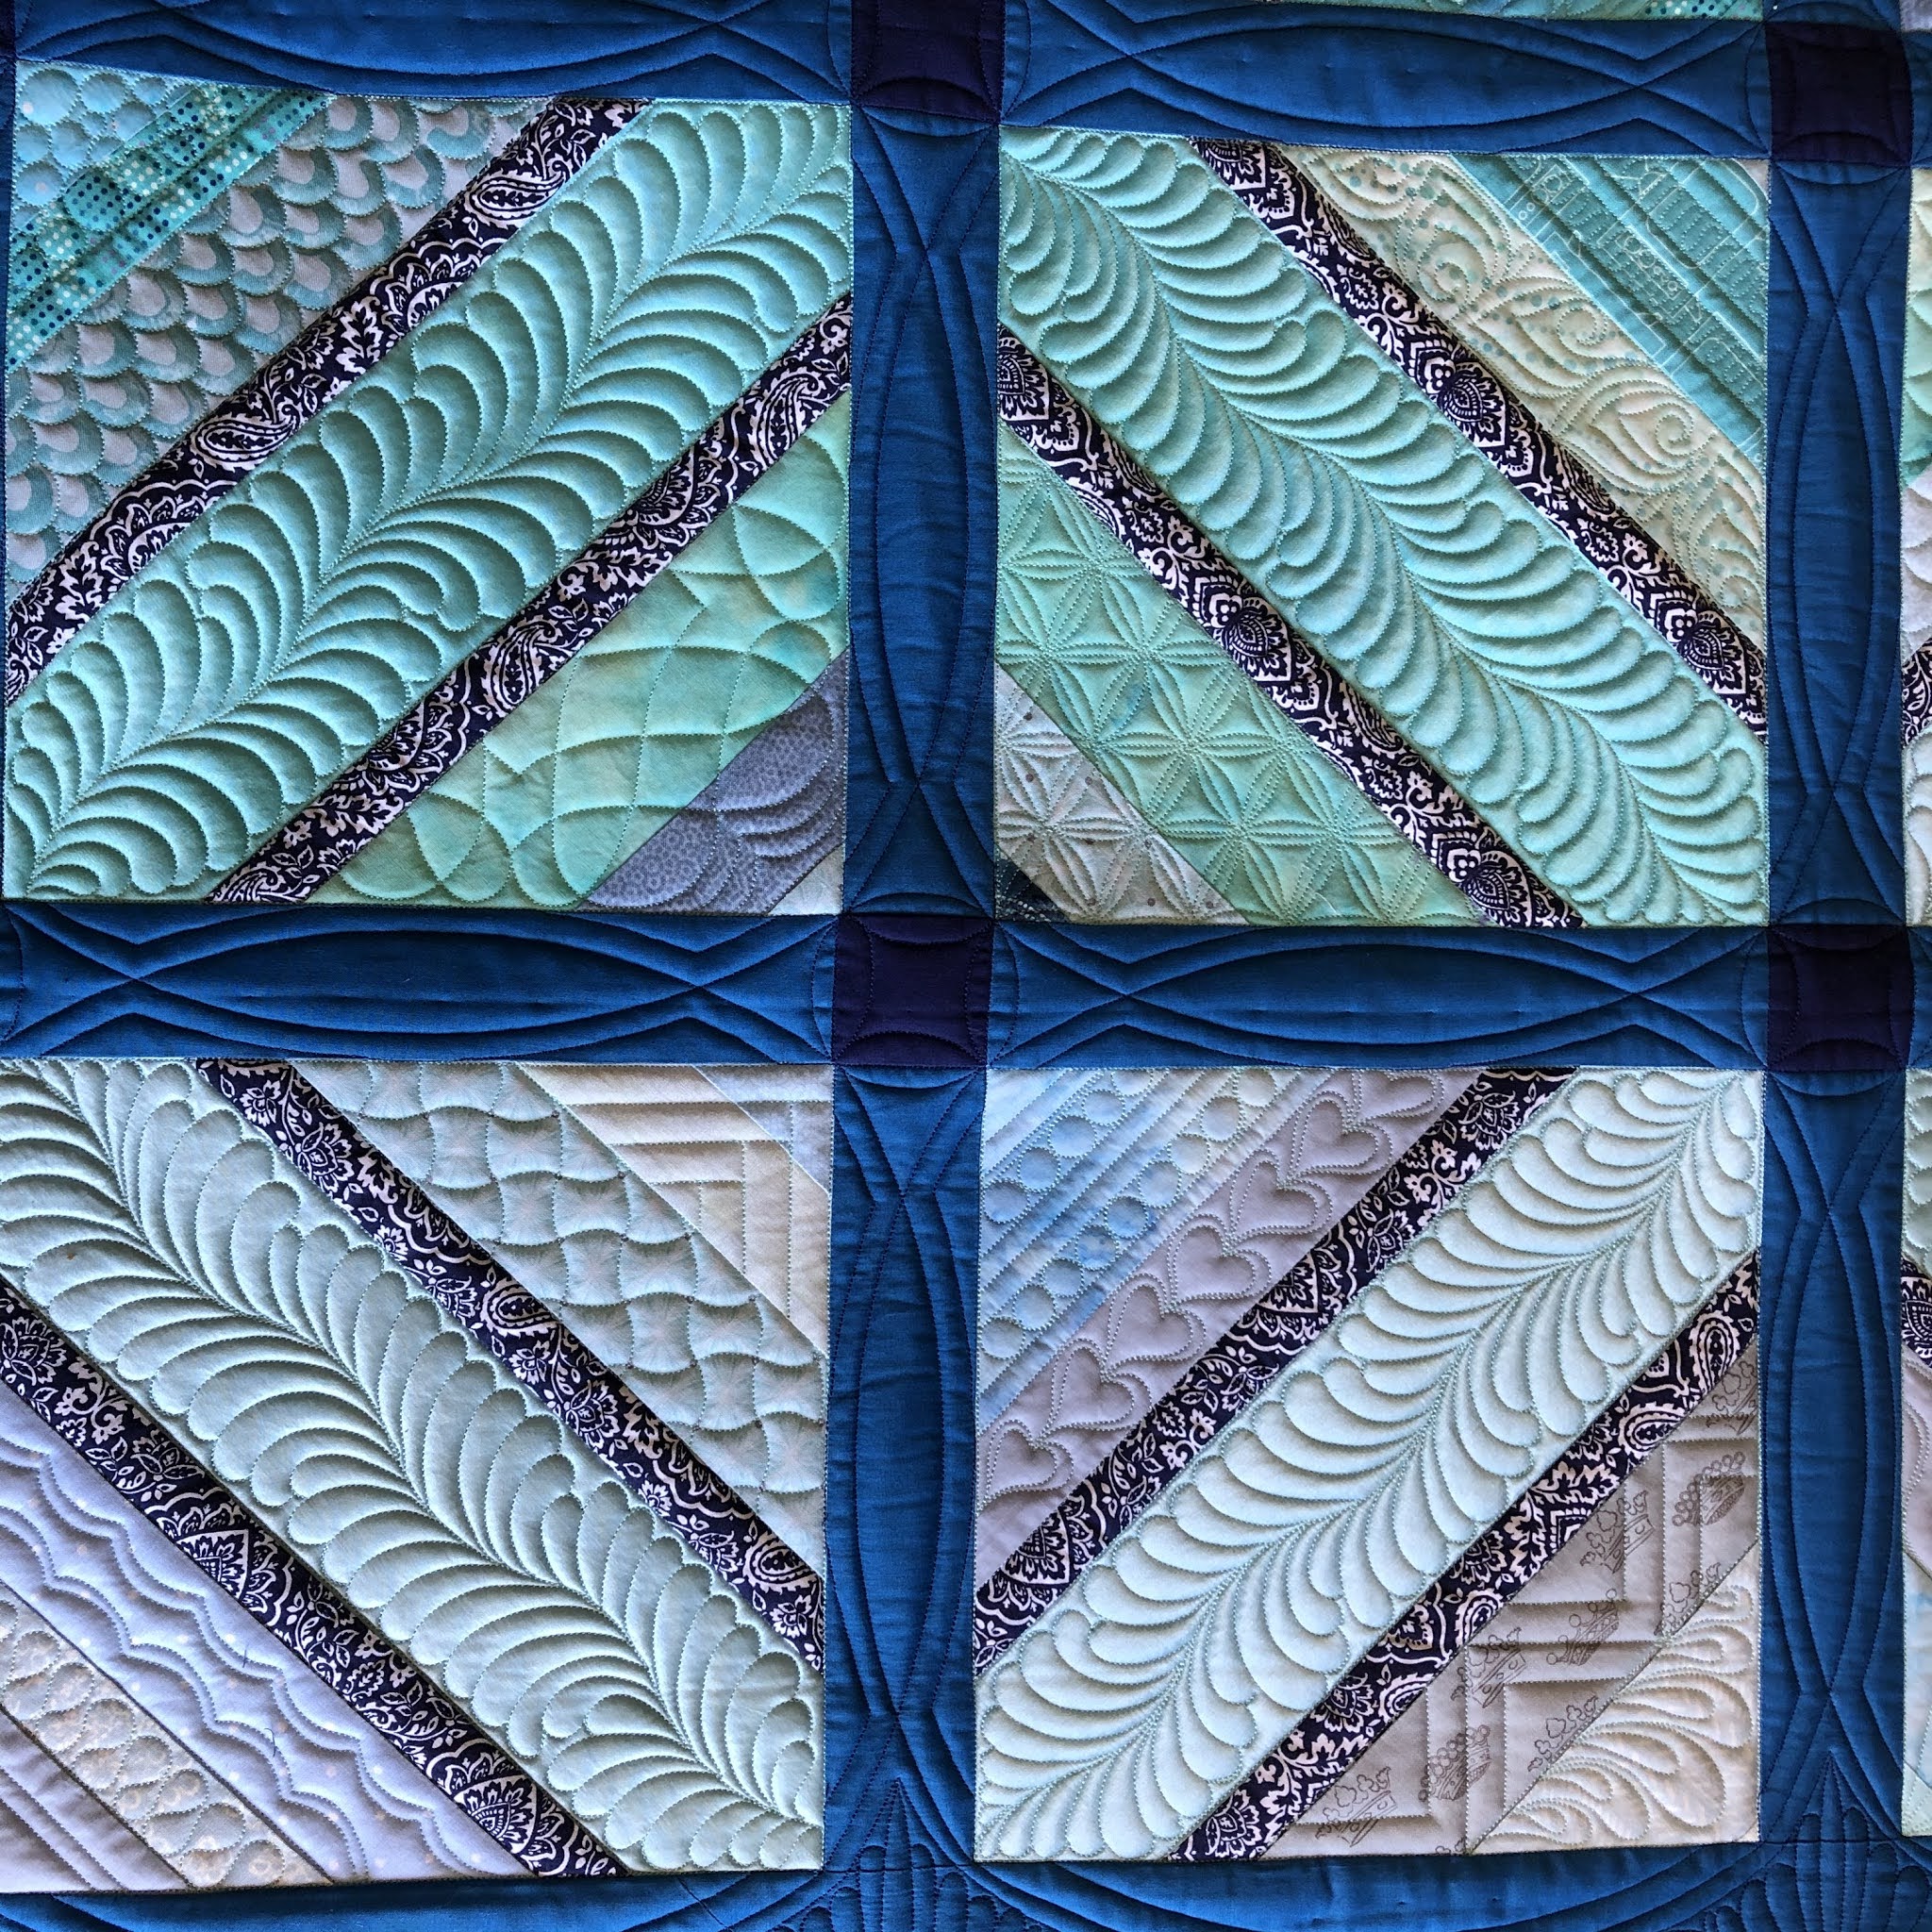
This is a very simply pieced quilt that comes alive with the quilting. I love how quilting can create movement to an otherwise plain backing fabric.
It is done with lots of template/ruler work and a bit of freemotion. Plenty of curves help soften the very linear piecing.
Here's just a fun and whimsical quilt. The fabrics were all very printed so I kept the quilting simple to just echo lines and parallel quilting. Overthinking on a quilt like this is really a waste of time because detailed quilting on print does.not.show.
This is another of Jean's quilts. I can tell just from the romantic fabrics she chooses. It called for lots of feathers and a pretty border!
...And a less typical quilt, but fun to stitch none the less.
I loved this quilt. At first blush I really was not sure what I'd do on it, but the owner said she likes more modern-ish quilting so I went with this notion.
Each pumpkin was framed out and filled with a different fill. I do have LOTS of designs at my disposal, but I often have to pull out my own
Dense & Dainty book to remember all the possibilities.
Here's a pretty wall hanging or lap quilt. It is a combination of a kaleidoscope block and stars (pattern by Edyta Sitar). It was harder than I expected to quilt though because not enough of the pattern shows as you are quilting to keep in mind where you need to go! It's double batted so that quilting shows over the prints.
I love this little wallhanging. The colors are delightful and the background just screams for pretty flowy feathers.
...and the back is just as pretty!
Believe it or not, I did 2 100" Dear Jane quilts in 2020! And what is more surprising than that is that they were made by the same woman! I'm not sure I have one of these in my entire life's future, let alone two. The all black one was first...
I thought I took lots of photos, but I can only find a few.
All the blocks were outline stitched (yes, it's days of SID!) and many of the block features also received ditch stitching. The border was quilted in a royal blue 40wt Glide thread so that it would show on the black.
and one of the black back side!
The second Dear Jane had ivory background. This quilt was intended to be used on a bed (single wool batting versus the double batting of the black quilt) AND the owner specifically requested lighter quilting to keep the quilt more soft and drapable.

It's challenging to quilt "less" when you are accustomed to being a fairly dense quilter.
I emailed Barb a bunch of photos though before the quilt came off the frame so she could decide if blocks needed more. The simplicity was to her liking.
Here's the white backside...It really is a lot of quilting when you see this!
How about a look at some of the year's baby quilts...
Actually, the pumpkin quilt I showed already was made for a baby. I forgot that as I was pulling photos for the next ones.
This is the cutest baby quilt. It was for a mother having twins, and yes, I had 2 of the identical quilts to do! Robyn does fantastic applique.
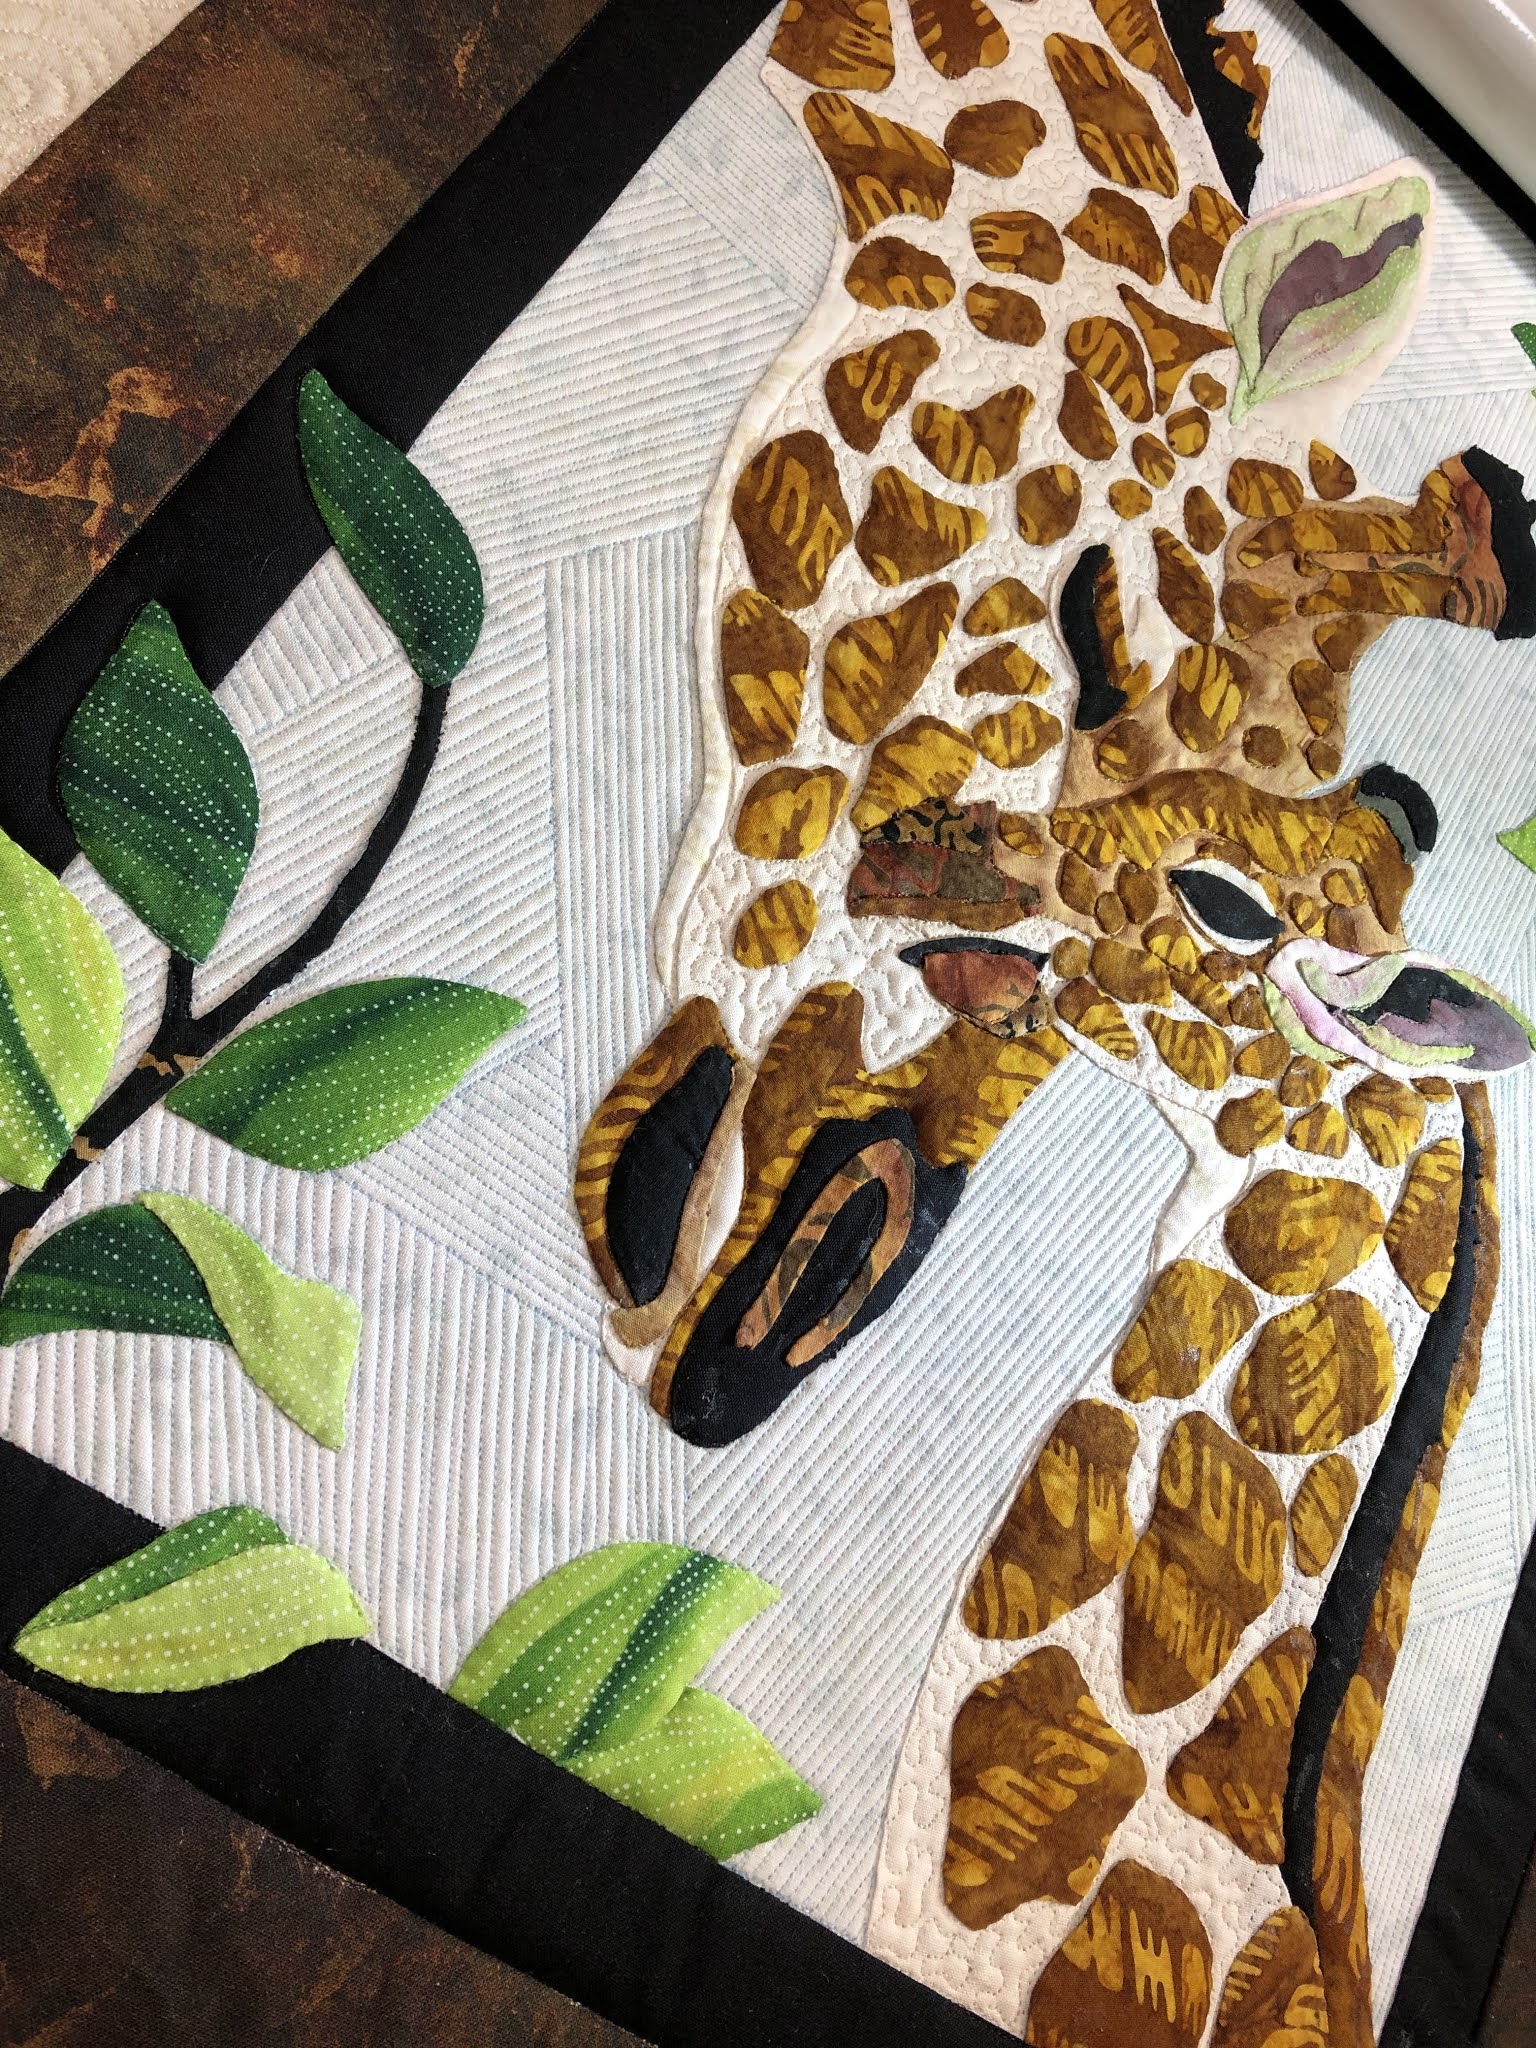
I can't remember if this was for twins, but here are a couple elephant quilts. Love the feathered elephant as well as the big raindrops in the background.
I have done this one several times previously, but they are always fun because fabrics change.
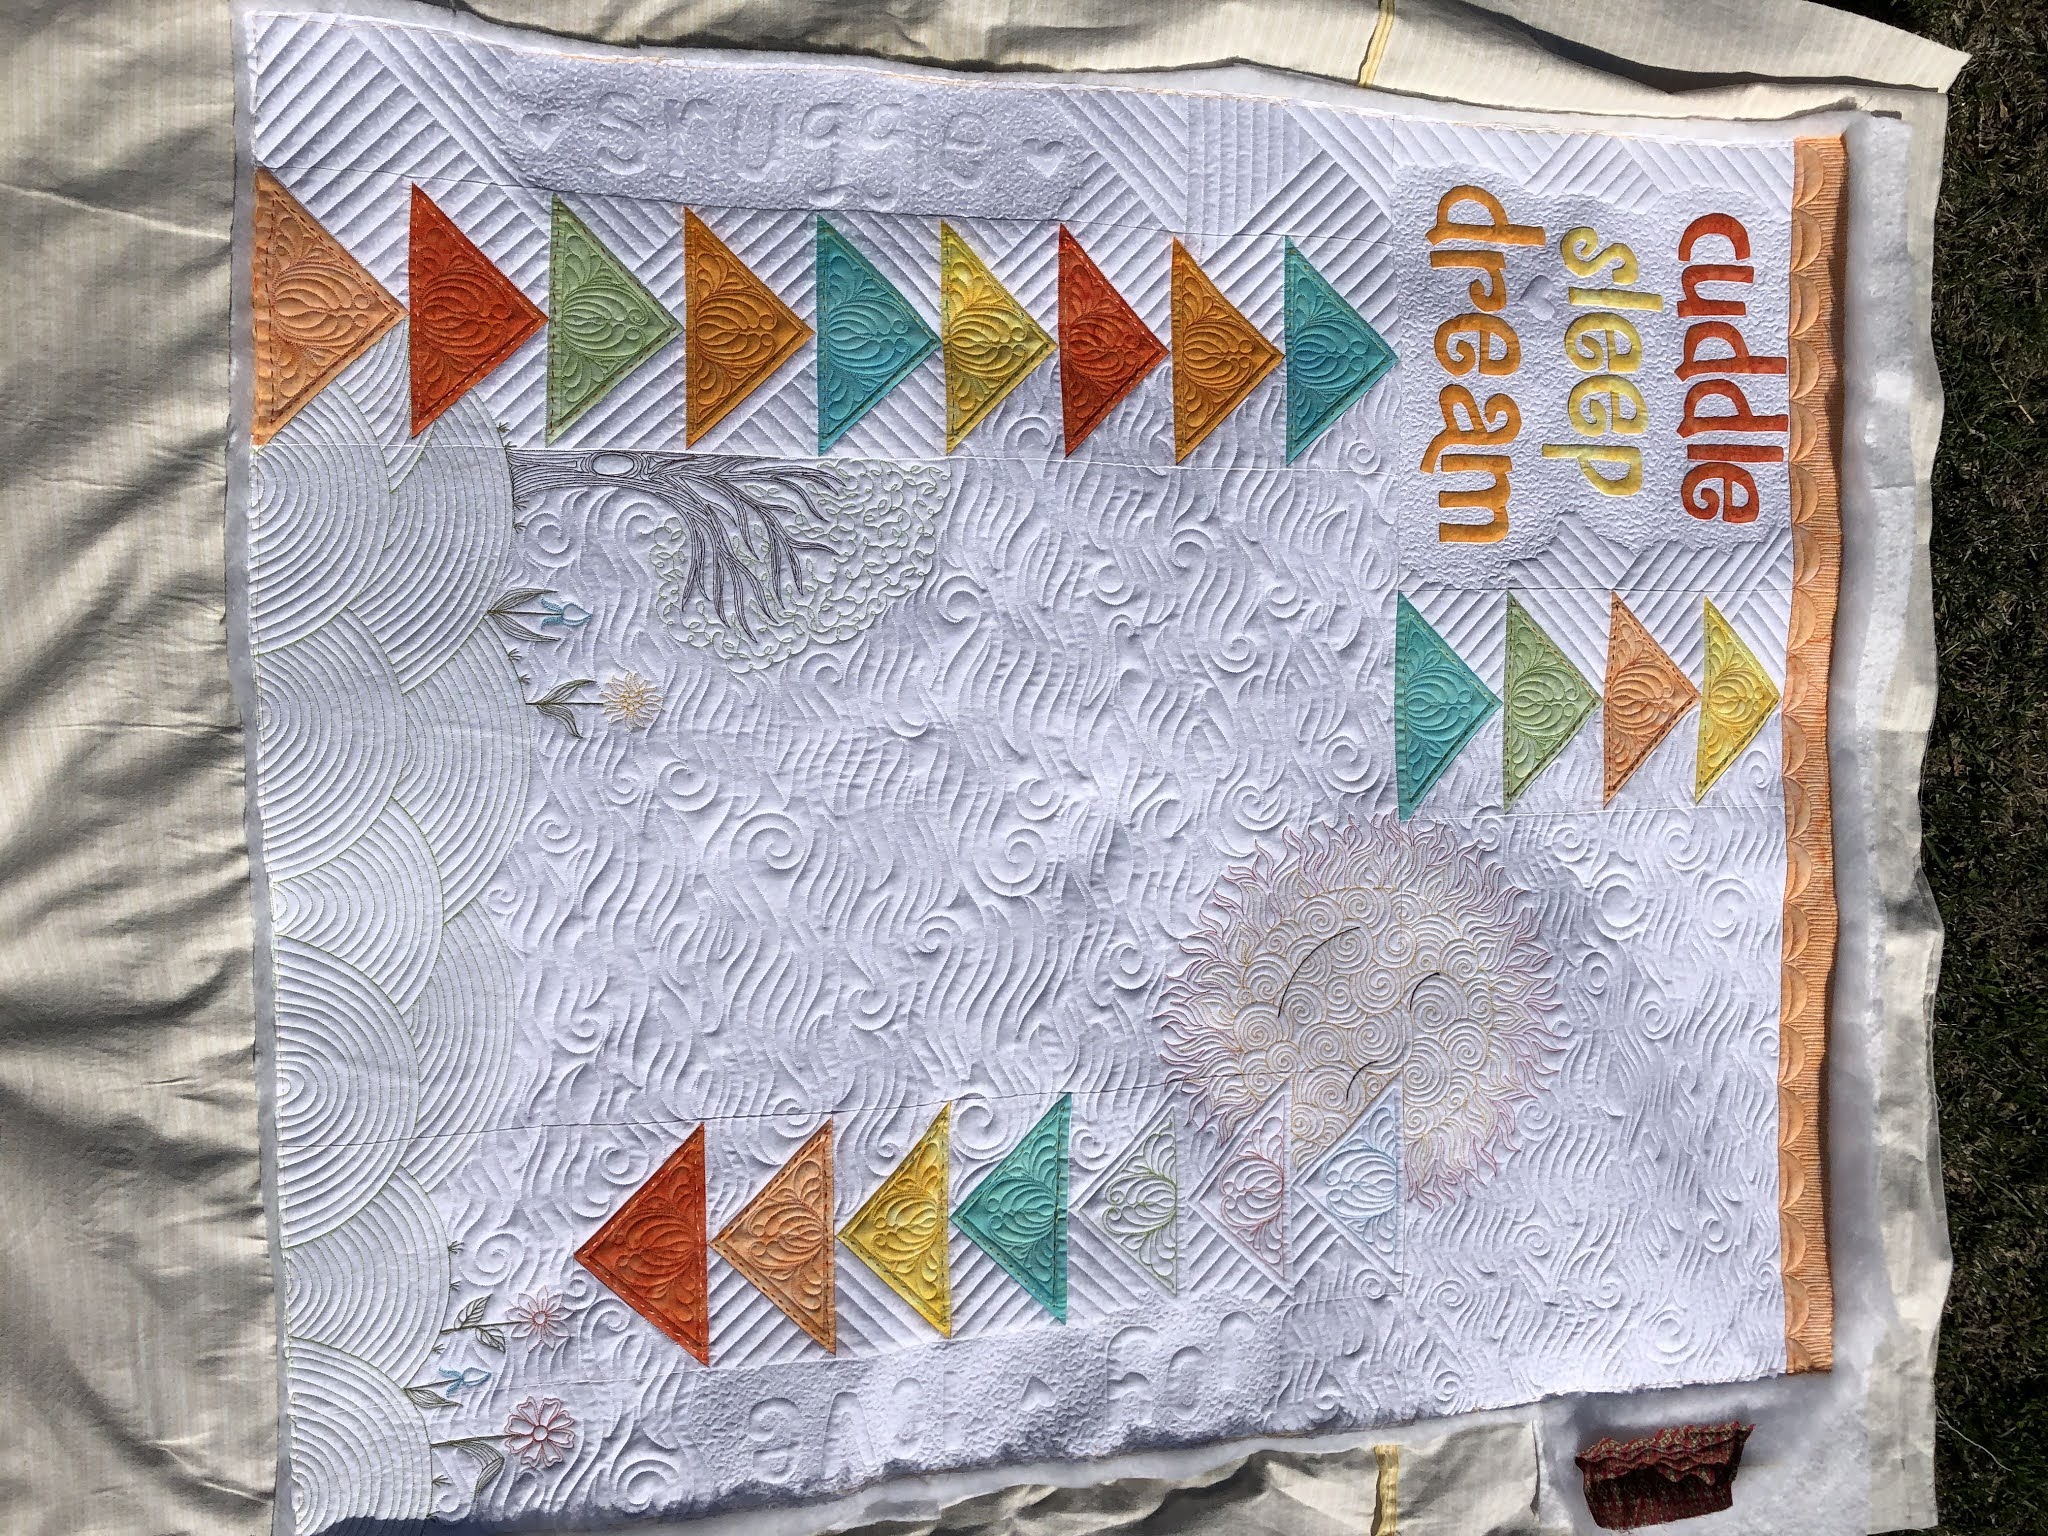
Turn your head sideways because blogger won't rotate for me. This had to be the simplest quilt I have ever been sent, but the blank canvas was for me to create a story with.
OK, I was terrified. I really prefer more boundaries on quilts, but its a client I have quilted for for many years, and I owed it to her to come up with something adorable.
I quilted some words into the sides - basically creating a border when one was not really there. I also added thread-painting of a tree and simple flowers, something I haven't done before.
A sun with sleepy eyes was quilted into the opposite corner. I think it looked baby-like and hope the client thought so too.
The next two were simpler edge-to-edge baby quilts with a heart panto. Contrary to what some may believe, I do not do ALL custom.
This quilt was done just a couple weeks ago also. It gets my most unorthodox (though that may be up for grabs with the Little Pumpkins quilt!) baby quilt award. It's one of Jean's and these hankies belonged to a beloved relative. It's a sweet idea for a girl. I quilted some movement into the background around each dancer.
Let's go back and see a few other customs I have forgotten to show...
I know that this is a Judy Neimeyer but I am at a loss for which one (there are so many!). What makes it different is that its not made with batiks, as many are. The one request the client had was to put some butterflies on the yellow sections.
I used a single wool batt as this was going to a bed.
and another back!...
Here's a nice wall hanging. This type quilt is right up my alley. I have certain patterns like feathers or crosshatching that I just know will quilt beautifully for this type spaces/
I've hunted for more photos of this quilt but come up empty. It has a ton of this applique, and like the Dear Janes, I remember ding 2 of these in 2020.
This was quilted with a wool batting to show off the applique loft. There's a week of SID (ok, that is a slight exaggeration) and then lots of quilting on top of the appliques. Why do I quilt on top?...If an applique is too large it will not wear well. It will look floppy. All in all, the quilt and the design just look better with more quilting.
Jean's done a couple of seasonal quilts. I love the beachy one. Most of her tops are appliqued, and in the thought of larger appliques, you can see that I did quilt on top of many of these. It gives added detail as well as security.
The sashing was a fun wave of bubbles.
Here's Jean's 4th of July quilt...
She makes lovely quilts, often with very unexpected fabrics. Who'd use the floral border? - but it's really pretty.
These aren't fast because all applique is outlined, and then most of them are also quilted on. Both applique quilts were done with a wool batting and a bunch of different threads.
I just love this little bike. With all that is wrong in our days, this is right.
Here's a Glacier Star. This type of quilt does take a significant amount of time. Every point and every flying geese is outline quilted with a clear monofilament thread before I add any details into the spaces. I would have double batted this quilt so that the quilting shows more and because this is a wall quilt.
Here's yet another Glacier Star. This was quilted before the last one, but I can't locate any of the detail photos of the quilt.
Here's a quilt made by Mary. I adopted this from another quilter friend because she didn't have time to quilt it. It's a fantastic quilt in terms of piecing and fabrics. The details are best seen in person.
It is double-batted. Darker fabrics and printed fabrics are much harder to make the quilting show, but double batting helps this.
I actually went back and added detailing on the leaves and stems, but the photo showing this has gone AWOL. Such is life. This is afterall, still 2020.
(edited to add this... leaf veins and stem details added)
Out of order, no doubt, but this massive and massively detailed applique quilt was done earlier in the summer. It is probably the most incredible quilt I have worked on. I spent many days just quilting the SID with clear thread. While there is not an abundance of space for creating background patterns, I tried to use what space there was.
Stand on your head for this one...
The backside of this quilt was phenomenal!
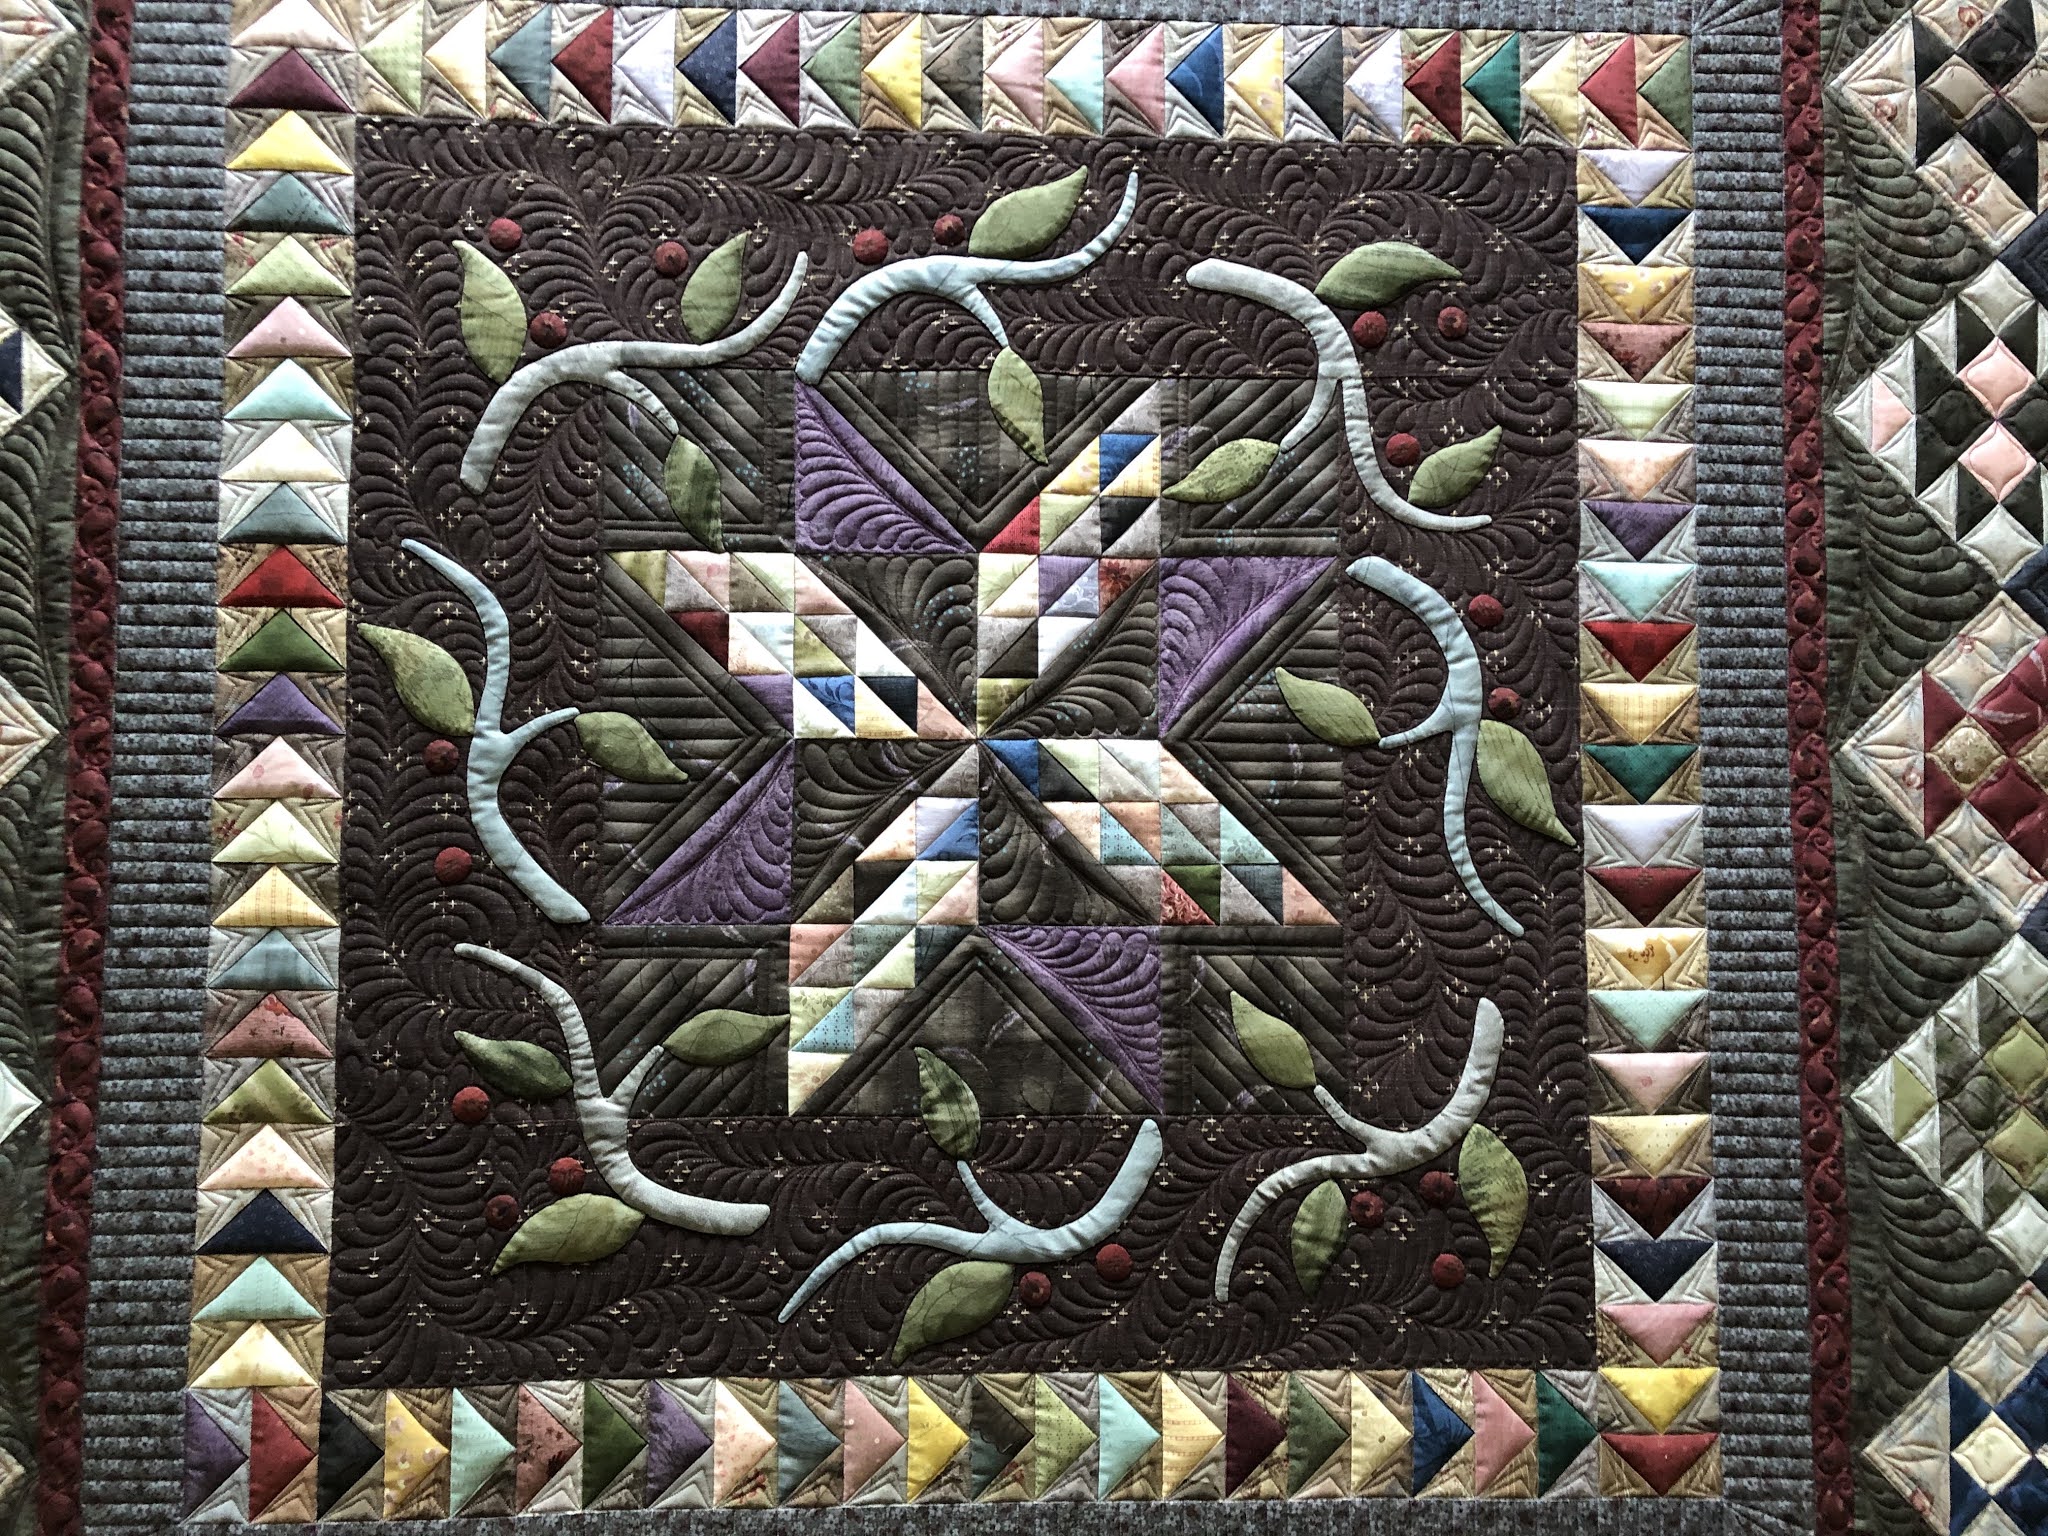
This reproduction of a traditional Oak and Reel quilt was made by Bonnie. It's simple, yet complex.
It is also large and will go on a bed. I used a single wool batting and 40wt poly threads. All fabrics were printed so to better see what I was doing, I quilted with green thread on the red, and red thread on the green.
I tried to intentionally select more traditional motifs like feathers and line work. The unique curvature of the feather's spine comes from using my Quatrefoil template (part of the Arabesque template collection and available on my websiteMainelyQuiltsofLove.com). I think that this shaped spine creates an attractive secondary pattern within the blocks.
Keeping with the very traditional look, the scalloped swag border is done on the 2 axisymmetrical borders (likely done to make the quilt rectangular.
As always, a lovely backside is clearly indicative of a lovely frontside :-)
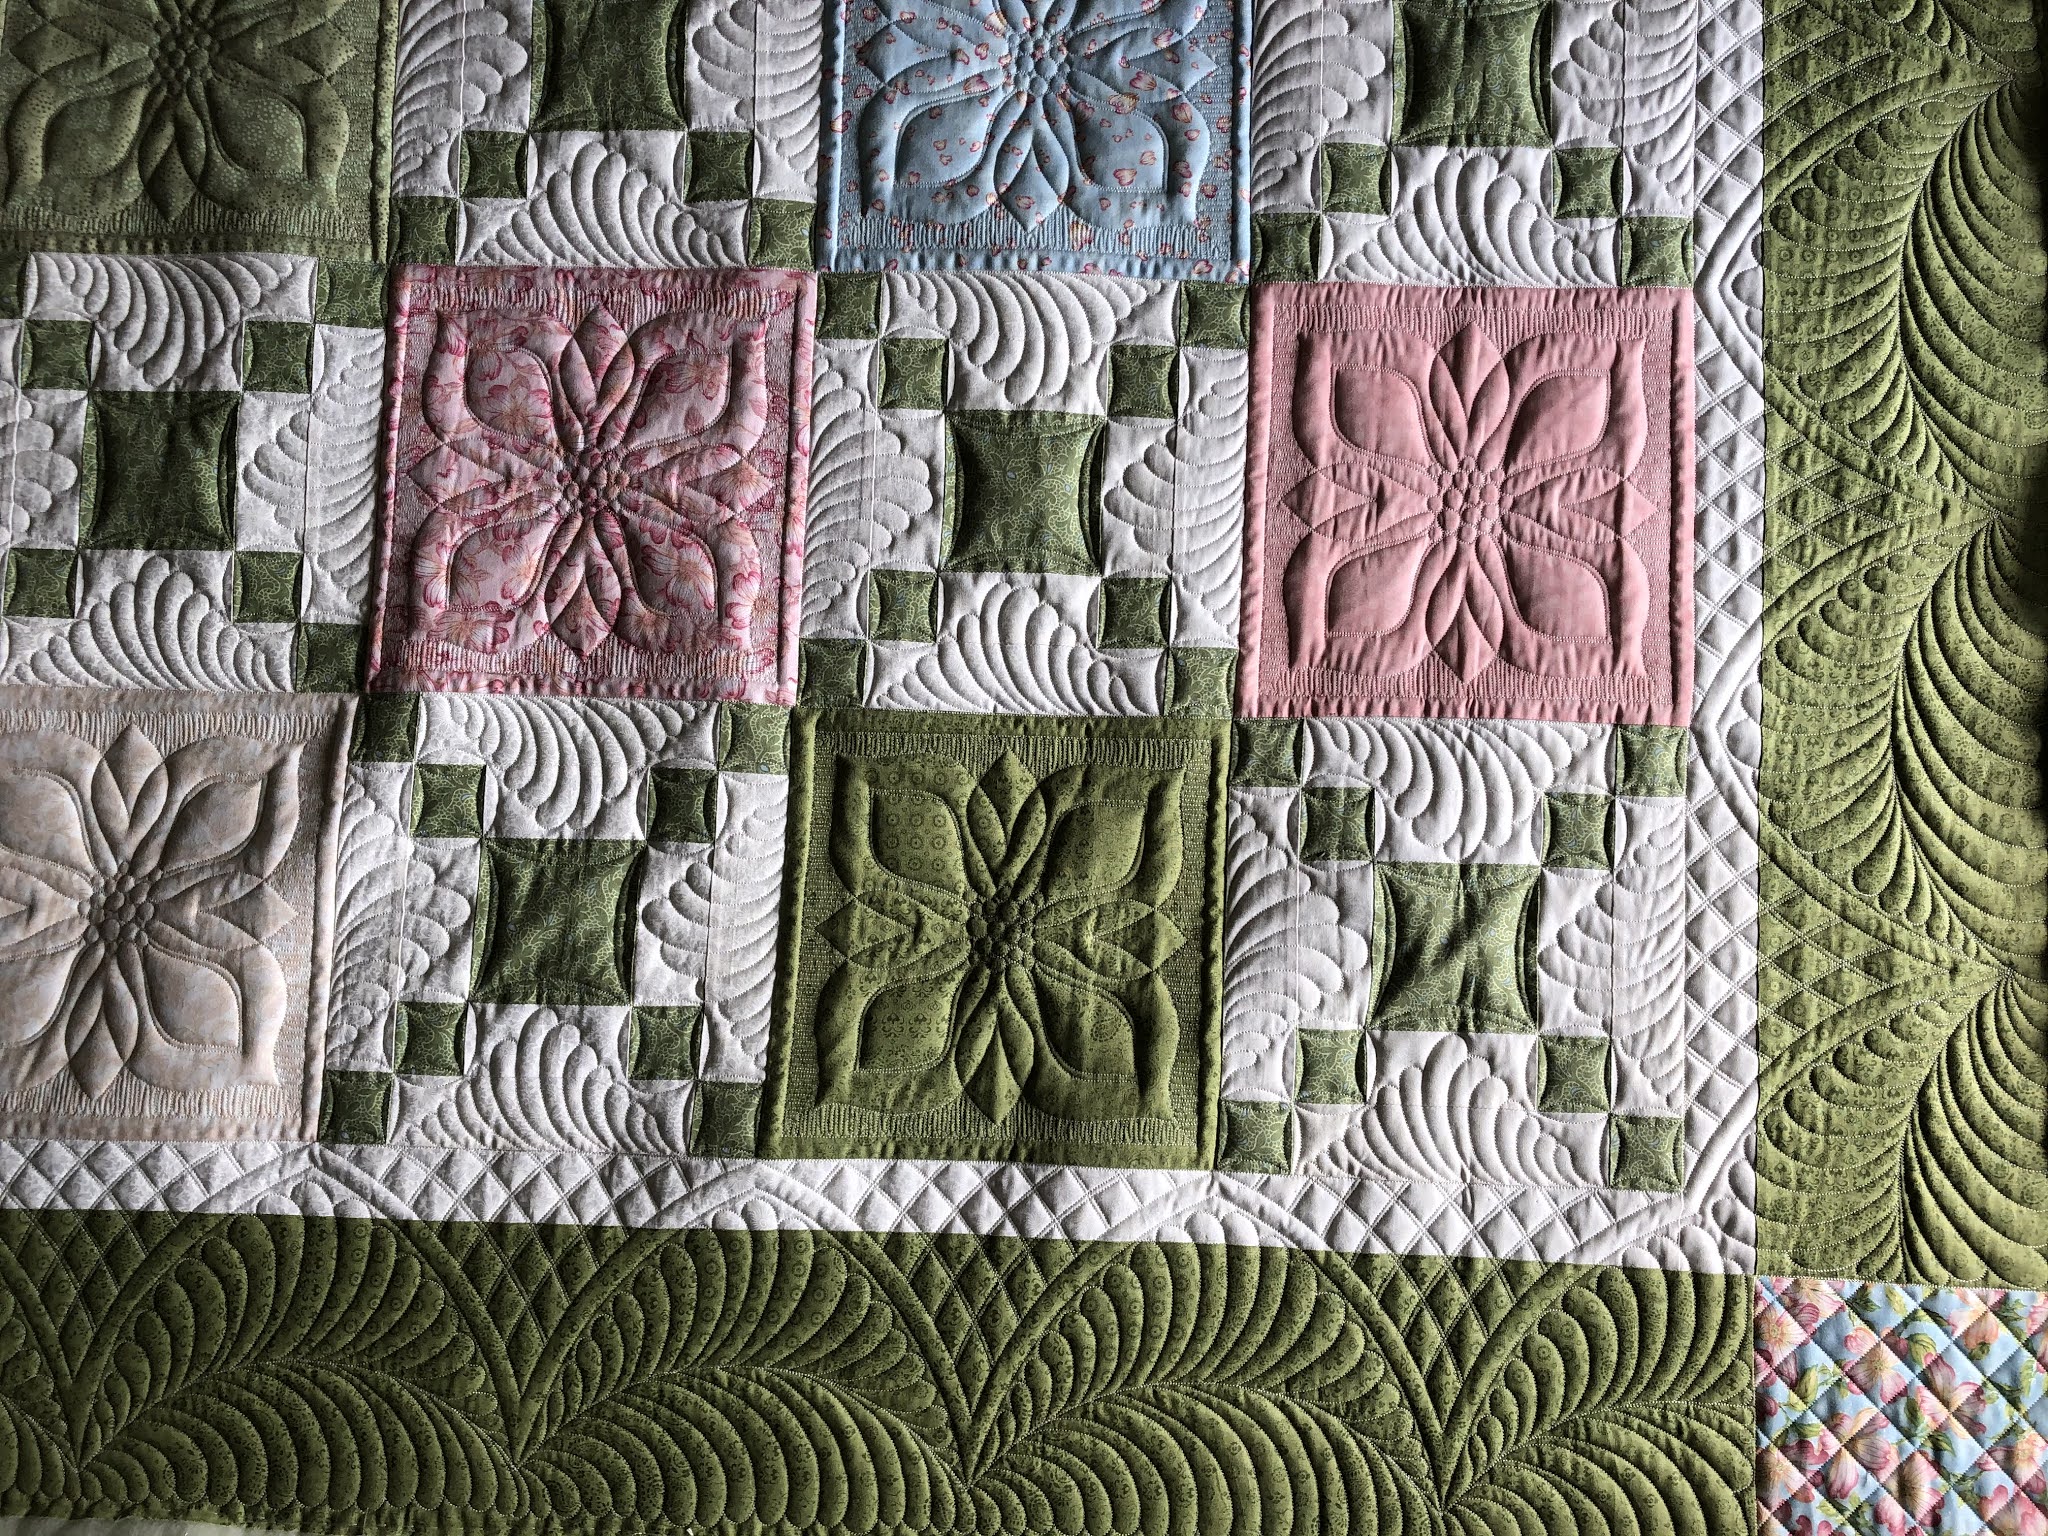
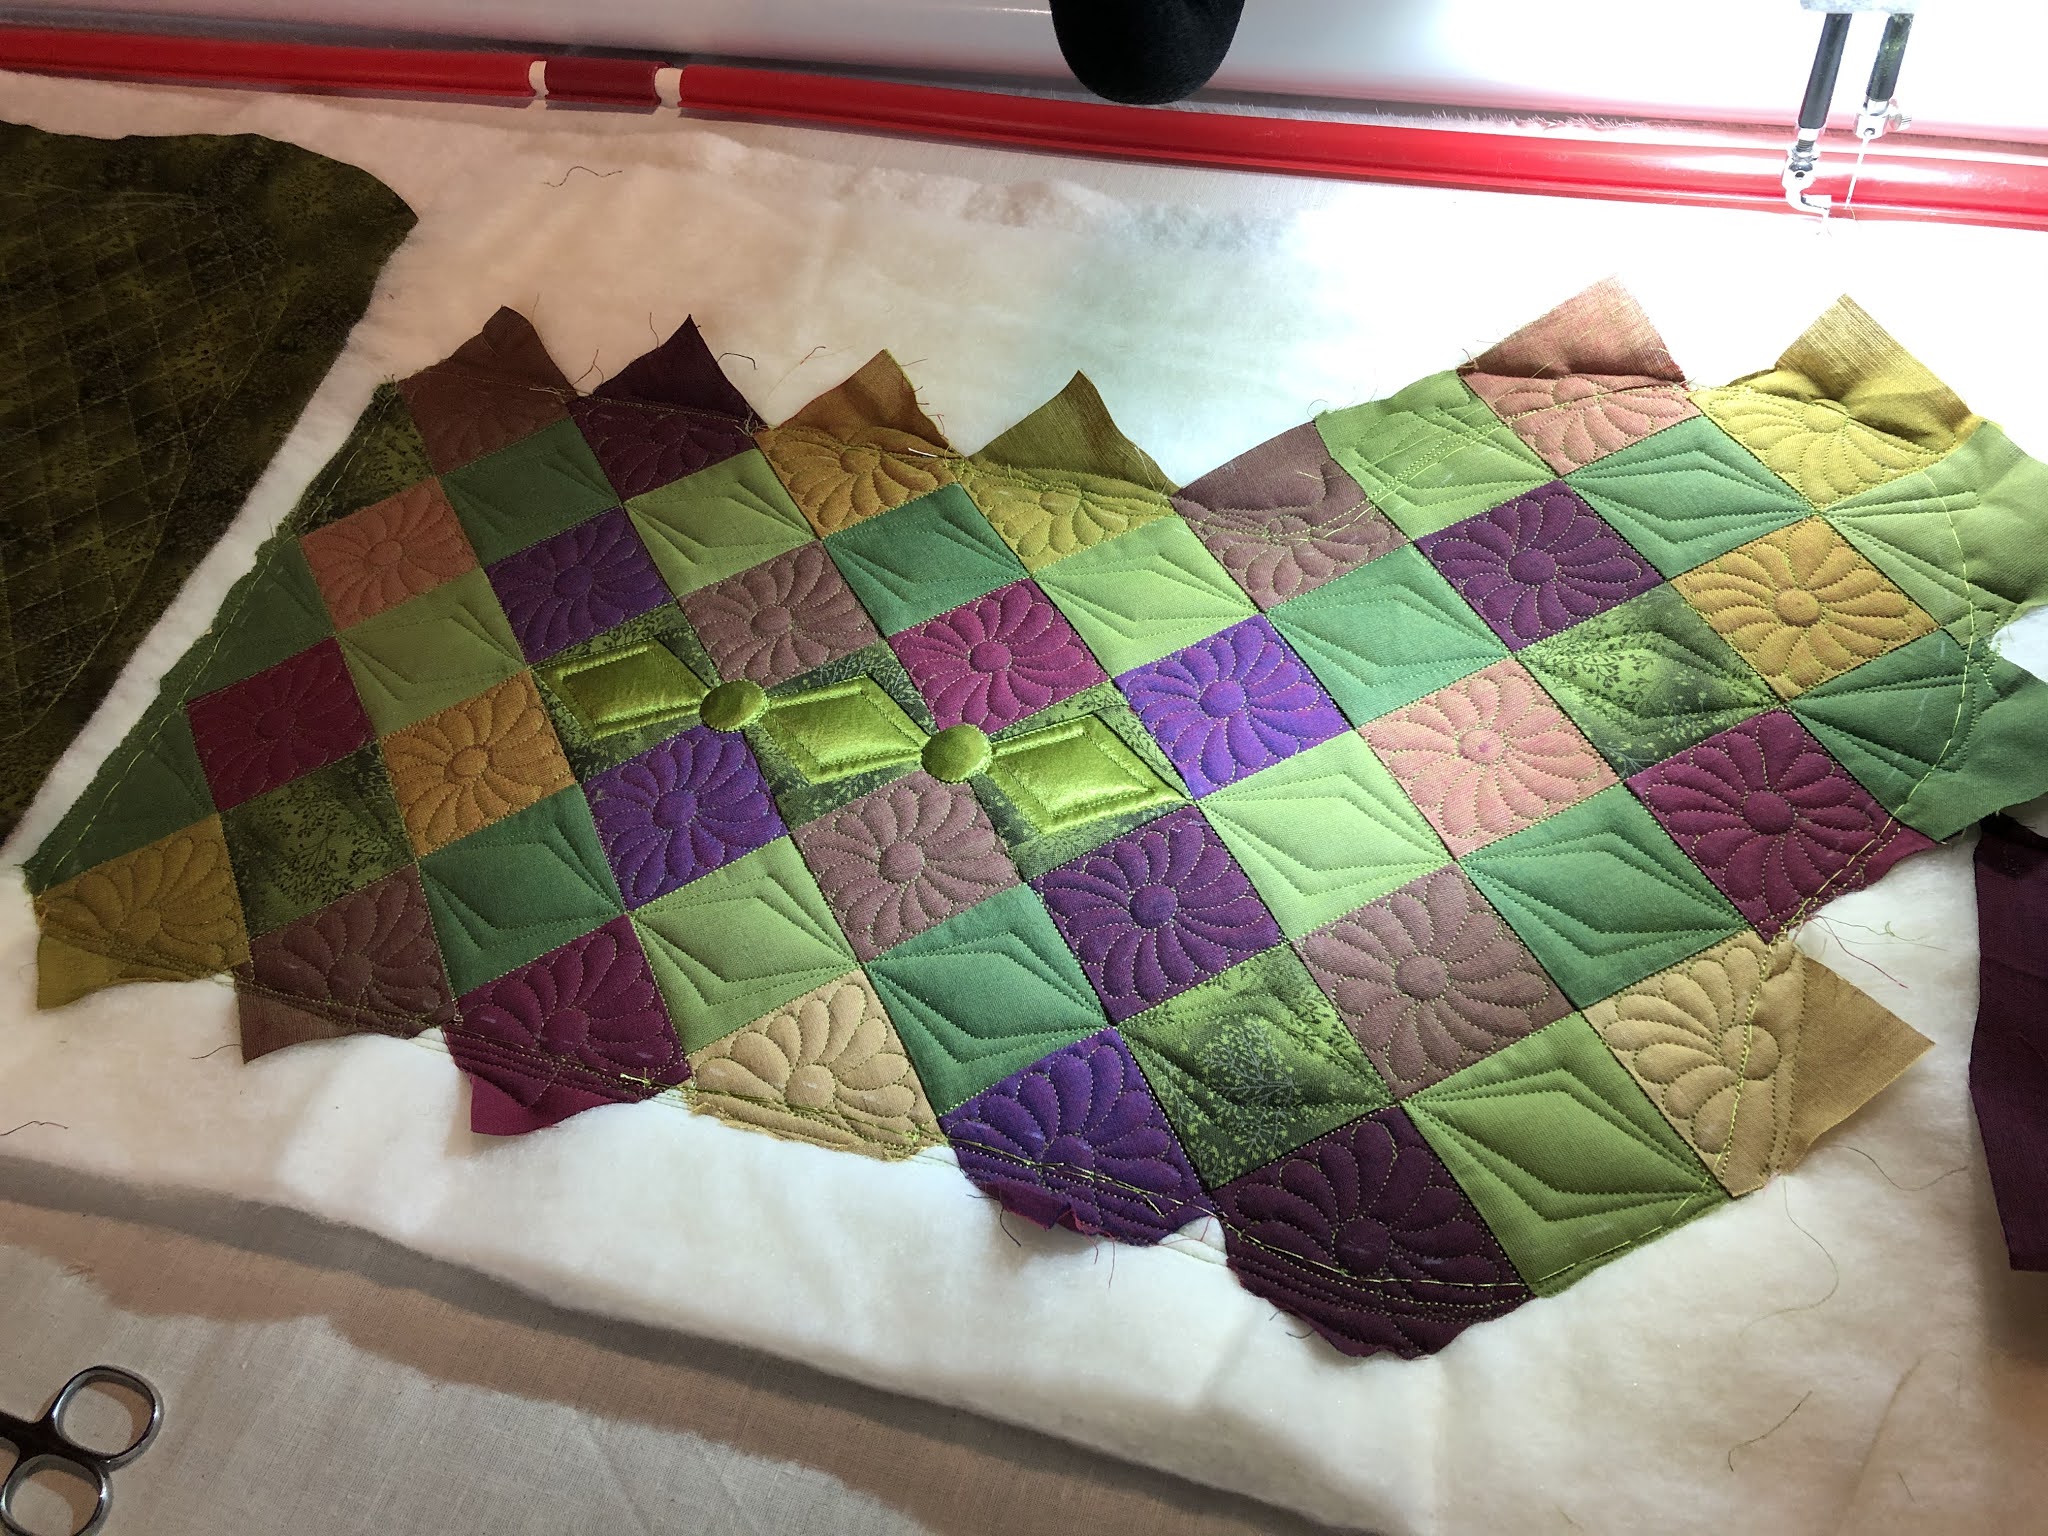
I adore how quilting can take an overly simple top and just push it over the top. The maker of this top was unsure if it was deserving of custom quilting. After quilting was finished I know she felt differently. It mimics antique tin ceilings.
The pattern in the large blocks is a stencil that I marked on each block and embellished with additional quilting. There is a pebbled floral center and dense linear fill outboard of the stencil pattern. The dense work makes the pattern pop.
I wish the backing fabric photographed better, as it was a lovely aqua print with a gold gilding.
Kendra sent me 2 large boxes of quilts this fall, most of which were done prior to Christmas. This one is a special and very cute quilt. Sorry about the glaring sunshine. I was struggling to get a good photo, either too shady or too sunny.
I especially like the fun details of the house from the scalloped shingles to the smoke rising from the chimney.
Another of Kendra's quilts is this American flag quilt, done in a modern take with the aqua background. In keeping with the unlikely background, I allowed the designs on the flags to be less traditional too.
Jean has another fantastic quilt that I was not certain I'd get done before the holiday. When she told me it was for her husband, I had to get it quilted. She is one of my oldest clients and an absolutely wonderful appliquer. The stars aligned with my traditional creativity. Both the client and I love how this turned out.
It has a single wool batting and is quilted with 40wt Glide thread.
Feathers give movement to the center block, while the feathered spirals keep with the traditional look.
I used a serpentine template to create waving frames on the lighter blocks.
One rogue photo of a hand-guided edge-to-edge, as seen from the back. I do edge-to-edge once in a while!
This was the last quilt I did for 2020. It's a 75" custom, quilt design by Jacqueline de Jonge and made by Sarah S. The piecing is very accurate and it has a good deal of background that I had to design quilting for. I wanted to bring circle designs into the background as well as keep fills more on the modern side than purely traditional. Lastly, I always consider the piecing when choosing what to quilt. There are lots of circles and stars, so I copied this idea into the border. Two of the corners have the 8-pointed stars. It was done with 2 layers of batting and 40wt threads.
This next one is really sideways, as I quilted it, but I suppose it probably doesn't matter.
And the back...The owner made my job tough with white background as well as backing. It shows off everything good about the quilting (as well as any flaws since I used colored threads!). I know it's sideways, but it's really pretty.
Right after Thanksgiving, I stole a couple days to "whip" up two stockings to give to my oldest son & girlfriend. While I made the stockings my family has used the past 20 years, I always wanted something that was more "robust". I traced a template of the general stocking and went off to piece something unique.

They are different, one red-ish and the other green-ish. Keeping with my signature, there is a touch of silk Radiance. Who can resist the shimmer?
Quilted on my longarm with a muslin backing, then assembled on the DSM. I added a partial liner in a red/green fabric to hide the internal seams and muslin. They are finished with a few crystals for twinkle and a jingle-bell.

A week or so ago, my daughter and I decided to make her good friend whom she hasn't seen enough this fall a similar gift (subsequentially filled). Sophie chose all fabrics and pieced the top, while I did the quilting. I tried out adding a name to the cuff. This cuff was a cotton fabric, and the embroidery was done on the longarm. Gotta say, I was quite pleased with how the name turned out.
When I unexpectedly finished my last client quilt on last Friday (I really expected it'd go through the weekend when I started), I knew my last task was to make the other 4 stockings for my immediate family. These are similar to the ones I did for my son, but not identical.
Each is a different colorway, all in pretty rich jewel tones. They also have a coordinating silk Radiance that is used for the cuff and diamond accents. This was my Sunday morning...4 tops and bottoms completed.
On Sunday afternoon, I started the quilting of the backs and the cuffs.
The last one of the tops was done Tuesday morning. The rest of Tuesday was a flurry of assembly. Being all different colors, I changed thread colors on the DSM more times than I can count.
The cuffs had names quilted on them in gold thread, and a gold trim accent.
At 5 hours each, I can hardly be a profitable stocking making business but I do like how they turned out.

Early in the spring I was asked to do an interview with AQS. This was 8-10 weeks after we'd been in lockdown - four souls stuck in my house every day. I had no space to call my own except my basement where my studio is. I do use the word "studio" loosely. It is where my longarm is and where I sew, but normally I don't spent hour after hour down here. But because I felt I'd been completely displaced by life, this is where I hid. AND the space looked like I hid down there (as well as looking like a tornado went through there.).
With about 3 weeks until I needed to do this interview (
here's the interview if you want to chuckle), I did a major overhauling of our basement, hauling box after box of crap up to have taken to the dump. It had just become the convenient collection point for too many unwanted things.
I also decided it was high time I culled the collection of fabric down to that which I truly expect to use. I pulled probably 30 yards and cut them into 6-1/2" squares. This box was full of squares originally.
And my shelves were considerably more tamed in the end.
I took the squares in the box and created charity quilts that were donated to Project Linus. I have made 2 drops of quilts this fall, totalling 23 quilts. There were times I needed to piece these to feel normal again. This year took away my purpose in life. I lost much motivation to do what I love. The quilt shows where I show the custom quilts I make all shut down. Several closed their doors permanently, while others just couldnt have their annual show. For me this is an enormous inclome loss - to the tune of $40000 between the show circuit and income lost my not being able to teach. I was stressed, sad and truly wondering why I ought to make any show quilts if next year may be the same mess.

The charity quilts were like instant gratification. I chose a pattern that could be quilted fast, showcasing the fabrics. A wonderful client sent me some backing fabric and the Project Linus local group had a free fabric day where I acquired backings for all of these tops.
I have heard it all throughout this time. I had a lady email me to rant about how I had no right to complain about quilt shows not happening since people were sick and dying. I was infuriated. This is my livelihood as well as my passion. I have bills to pay and kids to feed & educate. I'm not to blame for loving what I do to survive.
While I have clearly continued custom quilting, the shows have dwindled to just a few online offerings. The income potential is not the same. Work flow through the spring and summer and early fall was constant. I can see a downturn in the economy right now though. Many are suffering economically and choosing to pay money for quilting or food is an easy choice.
Nobody in my house is hungry or cold. My husband is still working. But this is my small business that I have spent 11 years building, and Covid has all but brought it to its knees this year.
Before I sign off, let me leave you hopefully with a little bit of inspiration. We are only going to get through this with some hope -- Hope that we can continue to thrive at what we love, hope that the wounds of illness & death heal, hope that I will get to hug my loved ones that I don't live with soon.
Despite no obvious shows on the horizon, I did finish one quilt this year. It's name is Hungarian Rhapsody. I will probably do a dedicated post for it rather than dragging this post on into oblivion.
It's all silk Radiance. It won BOS at the fall Virtual Quilt Show hosted by Gamill. Not bad for it's debut. I long for the opportunity to share it in real life.
Two last projects for 2020. These havent been shared much because they are xmas gifts for people who may see them.
This first is a quilt I made for my neice who is 17. She has grown to enjoy gardening so I hoped she'd appreciate the Dream Big flowers. It started with 5 or 6 of these 40" panels, mostly in blue shades except for the one red.
I cut them up, rearranged the pieced, cried & screamed a bit as I wondered how this would finish.
My biggest fear was creating something that didn't carry the blue, as I think my niece appreciates blue.
In the end, I gotta say I was not thrilled. It layed on the floor a few weeks as I waffled about actually finishing it. I liked it, but I questioned if she would.
I finally quilted it with a navy minky and a pantograph. We'll find out what the verdict is in a day or so. It does not scream blue nor does it obviously convey "flower", but it's unique and was made with good intentions. For 2020 that is all I can guarantee.
The last of my projects to share is a quilt I started for my mother. I made her a
quilt previously - going way back to 2008. In February I spent a couple days at her house and realized it was really getting thin. At the time life seemed crazy and the notion of making another seemed daunting. Little did I know that 2020 was about to royally dump on us all. In late March, I found myself with no looming travel (when I did have 3 scheduled teaching trips within a 5 month period), and I desperately needed some kind of therapy.
I dug into some of my silk scraps made for a new quilt which I won't share immediately. Suffice it to say that I hand dyed about 6-8 yards of silk Radiance in about 12 different blues for this quilt. I am not a blue person but the design needed the blues. I was left with many leftovers, as it was an applique project and a quilt for my mom was the perfect avenue on which to use these leftovers. I pawed through all of my blue scraps, which turned out not to be adequate because well, I don't use blue. As luck would have it, covid or no covid, my DSM wasn't working well and I was needing it to make masks. The machine went into the shop and I suddenly had a legit reason to shop in the quilt part of the store. About 2 dozen pieces of blue somehow came home with me.
I settled on a string pieced quilt because this would use the scraps easily, and also enable me to put the silks at the center. These 9" blocks are pieced on a muslin foundation. The navy print that is on all blocks is a fabric I made simple table centerpieces (like a 20" square to put red cutout stars on) that were at my dad's memorial service. The red, white and blue were to honor his Navy service. I held onto the 15 or so of these fabrics until I knew what I wanted them for.
72 blocks were made that rainbow through the aqua to dark blues. I didn't have loads of each silk color but I had many colors.
Blocks were pieced between early May and June. I knew they'd be sashed but I had time.
Old blogger would upload the photo that I rotated in its directory not the original. I kind of hate this. turn your head sideways! I couldn't find an unquilted pic but the sashing and border I chose left me questioning whether I liked it. These are Michael Miller cotton couture solids (my favorites) but I wasn't sure if I'd messed the look of the quilt by sashing. I was kind of stuck with sashing because I was out of blue silk and didn't want to dye more.
I loaded the quilt. It is double batted so it will be warm. The fact that it has a foundation makes it a bit heavier too. She may want the old quilt for the summer and this one for winter. Who doesn't love to sleep beneath weight?!

As I got quilting I knew I loved it. It was fun and liberating to go block by block, letting the patterns vary on everything but the silk strings. There are mathematical and geometric patterns, and there are some that are simply to hold this in place. Some strings got a stencil, others got ruler work or freehand. It is kind of like life...smaller, narrower (or ugly-fabric) strings represent the less desirable events of life, while there may be a nice fat string of a beautiful material. In the end, they all play ok together and represent something nice. The navy & white fabrics are like the glue that held all of these events together. I am hoping that she will be able to look at the symbolism of using that fabric and use this and love this quilt, rather than to cry about what is no longer.
This was a great quilt to pull out my fills books mentioned before as well as the Narrow Borders book and search for the ideal design.
Here's a few of the blocks...
Who knew I had so many design ideas?
And the borders...simpler but still pretty. The lighter border is quilted in navy thread and the navy border is quilted in royal blue thread - just so they both can show.

Hopefully when it is received tomorrow, I'll have good news to report. It's been a long fall/winter for my mom. It will be very nice when the vaccines reach us and she can be comfortably around people again.
If you are missing my show quilts, here is an interview I did with Lisa Walton in April I believe. She asks lots of questions about my Value of Violet quilt. https://www.youtube.com/watch?v=wPrdohKvdvQ
Have a good holiday and stay safe. 2021 will bring better times, As a small business owner this has been immensely challenging and frustrating to watch a business I spent 11 years building struggle. So all you quilters out there, keep making tops. Folks like me need your business now more than ever!
Take care, friends.