Saturday, September 28, 2019

Modernized Salinda Rupp Nearly Insane

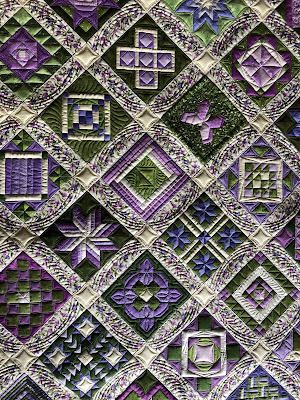
My client Erin made this gorgeous quilt. I think it derived from the Nearly Insane (for which there is a book) done originally by Salinda Rupp nearly 150 years ago. My client and a friend took many of the designs and created them into EQ so that they could be more easily created using paper piecing. I should note that this was a very wise move because these blocks are crazy complicated, and some have a total ton of pieces. Her piecing here is stupendously accurate -- just a handful of tipped points.
 What truly sets the quilt many steps above the original quilt is the beautiful floral sashings. You all know I am partial to purple and green anyways, but the sashings so incredibly perfect.
This quilt measures something like 90"x90", so quilting cost was an initial concern right from the beginning. One way to quilt a top like this (with 98 6" blocks!) is to put an edge to edge freehand fill in each block. This was something my client did not want. So...the next step involved a most laborious task of ditch stitching each block. I used a clear monofilament thread and was able to ditch an entire row of blocks continuously without tieing off. Kudos to the benefits of monofilament!
 After the 12+ hours of ditching was done, THEN I could get into the more decorative quilting. I sent Erin a couple prototype designs for the ivory setting triangles (below). She chose the pretty one with the arches and pebbles. It made a lovely frame around the border of the quilt.


This was my concept for the sashings. There are 224 pieces of sashing on this quilt! I knew it would be a time-consuming process to quilt them, but I also knew that they would be an integral component in the secondary patterns that the quilt would convey. I considered doing a serpentine feather, using the spine of the floral. All other options were fastly ruled out for the one below, which I used. This would hopefully create this larger look of rings on the top -- something to juxtapose the very linearness of the pieced blocks. Though the sashings took nearly 9 hours to quilt, the finished look was exactly what I was seeking.
The outer border has a pretty printed design. I have previously quilted a feather in the upper part of this and a linear pattern in the outermost region, but I feared this feather might compete with the feathers of the triangles so another option was selected.
It's hard to see what was done (above). Using a variegated pink/purple thread, I quilted a leafy swag down through the floral area. The ivory side received 1/4" lines, while the purple side got a beadboard on an angle. The design is simpler than the feather, and does not compete whatsoever with the triangles.

It shows much better from the backside, which is a soft lavender solid fabric.
I probably should have counted the number of pieces before I shipped it off yesterday (just for giggles & grins). You can see it had to have taken the maker nearly forever. Multiply that times two because she told me she made 2 of these quilts! I guess that makes her Totally Insane, not Nearly Insane...LOL
 As I added the sashing and border quilting, it became obvious that the blocks were going to need some additional quilting beside just the SID. Some blocks with 150 pieces would be fine, but ones with 20 looked disproportionately poofy because this is double batted. Detail quilting was added in ivory, sage green and periwinkle thread. Some blocks got one color, some got more than one and some got none -- I only added when I thought they needed it. The end result is a quilt that lays much more nicely, with blocks that don't look like they were neglected.


 Here's just a few more pics...
 And, of course, the backside.
 The circle design from the sashings shows very nicely back here.
Hope you enjoyed the pretty quilt as much as I loved quilting it.

Next week I will spend a couple days wrestling with a pain-in-the-butt binding on one of my own quilts before I load the next custom client quilt. I'm working through some of the quilts I got this summer before delving into my holiday deliveries. If you have anything you'd like an edge-to-edge on to be done before December 1st, just let me know.

Thursday, September 12, 2019

September 12...monthly blog installment

Yes, I know a month goes by in the blink of an eye, in blog-times.  Plenty has happened in the last month, just mostly un-noteworthy!

I went to Grand Rapids last month for a week to teach at the AQS show. This is a fabulous show, in a great venue. I cannot say enough about the happy vibe of this city (in the summer anyways). It is right on a river, and has walking paths on both sides, with numerous bridges. It's an outdoor's-person's mecca. I taught 6 sold out classes and all went quite well. It's been an interesting few months getting back into the groove of quilting and teaching. My show in July was a good start, but Grand Rapids really got me feeling the joy again.

I had a decent show there too, with both of my entries earning blue ribbons. The first is one my my wholecloth quilts, "Persistence". It is actually a greenish color, but it looks off in photos.
 This is a 71" wall quilt called "My Secret Garden". I love this quilt, and really need to get the nasty monster I am finishing done so I can work on another that I truly love.
 After I returned from Grand Rapids, I had 4 days before my family went away to a house on Lake Winnepesaukee for Labor Day weekend. Oh, and I should also note, that the kids started school...this is key because quilting progress doesn't happen without it!

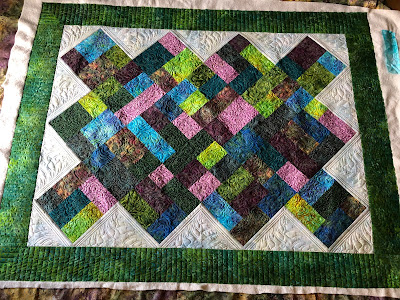
This lap quilt belongs to one of my local ladies, and forever friend of my mom's. She's an immaculate piecer, which makes my job easier. Batiks hide everything detail related so the center is just quilted with a freehand edge-to-edge. I put prettier feathers in the lighter setting triangles.

Last week, with it officially September, I started on a box of 3 quilts from a new client. All I really have in my stash of client quilts are custom, so there's no point putting them off!
This Be Happy quilt is identical to one I did a year or so ago. The background fabric is so heavily printed to the point that nothing really would show so it's stippled, just so that the beautiful applique can pop. It has an absolute ton of applique too!
 I love how the maker customized the little jar with her initials...
 When fabrics are heavily printed, texture is the only tool quilters have to get things to show. I paired dense stipple beside the beadboard border and the 1/2" striping of the inner border so that these would show. The thread is just a white 40wt, probably Glide.
Here's the back, only because backings are so pretty to see.
 Kendra sent another smaller quilt top, but this one seemed better fit for an edge to edge. Do I hear a great big "Yea"?? Heavily printed fabrics are pretty, but can mask quilting. 1920's reproductions are some of the hardest to get quilting to show on. This is just a simple and very appropriate design for this quilt. It will make a great lap quilt.
Last up is this lovely 98" bed quilt of stars. I knew with all the ivory fabric that it could be custom quilted and look great. The client agreed. A few things to note...it has a red backing so I knew from the start there would be only air-erasable marking pens. I would not risk having a red bleeder. This means that any marking has to be simple. The quilt has a single Hobbs 80/20 batting, and is quilted with both white and aqua YLI polished poly thread. I now use Wonderfil's 80 wt in the bobbin because Superior Threads no longer wants to stock neutral SuperBobs, and hasn't for many months. It's frustrating changing, and paying more to do it, but you do what you gotta do.
After quilting 2 rows of the stars, when the quilt had lifted off the floor, I discovered this...
Tell me my heart didn't nearly fall out of my chest. I contacted the owner and got her OK to do a manual fix. I wasn't going to remove the quilt from the frame to fix this on my machine and risk pleating the backing. All take-out and repair was done by hand.

Here the blocks are removed.

 You can see how I just take a small running stitch to put it back together. I've done enough handwork to know that this will never fall apart.
The finished repair...When the block was up on the horizontal part of the frame, I did press the seam before quilting. The points are not perfect because a good bit of the seam allowance was fraying. Though her points are generally very good on the quilt, this is not the only location with a tipped points so I didn't fret too much.
 The finished quilt is so pretty. Feathers are a great finish and create so much movement on the quilt.
 The star blocks are 15" blocks, which is a good size. I always have students ask me what size machine should they buy. This is a perfect example of when a smaller longarm would have driven me crazy...With my 24" machine, the 15" blocks were about all I could manage to reach (either because of the ruler base or my short arm syndrome!).
 I'm going to show how the swirly paisley sashing was quilted because I have received numerous comments on facebook about this, on this quilt as well as a few others. It's so simple, but is a more unique design than some that are used. I also quilted it in aqua thread to tie in with the outer border.

The center 5" block of the star was quilted using a stencil. These can be a great tool to use.
 One last peek...
Hopefully I won't take another month before I post again. I just loaded the most gorgeous and crazy-pieced quilt. It'll blow minds!