Friday, September 30, 2011

Friday Fun

Or something like that, maybe. Hard to believe that tomorrow is October. Three more months of 2011. Doesn't seem possible. This is just about the best sight I can imagine right about now...I know, "what is it?", you are wondering. It's the END. The BOTTOM. Finito! Well, not quite finito, but at least finito is in sight! I'm aiming for early next week to have this off. Not done, but off.
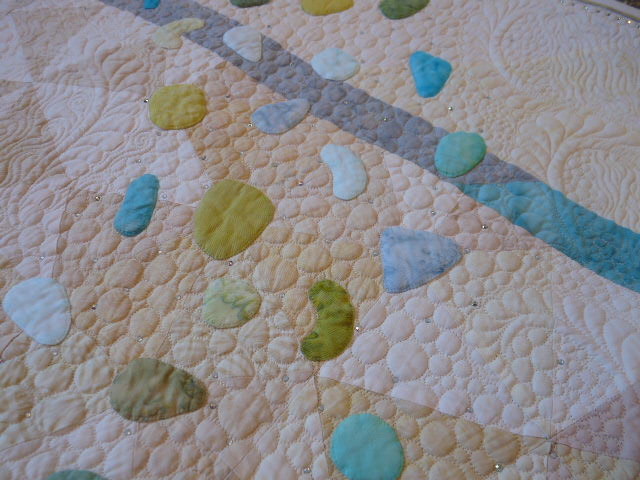
Here's another peek-aroo...nice texture. An absolute ton of grueling, closely-stitched ruler work, but it is pleasing me thus far.


As usual, I am dittling with EQ designs. I do several a week, ditch many for one reason or another. I guess I just have an itch to start a new project. My Dresden plate quilt, which is all hand appliqued, is requiring a little bit of re-stitching (aka I F-ed something up and need to fix it). I want to keep working on this, but re-work can be so harmful to my productivity. Anyhow, 2 years ago I received a FQ bundle of 24 hand-dyes, and have used much of the blues and purples and greens, and have been seeking a project for the red, yellow and oranges. The problem, my brain does not really think in these colors, so invariably if I start out designing for them, they end up being just highlight colors. This design is intriguing because it is 36 of the exact same 8-pointed star blocks, just in different colors. Kind of reminds me of a southwest sunset.

Of course, I managed to sneek in the green. And the same design, without the sashings. Rather a different look. I just dont like the way all the seams will be thick where the blocks come together. Keep designing...

If I hadn't been so doggone busy this week with one thing and another, I probably would have done a dedicated post because I encountered someone's post that was essentially a hot-headed rant that was all but screaming the reasons NOT to have a longarm quilter if you are a domestic machine quilter. The person who I will not name is a very skilled domestic quilter, and in her defense, she was trying to justify her position for how she quilts and why she doesn't need to have a longarm, but damn, it bugs me when non-LA-ers try to tell the world that they know about longarm quilting when they clearly have no experience! Yes, they are large. Yes, they are expensive -- over $10k before you buy any templates and gizmos. Yes, they are heavy, but for Pete's sake, if your's is good, you are not pushing 40lb around because the dang thing is on wheels. That quilt you are tugging into the neck of the domestic machine is heavy too - I know this because I have actually domestic machine quilted too. A properly balanced table and carriage allows very smooth movement of the beasty machine. And again, yes, it is an adjustment learning to quilt with a LA over a domestic. It is so freaking difficult that it took me an entire month before I dared to take a customer's quilt. That was 2 years ago, and close to 2000 hours of quilting later. I do quilt for ME, and I quilt for others. It's the funnest and most creative job I have ever had. I have regretted spending that much on a car, but not on that sewing machine. And if I want, I start quilting at the center, or the top left, or the bottom right -- there is no rule. Now all you domestic quilters just keep doing what you are doing because your work is lovely, rewarding, and perfectly complete the way it is. You are a quilter just as much as I am. I just needed to get my "Why the LA is a great thing" rant off of my chest. It's been itching at me all week. If you want an LA, get one because you won't regret the decision. Achieving proper tension was 500 times easier on the LA than on the domestic.


Have yourself a nice weekend~

Tuesday, September 27, 2011

Progress on Carpenter Star

I have been puttering away at this quilt for the last 7 days, 2-3 hours a day. More customer quilts have come in this week, making me stress over how slow the progress is. At this point, I have to just stop fixating on the minute details and small fillers, and get the silly thing stabilized enough that it can come off the frame in 1 week or less. That should be doable since I am nearly sitting on the middle right now.
I had fun with the tan filler (above), although this is the last quilt I will make where I mix a solid fabric with other prints. The weaves are different and I am not thrilled how the dense quilting looks on the tan. It will be just fine when done. This is just a case of "ole picky me". The butterflies, which were nearly an afterthought on the quilt, are quickly becoming my favorite part!

Each of the diamonds of the wheel are densely quilted with different patterns. My hope is that it will appear as bands of texture going around the carmenter star when it is done. I'm using a wool batt over 80/20 so this (with all the piecing seams) is a thick quilt. Will be super heavy if mailed anywhere! So far, threads are Bottomline in bobbin and Invisifil on the top. Because the fabrics have so much pattern, it is hard to see the stitching. I so hope that the texture and time-consuming patterning does in fact show in the end. This seems to be a constant worry. What else am I to do, though, unless I want a bold or thick contrasting color thread?? Still going on faith at this point that my plans will work out.


I haven't settled on what will go in the tan (above the yellow applique) below, but it's stable for the time being. I do like the filled radial stripes, and I know that they will have a great look.
Here's the long awaited center (...long awaited for me, anyways, because it marks where the first half ends and the next half starts!). With a light held at angle, the quilting is visible. I have feathered along the outline of a star, and then done 1/8" radial lines to help mash down the fabric to enhance the feathers. The thread is a sage green, and it unfortunately matches way too well, almost to the point of disappearing... It is nice to be freehand quilting, rather than using the templates (which can be rather slow).


But, again, I ask, what should I have done differently? I'm not about to quilt in pink just to see it!


The grand reveal on this quilt should be interesting. I'm going half-blind trying to see the stitching for the printed fabric :-)


Saturday, September 24, 2011

My Memories Giveaway

I was approached recently about testing the My Memories Suite digital scrapbooking software. I jumped at the chance. In past years I have created many digital photo pages, and had them printed into my kids's photobooks. Though I have been lax the last couple years about keeping up, maybe this is the push I need to make those fun pages for the family's history.

The software is www.mymemories.com. And before I tell you more, I'll say that I will be giving away a copy of the software to one reader (name drawn at random on Oct 1). More on the drawing in a moment. I have used a different scrapbooking software previously so it was fun to Beta test a competitor's product. I made the rather simple page shown above (you know...gotta always push that business!!). There are many scrapbook pages to choose from, even ones that look like quilt patterns! There's lots of pre-arranged pages to use, or you can create your own. Borders, text, clipart, etc...lots of fun for all!

So how can one of you get your copy of this software??? Simple. Go to the site given above, have a look and leave me a comment with a valid email addy telling me why you'd love to win this software. I'll randomly select a person on October 1st.

If you happen not to win, and still want to purchase the software, tell them promo code "MSV210D" to get $10 off.

Thursday, September 22, 2011

Thursday Thoughts

Almost another week is gone, bringing a weekend of what may include yard work (seeding to be exact) - ew! I try to be productive, but gosh, I seem to putter best of all lately. I have a bunch of hand-dyes in a variety of colors that I have been most ficklely waffling on what to make with. There have to have been 10 different designs, and yet another one on the drawing board today. I did get to start stitching on my applique quilt. I actually started yesterday, but I think the hour or so I worked was more or less a stitch, curse, pick-out, curse some more, repeat session. I couldn't get the dang Monolon thread tensioned properly, and finally gave up and decided to outline the appliques with beige Invisifil. Nearly invisible, just not quite!
I am stitching the entire top with the Invisifil thread (Bottomline in the bobbin). So far, not so much as a problem. Just what I like. Much is obviously not yet stitched (aka, the leaves, flowers, background, etc), but it is begun, and I do have a plan for most of the top.

I'm looking for suggestions from the readers as to what I ought to do with the creamy diamonds that are currently left unstitched. I'm at a loss. I designed them with curved stitching, but I have a hard time doing this on diamonds repeatably well. Ideas include do nothing, and outline with another row of straight stitching. Other thoughts??

Monday, September 19, 2011

Postcards to the Press

I grabbed a magazine at the grocery store yesterday...
I knew this edition had an article on the quilts of MQX West, but never figured to be featured since there were so many other ribbon winners. Much to my surprise, look what I found! The article is 4 pages, and shows about 15 of the lesser known quilts. These are truly some of my favorites from the show, and for the most part, they did not receive ribbons. It's nice to see all quilters rewarded, regardless of how their quilt places.

...and a closer look,

I just mailed this quilt off to the Quilting with Machines show in Ohio. If you are in the area, you can see it there in a few weeks.

Saturday, September 17, 2011

Bitten by the Silk Worm

My husband took all 3 kids and went somewhere nearly an hour away this afternoon. Translation: they will all be gone at least 4 hours. I no longer care that I have a headache. The house is quiet, and I have had the fun time of playing with fillers on my silk wholecloth quilt. It's small enough and stabilized so I can take it off and on the machine whenever I want/need. I received a box of Superior Bottomline thread this afternoon. It's mostly prewound bobbins in a variety of colors that I will use on a couple of upcoming quilts. One just happened to be the color I needed to get back on this quilt. Initially, I thought I might do the backgrounds in colors so that they show up more, but I had so much trouble with the Bottomline thread pulling now and then as I stitched the feathers, I decided I'd take a different approach. I'm awaiting several cones of Invisifil that I was going to use, but there was still polyester doubt. I have one 1000m cone of taupe silk-100 thread that I had yet to try, and I figured when better to do so than on the silk quilt?


Holy Shazam! I absolutely love this thread. It is smooth. It never pulled or nested on me. Never shreaded like the poly does sometimes. Many times. If only it weren't so freaking expensive. Like 6-1/2 times the cost of thin poly thread. Yikes! But it sews sooooo nicely (you can see where this logical argument will be going, right??). I just may have to get more of the taupe for quilting the background of the quilt I showed yesterday.

Anybody have a supplier of YLI-100 thread (1000m cones only) to recommend? Even better if they will sell to me wholesale...


--------------


supplier update...


1. www.brewersewing.com has YLI 1000m at retail $18. Don't know about wholesale yet


2. Superior's www.superiorthreads.com has them wholesale for $9, and $12.99 retail, but I have not tried their silk.


3. The best prices I found are at Linda's Electric Quilters www.longarmsupplies.net at $9 for the 1000m YLI silk - retail price.


-----------------------------------
Inquiring minds want to know...Why does a silk 100 never shread at the needle and the 60wt and 100wt polyesters do???

Friday, September 16, 2011

Got Butterflies?

I have been finishing up a quilt this week that I just LOVE. But this quilt has just been screaming for a little something to break up a large-ish area of blah tan fabric. ...As an aside, I chose to make this quilt exclusively from my stash fabrics, so the background may not be entirely what I'd have chosen had I wanted to spend $$. Now these tan areas didn't need anything large, just some kind of "distraction" to help the eyes to wander. So, I found the perfect solution in Butterflies. They are about 1-1/2 inches large, and have been slightly colored with permanent pens to be less blue. I know, I know, you are thinking that I am a master butterfly appliquer, but you couldn't be further from the truth!
Several years ago, I bought this great piece of fabric in a clearance bin for $5. I have always loved the green tones and patterning, so I looked beyond the butterflies, fully expecting to probably cut around them whenever it was finally used. Guess the laugh's on me. I chose 2 of the larger butterflies, and carefully appliqued them onto the quilt. Two for each corner. I have done basic embroidery for the butterfly bodies and will add antennae with dark thread while quilting.


I think that this is ready to be quilted. I have to go underneath and cut away some of the backing fabric & bulk that are under the appliques, but the hard work is finished. Phew!...I even got out my wool scraps this morning and hand stitched enough together for a batting (yes, my thriftyness has no bounds). I have designed the quilting more or less, and it's full bore ahead. As for the butterflies, I love them. They are delicately flying around, and help to reinforce the garden look of the quilt.


Wednesday, September 14, 2011

The Art of Quilt Labeling

Now I am by no means an expert at making quilt labels, and I frequently opt for the easy-out approach to labels. For years, I gave quilts and didn't bother with a label. I was like Wendy, barely finishing the bindings before the quilt needed to be gifted and wrapped. A label seemed out of the question, or at the least unnecessary. It has only been since I have been making a ton of quilts and making quilts for shows that I want to label them, if only to document what year they were made. But labeling does so much more.

A label on a quilt is kind of like a head stone in a cemetary. It gives credit to who made the quilt for future generations. Sure, you are not likely to forget that you made the quilt, but will your daughter's daughter always remember? Being a lover of all things old and cherished, I hate that my daughter may not remember who made her crocheted & embroidered dresser scarves. She never knew her great-great grandmother. Heck, I barely did. These items were on my mother's dresser when she was young, and to me, that is really neat.

Anyhow, off track as usual...sorry. The point is the same though. As creaters of art (yes, quilts are art!), we should all try to label each quilt, and include at the very least a few basic pieces of the quilt's history. I include the following...a name for the quilt (not critical, but for shows it is required), my name (and if a different person did the quilting, include their's), where I am from, and the date when the quilt was finished. Beyond that, much is up to the individual.

One quilt I included a saying and a photo. The photo is special to me because it is my daughter, who the quilt was made for, at age 2-1/2, wearing a dress I started kindergarten in.
Another example of a quilt label is here. I actually (gasp) put it at the center of the quilt's back because I had had a little bit of thread tension issues there, and really wanted it covered up. I designed the label to blend into the style of the quilt front, even adding a few crystals to the points of the star. It is printed on my computer, and hand appliqued from the batiks used on the quilt.
In retrospect, it looks kile it belongs there, and was not a band-aid treatment!

For a recent quilt I completed, I chose to create a label with a scrapbook software, and have it printed onto a fat quarter of fabric at Spoonflower. This is an economical way to create several labels (as many as you could fit on a FQ, for a mere $11. The printing is good quality. This particulare label is a little simple, but more because I printed the label before I knew what the backing fabric for the quilt would be. I didn't want to use purples and have them clash. It gives only the pertinent information about the quilt and it's maker.

My Seaglass quilt (below) is off to a show next month and it received its label just a few days ago.
This is one of those quilts that adding the label proved more of a chore than a creative burst of wonderfulness. I was out of time to have a label printed. I have tried, however, to keep the label in the same design feeling as the quilt. I have hand written on a piece of aqua batik the quilt's labeling information. I actually traced something I printed off the computer so that the text was mostly legible. And then cut it out in the shape of an oval -- a pseudo piece of sea glass. It's not great, compared to other labeling efforts, but it relates to the quilt top.

The last label I will show is probably my favorite. It is from my Postcards from Venice quilt. For this label, I used the scrapbook software to design a postcard. I used an actual photo that I took in Venice 10 years ago, and labeled the top of the postcard with the English translation "Postcards from Venice". The overlay is what would be the part of the postcard that you'd handwrite. I have transcribed a postcard that my then fiance sent home to me (even though we were in Venice together) to receive in the mail. The Italian "Cartoline da Venezia" and my name and place are in the address, while the stamp over the postage contains the completion date of April 2011. Pretty clever if I do say so myself. I had this printed at Spoonflower. To date, it's been covered up at every show :-((


So, even though that gorgeous and creative quilt label you make for your show quilt will be covered up so that nobody can admire your craftyness, put it on anyways. Someday, someone will be curious enough to wonder "Who made this quilt and when?"

--------------------------------------------------

Emma has given her approach recently on quilt labeling too if you are looking for another quilter's perspective. Unfortunately, living in theUS, I don't have access to the Australian magazine!

Monday, September 12, 2011

Mixed E2E and Custom Blocks

A customer brought me this quilt recently. She thought she wanted a simple pattern on all of it. She was not interested in custom quilting (and it's cost). Rather than stitching a paper pantograph pattern on all of the quilt, which would have left the pieced blocks looking underwhelmed, I chose to do a front-side all over free-hand design on all areas but the pieced blocks, and something more custom for the pieced blocks.
This technique is fairly commonplace amongst many quilters, but only works if you are truly comfortable free-hand quilting. I think the end result is very attractive. It's a design of swirls, loops and simple feathers.

This quilt is stitched with a pale yellow So Fine thread. Turns out, it blends fairly well with every fabric she used, even the white block backgrounds.

Her backing fabric is a royal blue broadcloth. This is not my favorite choice for backing fabric, as the weave of broadcloth tends to be more open than most quilting fabrics, and the batting does occasionally tend to "pokey" through. On the bright side, it really shows off the quilting, in that it is a solid!

Saturday, September 10, 2011

More Time translates to Less Progress

Why does that saying always seem to be true? When I only had 2 hours a day to quilt, I was the master of productive. I was focused and on-task. Now that all 3 kids are at school for 3 straight hours every afternoon, I am a mush of anti-productivity. I find more things to do that just dont need doing. I waste more time on the computer doing Lord knows what. It's enough to just drive me nuts! Things need to change next week.

My silk wholecloth is off of the frame now. I tell myself: "It's off so I can plan what to do in the backgrounds and order thread". Reality: "Customer quilts really need doing so my indecision has to wait!" I have some ideas, and am contemplating using colored threads for the fills, but may chicken out on that. We'll see when the next order of Invisifil thread arrives. Thank you MQS!~
The back is this nice olive, which shows every painful stitch (and mis-stitch). I don't know what came over me when I chose the backing that dark, knowing that the thread/bobbin would match the top.

This week, I will lose 3 of my quilts. The babes are all being sent off to different shows. The shows seem to be rather late getting their acceptance notices out, giving us barely a week to ready the quilts before they must be sent. Sea Glass is very close, but still needs a little attention to some stray threads, and a 4" section of the binding. As I mentioned earler - procrastination! Fortunately, I did get the crystals put on this week. There's an insane number on this quilt. I only wish I could see it hanging in a show. Someday... As usual, I am busy designing another applique project. Like I really need another one?! But one of them is wrapping up, and what's another hand sewing project for the evening???


Have a good Sunday~


Monday, September 05, 2011

The Fruits of my Labor

Today marks the end of the 4-day weekend. Kiddos go back to school tomorrow and hopefully they will slip into a normal routine without too many days off. I have had a little time this weekend to play on the wholecloth quilt I have loaded. This is my first attempt, so it is completely marked with blue pen (which is still there). Perhaps someone can tell me if I can remove the pen from the silk (silk Radiance 50% cotton) before I do the background fillers, or will it leave water spots?
It's not large - only about 38". I have not decided what fillers I am using. In fact, when the last of the feathering and echoing is done, it will probably come off the frame so I can qiult some customer's quilts. I have some Invisifil coming for the background fillers in colors other than the champagne.

I had to lay on the floor to take this picture from the back side. It is really a deep olive green (and not the brown that my monitor is showing). It is clear that I have some areas that don't have exact/ideal symmetry, and these will possibly be "fixed" at some point. I am still having trouble with looping of the Bottomline thread (but on the topside of the quilt!), but sinceI changed bobbins, I have had less issues. Nevertheless, I have at least 2 places on each of the feathers stitched so far that have to be taken out and fixed (sigh!). Not sure that this will ever be "show worthy", but it is a learning process I wanted to take. It's more like going to the mall in your satin underwear...every last mis-stitch, wobble and roll of fat shows!


Friday, September 02, 2011

Goings On for the week

The week is over. I have had some good work time this week, with school starting. Despite it being a short week (Tues-Thurs), I still had calm, productive quilting time. I have done one customer quilt, and taken in a couple more to get done in the coming weeks. In the meantime, I am frantically trying to get all the last details of the Seaglass quilt finished up. This week was for binding and the sleeve (which is approaching done).
I have the last of the crystals that are being put on this quilt due to arrive next week. The binding was time-consuming, but is so worth it in the end. The micro-piping coordinates with the backing and tones in the sand fabrics. It also stiffens the edge to help hold the edges from ruffling while hanging. I also went to the pain-staking trouble to align all of the changes in binding fabric with where the border fabrics change. It's a nice effect, but took lots of tweaking.

Before we left on vacation 2 weeks ago, I was working on my so called "fast pieced quilt". It was supposed to be designed with minimal piecing so it could be more of a quilting project than a piecing project. Oh, was I so wrong. I have learned I am incapable of doing easy and simple and fast piecing. My mind thrives on the complicated and intricate patterns, and even better when they intertwine. This is lacking a couple more borders still, but you get the idea.

These are some of Northcott's stonehenge fabrics from the Amazon and Maui (I think) lines. They are so gorgeous; I just love them, even more than the Stonehenge ones I used on my Postcards quilt. My heart beats to purple and green. Just a simple fact. A few of the materials have gold leafing on them too.

One more looksee...

I have been helping my 9 year old design and sew a placemat. And my 5 year old is attempting to hand quilt a doll blankie that I pieced on machine. They are having fun, but it's eating into my time!


And lastly, I loaded the silk wholecloth this afternoon. It is only 36" square so in theory, it ought not take that long (famous last words, I know). I have only done this much, and I have things to rip out and redo. The Bottomline thread is giving me frequent fits on this job, making little nests, and bunching out when it should not. From a few feet away, it may look OK. My eye is too trained to want the feathers more uniform and areas of symmetry to be actually symmetrical. I may leave it and opt to fix things when the rest is stitched. On the bright side, the silk is not hard to stitch on, just a bit nervewracking.