Showing posts with label longarm quilting. Show all posts

Thursday, November 08, 2012

Laden with Blunders

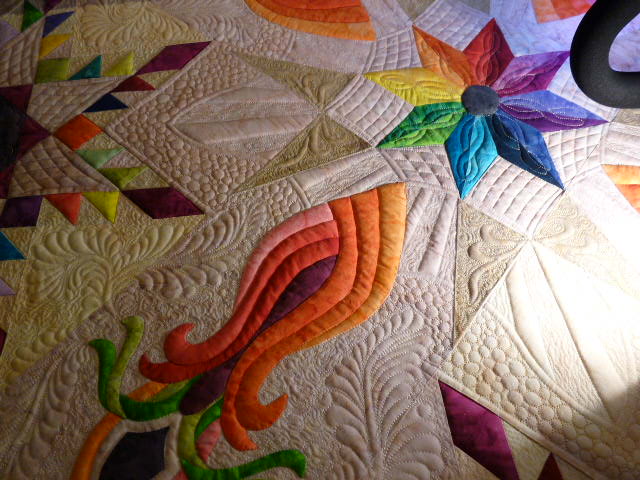
The pictures I am showing are of my 38" quilt.  I can be overly critical because it's not your's.  I can explain my errors in the comfort of knowing that I made them on my own quilt.  Mostly, these are not huge "errors"; they are more a matter of personal pickiness, or cases where the stitching didn't turn out as symmetrical as I would have liked.  Whatever the reason or excuse, it is frustrating me because each time I quilt the last couple days, it seems I make many hours of pickout too.

This corner is actually coming along pretty well.  My brown thread arrived yesterday.  Then we got snow today, kids got school delayed an hour and my daughter ended up home today with an eye infection.  As a result, not too much quilting.  For the entire day, only the sections of curved cross-hatching on the brown.  Oh, I say that, knowing that I did start on the center star only to realize it was going to have to be picked out because I hated it.  
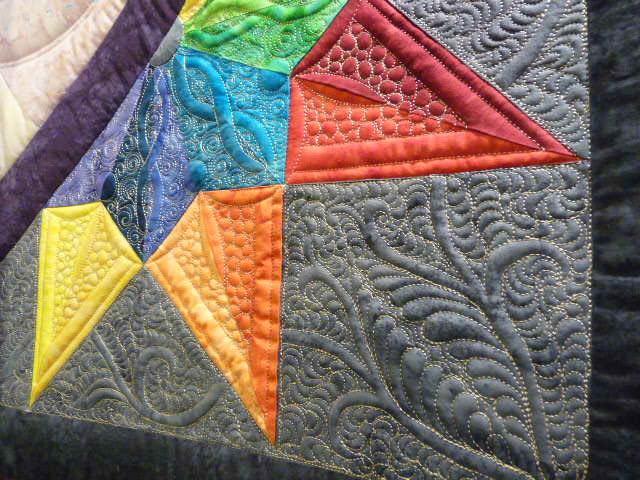
 Yesterday was full of ups and downs.  Pros and cons.  I DID manage to get the bottom 2 corners quilted.  And I even like them.  That's a definite plus.  The downside, however, is that they (see below) are not exactly like the top two corner stars.  Translation: Some Pickout Required!  I decided that I like the single 1/4" of outlining on the inter-connected blocks (below) better than the double-line (above).  That's a relatively quick and easy fix.  I also decided that I don't particularly care for what I did on the 1/2" narrow border (above).  If I quilt on this at all, I will use a coordinating thread not the gold.   I am always going to be my worst critic, and sadly, won't be completely satisfied until this looks right, even if my right is different from your's.
 Only a little bit of the center red star shows, but it's all coming out.  I have been sketching away this afternoon trying to come up with something I like.  I want motifs that I have repeated elsewhere to make it cohesive.  That will come, and is by far and large the smallest of the quilt's demons right now.  What I discovered last night is that the filler that I am putting on top of the pieced stars has distorted the lines of the piecing in a few locations.  I didn't stabilize each seam before stitching the fill because I didn't want all those extra lines.  But another quilter noted today that I could have done it initially with water soluble thread (insert whack of forehead!).  It's not that it is an extremely huge area should I decide to rip it all out.  Afterall, this quilt is only 38" square, but it is, Ah... (in my best nonexistent Maine accent) wicked tightly stitched.  It would make me curse some fierce obscenities, and probably make me create some new bad 4-letter words. None the less, there may be no getting around it if I hope to have this in top showing condition.  If you double-click on the next picture, and look at the lower left points of the star, you can see what I am talking about.  That line ought to be straight.
So, thanks for all the great comments recently, and be patient with me as I stew in my frustration.  I know that much of this quilt is insanely unique.  It's just the other areas that leave me rolling my eyes that I must deal with :-)  Hope you have a good week-

Monday, November 05, 2012

Back to work

Though I have not posted in over a week, I have most definitely been busy.  I have several quilts finished for my clients, and am now working on a small wall-hanging of mine.  I'm really not at all convinced that I like this before the quilting, but I will finish it before I opt not to bind.  My goal was to create a quilt from solids that can be shown at quilt shows in a small quilt category (under 40" per side).  Hindsight tells me that the Moda Crossweaves may have not been the best fabric to use.  A batik or mostly solid would have been better.  None the less, I am quilting the heck out of it, hoping that I will like it better in the end.  After today, I have a sore back and wrists, but no added love!
Yesterday I went to A Quilter's Gathering show in Manchester, NH.  I had 3 quilts there, but only Zen Garden brought home quilt bling.  It was the only quilt to receive more than 2 ribbons, so that's pretty cool.  It received 1st in Color Compatibility, 2nd in Machine Quilting Excellence and 2nd in Overall Craftsmanship.  This is a smaller show, but it attracts some pretty big name quilters, both hand and machine quilters.  Several of them I know from the machine quilting show circuit.  Since I posted many of my pics to my Facebook page, I won't repost them here.  Best of Show was another Linda Roy hand quilted masterpiece.  Seems it was one of her's that won last year too.  It was fun getting to meet The Megan Farkas - even if it happened because I overheard a conversation where my name was mentioned.  I'm not nosey...just curious!  For those of you that don't know Megan, her quilt is the one here of the Japanese Ladies (maybe you've seen it in a magazine...).  I'm a fan of her quilts.  Yesterday was interesting listening to the much divided discussions over crystals on quilts.  I don't remember too many of them in the show that were twinkled up, but Zen Garden does have lots of very tiny crystals - 3mm ones.  It just twinkled because it was hanging beneath a bright light fixture and a skylight.  It almost seemed that the guests had been listening to the pre-election crap too long.  The crystal-no crystal discussion was taking on an election tone.  None the less, this quilt was appreciated and it was fin talking to people about it's making.
The quilt shows for 2012 are over now, and the planning for 2013 is in progress.

Thursday, September 20, 2012

Week's End

It's nearing the end of the 3rd week I have been working on this quilt.  On Tuesday, I'd had enough.  I was getting upset.  The green border was not coming out quite like I wanted.  I had a tension snag, had to unpick stitches, and silk thread is hard to remove .  Then I found a small pleat.  The vertical borders were not stitching as well as the ones across the frame.  Live and learn.  I should have quilted them AS I WENT, not after I got to the bottom.  It just seemed that the problems were happening one after another, and I was tired, and in no mood to deal with them.  When I went to bed Tuesday, I decided the quilt was coming off the following morning, and I'd deal with it in a few weeks.  When I awoke on Wednesday, I had changed my mind and dove right in on the red quilting.  I sort of look at this as mindless stitching.  The Dresden plates were SO simple - just follow the lines in the print of the fabric. Clever and effective.  The other dark cranberry shapes took a little thought, but aside from there being 24 of them, they were not very hard.  They look good, though, don't they??!
One thing I did on the red that I have never done is use a wicked thin bobbin thread.  The best matching thread I had is a Master Quilter 40wt poly by Wonderfil.  This company is from Canada, so not as many Americans probably use their products.  They are also a bit pricey, but my cheap thread standards.  I won this last year and have 15 cones of the thread, and I really like quilting with it!  That thread and the Invisifil are my favorite Wonderfil threads.  Anyhow, I have never used smaller than a 60wt in the bobbin.  In fact, I often encounter difficulty winding 60wt Bottomline, so I buy it in the prewound bobbins.  The best match I had for the thread I wanted on the top was either 50wt poly or 100wt Invisifil.  I stitched one Dresden in the 50wt and hated how thready it looked on the backside.  It got ripped out, and I learned how to wind a 100wt bobbin.  The end result is that the red is superfine on my green backing, barely showing at all.
 Here's my mostly round circles -- good enough for me.
I did get the quilt off of the frame today, and as I expected, it looks amazing.  The designs that are hard to envision on a large quilt, are most evident when it lays on the floor.  I'm not saying it is not without a few things to fix and tweak, but I'm more relieved now about the quilt than I was a few days ago.  Pictures???...not right away.  I expect I will get it finished to send it to MQX and other shows next spring/summer.

I got fantastic news today from the Quilting with Machines show in Ohio.  All three of the quilts I entered have received ribbons -- two third places and one second.  Maybe you can recognize them here...

I predict that life will calm down a bit now that the stress of quilting my own quilt is off for a while.  I have half a dozen client projects, and more on the way, but there is no stress like knowing YOU are holding up everyone else's work.  I'm going to take a day to play tomorrow with some new fabrics I have had for nearly a month now.  They arrived just before I started Monster Dresdens (it does still need a righteous name), but I couldn't justify doing anything with them with this looming quilt on the frame.  I have designed a small quilt with some Moda Crossweaves.  They are discontinued, as I understand it, but I found a vendor that still had some for about $5/yd and I got a bunch of pieces.  This quilt was (aren't they always) supposed to be simple, but I loved too many of the colors too much not to get them.  It will be under 40" finished so it can go to the small quilt category at shows (unlike the Intertwined quilt at QwM that is 40.5"!).  I wanted it simple with elegant quilting.  Hopefully I can pull off decent piecing considering how small those blocks are finished.


Monday, September 17, 2012

69 Hours and counting

Finally, after 2 weeks of quilting like a mad-man, I am on the bottom border.  It is coming along.  It took about 4-5 hours to get this much done today (it is a 5" space).  It's hard to get excited about the remaining 3 borders that need quilting when one takes this much time!
 The quilt will come off the frame at the end of the week, done or not.  I know it will still be incomplete, but I should have all 4 borders finished by then.  None of the deep pink has been stitched yet.  It's time to get going on some client work :-)

Thursday, September 06, 2012

Quilting!! and a big win

The Big Green Monster (aka green modern Dresdens) has been on my machine for 5 days now.  The kids are safely off at school 7 hours a day and I am quilting more hours a day than I think I ever have to get this at least to a state that it can be safely removed.  Notice that I did not use the "done" word.  I won't even assume that I can finish it before the client quilts are piling up, but it does need to have the majority of the fill-work completed so it's adequately held together.

I discovered right off the bat that the green thread I had planned to use was too dark for the lime green outer border.  You'd think that I could have checked that sometime in the last month or so and ordered a lighter shade, eh?  Nope.  I figured it out the day I hoped to actually quilt the border.  Today, 4 days later, the paler green thread arrived.  I was not patient enough to wait, so I have to go back and quilt the basted border when I am done with the center.  Pray for no pleats.

So far, there are areas of the quilting that I love, and areas that I might raise an eyebrow and question why I thought that would be good.  I love the silk thread.  It.is.awesome.  Super.duper.awesome.  Want more, Santa...must have!  All 20 of the Dresdens will be quilted as below.  I have not done the pink center yet; will get after the rest is done.  The thread is a heavier-weight so I don't want to be constantly adjusting tension as I go back and forth between Glide and silk.  Note that I echo quilted 1/4" around the Dresden.  Looks nice, I think.
On day 3, though, I was so freaking gung-ho to test out a filler that I failed to outline the top center Dresden!  I could have screamed.  There's no way I am pulling out as much of this silk thread that would have to be removed to outline the plate, so the outlining is reserved just for the corners. That's my story and I'm sticking to it.
I'm using some fills that I have not really used on a competition quilt before.  I'm not really sure about the 1/2" curved-crosshatch.  It's nothing overly original.  I have seen it many times before on show quilts and liked it.  So, tell me why I don't love it here?.  It just seems like a lot of it.  I really wish I'd chosen some free-flowing feathers...except that when I designed the quilting for this quilt I wanted to avoid just putting feathers everywhere.  I want a variety of textures.  Fingers crossed.
Above you can see my "modified prairie points".  I'm a bit of a rebel.  I wanted to try them because they seemed era-appropriate for a Dresden quilt, and the triangles look great, but I couldn't get over the flaps flapping all over the place so I stitched them all down.  Prairie points no more.
There are 9 ivory blocks, and eight of them are exactly like this one.  The center is a little different.  It turned out really well.  The band of pebbles will create a sub-frame within the quilting.  I designed this, and actually traced the pattern onto all 8 blocks with a pen.  I am all about free-quilting feathers, but I really wanted uniformity for these.
Here's a fun fill I drafted for this quilt.  Those cross-hatched frames go up the diagonal of the quilt to frame the patch of 16 Dresdens on pointe.   This is 22 hours into a 102" quilt...maybe at the 30% completion mark.  Maybe.

I got word that my quilt Meet Me at Giverny shown here took a first place at the Wisconsin Quilt Expo!!  It sounds like the quilts there are really spectacular - hand and machine quilted both.  If you are in the Madison area, it's well worth a trip.

Monday, July 23, 2012

Baby Quilt: 1st of three

I have 3 small-ish baby quilts to quilt for a new client.  For the most part, they are only about 50" square.  They'll be relatively fast jobs, which is good.  The first one is so bold and lively.  The green is actually more green than the picture shows (more bright apple than mustardy).  I know the popcorn panto is used often by many quilters, but it is just perfect for these fabrics.
It's going to a baby boy as soon as the owner binds it.  I snapped a picture of the backing, only because it was SO cute!
Later today I hope to load another of these quilts.  This week, both of my boys are headed to day camp, and later in the week, my daughter is going to "Nana camp".  I should have sufficient time to get all 3 quilts finished.  Heck, I may even make it to the grocery store to get more than enough food for 2 days!

Last Saturday, I dropped off the last of the show quilts that I have for a show that is this weekend.  Two are currently in Hershey, PA for the Quilt Odyssey show, and two others made their way to Milwaukee for the MQToday show (formerly the Milwaukee Quilt Show).  My experience this past weekend makes me less comfortable to send quilts anywhere.  I have always felt like the scariest part was putting them in the mail, but  now I think I may wonder more about the handling.  Right in front of me, I watched the quilt that was dropped off ahead of mine get refolded (the owner had already left).  In the process of refolding, it was dragged on the ground, and given little care for how it was folded.  It makes me sick to see this done.   This was a judged quilt too.  I always very carefully fold mine so that the corners are not crumpled.  I delint both sides very carefully before folding.  I fold them in a way that will minimize wrinkles when it is unfolded and hung.  I do not expect some shmuck to unfold it at drop-off to check the sleeve width.  I refused to show her - when is "Trust me, it is fine" not good enough?  Mine are routinely 4-1/2" wide.  The sleeve is always at the middle of the folded quilt.  I folded them so that the lower right corner was exposed so that they could add their tags without messing with a thing.  And what's with a handfull of shows wanting cloth bags??  I hate them.  HATE them!   They breed lint and little threads.  Where do you think those go???  And these quilt collectors thought I didn't need to repin the end of my bag (it will slow them down when they are emptying the bags (or pillow cases, as most were).  Seriously, are they total idiots?  What's going to happen when the pile of quilts slides off the table?  They obviously are not as concerned with the integrity of the quilts that they are collecting as they should be.  I think this may be the last year I submit anything to this show.  I've really seen enough.

Thursday, June 28, 2012

Wedding Quilt Finished and Delivered

This quilt was finished a couple weeks ago, but it was delivered to the wedding couple yesterday, so I can safely post pictures of it here.  My mom is attending a wedding tomorrow of a former student of her's.  She asked me to help her make a quilt.  Now, she does know how to sew and quilt, so I'm not really sure why I was called in to do as much as I did, but I think it was so that I could have input on what I'd be quilting.  Probably a good thing or I may have had a paisley-heavily printed background to make pretty!
I designed the quilt to be as simple as possible for her to construct.  She had that stipulation - she did have to do something on this project besides the binding.  These are simple stars, made to 12".  The center star was a little more fussy, but not much so.  The Star of David was chosen because the groom's family is Jewish.  I left the background in soft tan fabrics so that the quilting would show a lot.  The other materials are Anna Griffin fabrics we found at a local rummage-style store at $4-5 per yard.  I'd buy more if only I knew what I'd possibly make with them!
She had the border print too in this collection, and I coached her on how to utilize it symmetrically to get the most from it.  I used the scrolls of the border to quilt to.  There is straight lines spaced at an inch outside of the scroll, and feathering inside of it.  There is no shortage of feathers and pebbling for variety and texture.  I also used 1/2" frames to set off the blocks.
 The blocks were fun.I chose a few fillers to use and reuse on the 62" quilt
I also created the frame that runs through the stars, then densely filled every other section to enhance the stripes.
 Here's a closeup of the blocks...
 And the center star...It is feathered, and has an "F" monogram for their last name.
The quilt was delivered to the groom yesterday, and the report to me was that he and his mother (where he was staying) were very pleased.  It turned out lovely, and took me 12-13 hours to do start to finish (not counting the design time and shopping for fabric with my mom).  Mom was skeptical when the top was finished because there was so much tan (and I think she really wanted more blue).  I told her to trust me, and that the tan would be lovely quilted up.  Was I right??@!

Monday, April 09, 2012

One last day

This morning was full of pre-trip chores...go to the grocery and the bank, do 2 loads of wash, locate a suitcase, finish the dreaded taxes...entertain the 5 year old, etc. Nothing all that fun here, mind you, but they all had to get done before tomorrow.

With my long awaited departure tomorrow for MQX in Providence, I have this one last day to finish off a little bit of the quilting on this quilt. The 52" center section is done, as is half of the 2" purple border. I stitched it this morning, but quickly ran out of stitchable border because the rogue-tension cranberry thread had not been ripped out yet. Sadly, after I prepared all my stuff to take to my MQX classes, I rip-rip-ripped for over an hour. At this juncture, it is nearly done, and I may stitch the remainder of the border first thing in the morning (then again, I may just stay in bed!). I have two borders (one is 2" and the other is the ~7" applique border) left to quilt. Both are designed, but will probably take quite a bit of time (on account of all the applique). I have client quilts awaiting me, so I need to get finished up after I return this week.


I love how it is turning out. It's different, for sure. The backside of the quilt is textural, appearing to have all matching bobbin thread. I have used gold, white and beige bobbins, none of which really appear different in color from the backing fabric. I finally ventured out a little, and stitched the pebbles (below) in the gold thread. It is only different enough to set off that frame slightly.


See you when I return Friday-

Thursday, April 05, 2012

Progressing right along

I've stopped keeping track of my hours on this quilt...MANY. I quilt about 3-4 hours a day. The 52" ivory central part of this quilt is now down to the micro-fillers to be called done. OK, there are 2 sections that have to be ripped out on account of Sunday/Monday's bad adventures with mistensioning, but I may do that when it is off the frame, where I can get comfortable. It's gonna take a few dozen hours! Yesterday, I started the curved-crosshatching of these 20" feathered stars. I was a little uncertain right off the bat if the hatching density seemed dense enough, considering the fact that I have quilted the rest of the quilt to within an inch of it's life.

After I finished the center part of the stars today, I have decided that the very traditional stars are just fine. They stand out in part because they are less dense. I may checkerboard-fill the CChatching later with silk, but for now this is it. All 4 of the center feathered wreaths came out good, considering they are completely freehanded.

The four corners of the quilt are also now finished. I will likely come back after the quilt is blocked and paint the swirly vine to make it more prominent. The texture is simply amazing from the back of the quilt. I can hardly wait to have it off the frame to see the back!

The view from below...but the texture is lost. It's kind of like a stained glass window.

And lastly, I ended to day going back to the back-filling. I don't think this will take forever, but I have not really been the best judge of time thus far. We'll see!

So, my question to you is this: Are you going to MQX next week???

Monday, April 02, 2012

Never Again

Never again. I mean it this time. I have been good on my last couple of quilts about choosing a mottled or sort of busy print for the backing, but I got stupid this time. Never again. This quilt has a tan batik backing, despite my knowing that I was planning to use some colored threads. I always love seeing other people's quilts that have colored stitching showing. Why on earth did I think that I needed to be that crazy?

You see, it all started so well. I spent nearly 10 hours ditch quilting this with monolon. The tension was near perfect. My stitching was as good as I could have asked for. Then I switched to a cream colored Glide, and began the larger motifs -- the feather sprays and the cross-hatching at the quilt's center.
Seriously, in 12 hours of quilting, I only had one area that I knew I planned to rip out and "fix". It was going as well as could be expected, considering it is an 80" square quilt.

Then things started to unravel. Last night, I decided to do some of the ivory dense background filler. There was no change of thread or bobbin, or anything that should make the tension go whacky. I stitched 4-5 sections of the ivory background, then had a look to find that the last one really needed an adjustment. It didn't look good on the back. Sadly, looking really good on the front left me just feeling frustrated. This is about the densest filler I have ever stitched. It will likely take 3 hours to remove that 6" triangle, it is THAT dense.

I was upset last night, but trying to formulate a plan of attack for today. Clearly my plan of attack consisted of more foolishness and time-wasting efforts. Right off, at 6am I started on the squares on poing along that dark plum border. This is stitched with a cranberry thread. I rechecked the tension and went at it. As you can see, it really looks pretty good. On the front, anyways. Once again, my bubble was burst with a sledgehammer. The backside to my surprise, had a ton of little ticks showing. UGGGHHH! The straight line work looked really good, but the filler is where it all fell apart. For some reason, the Glide thread needs the bobbin tension to be freakishly loose. As much as I hate it, I will probably rip it all out and restitch it, and not in the cranberry thread as I want. I will choose a thread that will blend with the quilt's backing, should the tension wobble again.

Then there was the call from my son at 1:30. He (cough, cough) thought he was not feeling well, and needed to be picked up. Well, he's just fine, and I needed that extra hour to get myself unwound and productive again. I am frazzled right now. I have nearly 2 weeks this month that I won't get much quilting at all done, and this quilt is supposed to be done, blocked and bound for a show mid-July. The thoughts of pulling it out are seriously crossing my mind. I don't want it to come to that.


After we got back home, I resolved that I have the ability to use shades of thread from white to cream to light gold, none of which need a highly contrasting bobbin. The back will still show the quilting, it just won't show the stitching in color. Downside: I cannot match colors to the front unless they fall into those shades. So, I quilted the gray background of one of these large star corners, using a Khaki (really looks like shiny gold) thread. I think it looks pretty good, though I now have to outline the blocks with this khaki thread to clean up where all the "bananas" meet the edges.


Another look...

I hate spending 125 hours hand appliqueing a quilt top only to have to make sacrifices on the quilting that were not in my initial plan. It just makes me neurotic!@

Friday, March 30, 2012

Big Star Quilt

This big star quilt belongs to Michelle. It's enroute back to her in California as I type this. This large 96" or so quilt is made from mostly Michael Miller prints. They are very soft and modern, and thinner than many quiltshop grade fabrics available right now. Living in the So Cal climate, she likes the lightness of the quilt. I, personally, found them quite a bit harder to tension. They were more succeptible to causing small tension adjustments. But, that's my problem.
The green and pink print below is my favorite. It reminds me of a dress my daughter had. It's a bit more nostalgic than the other modern florals. Michelle basically said "do whatever" (E2E on the body) and quilt something different on the blue borders. Leave it to me to select a pattern that wasn't really all that quick to stitch!

The free-handed meandering feathers-nfronds look great, but they took a surprisingly long amount of time - about 2 hours more than I anticipated. They are essentially a scaled down version of the Plumage pantograph. Since I feathered the body of the quilt, I chose something non-feathery for the borders...something to tie in with all the swirly fronds and the flowers on the fabrics.

Here is a look at the back...It is a fabric I used on a quilt a few years ago for my MIL. It is actually a soft aqua, with words on it like "family", "peace", etc. The one thing I found challenging with this quilt was thread color selection. I wanted it to look good on the top and backside, since the back is mostly neutral. The back is aqua, while the top is an odd olive shade. When I auditioned aqua thread on the top, it seemed out of place. The top is seen the most, so I want the top to be better. In the end, I chose an muted olive (some may call this baby-poop, but it actually works very well with a multitude of colors!). It blends with the background around the star. To me, this is the intuitive place that the thread ought to "disappear". The downside is that the olive thread is quite evident on the soft aqua backing. Oh well! It does look good, and what's a gal to do when aqua and olive are the colors ?!? The top thread is Superior Omni, bobbin is Bottomline, and batting is Hobbs 80/20.

I believe that this quilt will be given to the client's MIL.


Happy weekend :-)

Wednesday, March 14, 2012

Patriots & Petticoats is going Home

Before I show you the most amazingly beautiful quilt I finished this week, let me share some other rather surprising news. Somebody apparently nominated me for Best Longarm Quilter over on SewCalGal's 2012 Golden Quilter Awards. I am amongst a strong field of talented quilters. From now until the end of March, the above link will take you to where you can vote for best fabric store, best teacher, best longarmer, etc. If you want to make me smile (and I know you do!), put a vote in for me (Margaret). Many of you probably only know me from what I show here for quilting, but I assure you, I am just one of those not yet know :-)

And now to Lynette's Patriots and Petticoats.

Stats...98" square. It has wool batting, and is stitched with 3 colors of Superior's Omni thread. This is their newest thread, and is a 40wt polyester. It has a dull appearance, like a cotton, and seemed appropriate for a quilt that would have been quilted with cotton thread 170 years ago. My hallway prohibits me from showing the entire quilt, but one of my previous posts gives a link to the entire quilt. This is a nice layout for this style of "scrap" quilt, as all 1840 reproduction quilts are. Some designs just don't leave much room for quilting or show cohesion between the many pieced blocks.
I chose to break up the center background slightly with an outlined square on point, with feathers inside of the band. The inner section is straight cross-hatched. It seems really simple, but it is so classic to this period, and lets the focus be on the center medallion.
The medallion is where I may have deviated from pure Civil War tradition a little. I kept plenty of feathers, but added a few swirls here and there (to fill those pesky points), and created tulips from the tulip piecings. Hopefully I will be forgiven for not quilting purely to the 1840 period. Another thing I did that is a little out of character for me, is the feathers are stitched in contrasting thread (sage on the cranberry). It limits the thread changes, and allows them to show creatively. I like it.
The borders have single scallops, piano keys and a feather filling. Simple (well, comparatively!) and effective. The ribbon border is accentuated with straight lines and feather back-filling.
The logs were only supposed to be outlined, but I made a couple wrong turns on the first set, and ended up cross-hatching all of them in the end. It looks just fine; no regrets. Everywhere else has lovely curving feathers and curved-crosshatching. Yum.
It's amazing how much better the quilting shows on this quilt than it did on the previous repro quilt I did - mostly because the color is so much lighter. Each of 16 pieced blocks were stitched with a feathered wreath. I did not want to do each differently. I don't think that is as effective (or representative of CW quilts). When I saw the back, I knew that this was the right choice.
One last look at the front...
The backing is pretty. I like when backs show the lovely texture. Those feathered wreaths just rotate so serenely!
And the scalloped border is so pretty from the back.
I've got several simpler (mostly E2E) quilts to fill my time for the next 3 weeks. I am so psyched about getting out of here to go to MQX - Will April 10th just get here??!