
This is a post that has been coming for a while. I don't mean to imply that this quilt has taken a while, but rather that the topic is one that many piecers should have a good look at. Longarm quilters that have quilted for a while have undoubtedly encountered a quilt that just would not lay quite right on the frame. You see, our frames are square, and they want to lay the quilt flatly, so if a quilt is not both of these things, then we're going to know it immediately. In cases with a minor problem, we can usually quilt the quilt making the piecing anomaly mostly unnoticeable. Cases where borders are just too ruffly often require some manipulation in order to quilt them.
Let's backtrack for a moment... I had the tremendous pleasure of quilting this gorgeous quilt (made by Robyn P) over the last few weeks. It is a pattern called Little Brown Bird by Margaret Docherty. As you can see by the photo of the right half of the quilt below (laying in my 7' hallway), this is bohemoth! It measured 110"x116"!
Now, before I go into the nuances of this quilt, please know that I have Robyn's blessing to share this story. It is in no way a roast of her piecing abilities. We want others to understand what happened during the quilt's construction, and the implications these errors had on the ease of quilting.

You can tell from the nature of this quilt that Robyn is unusually gifted at complicated applique. She does quilts that I personally would not dream of doing. I have already quilted her Ladies of the Sea a few years ago, and a couple of other applique quilts just earlier this year. She knows her way around needle-turn. I know that the applique will be the star of this quilt.
I made one error when I assessed the quilt as I loaded it. I did not fully lay it out flat to confirm that it is fully symmetrical, and should have been a square. It is massive, and I don't have a flat space this big. I just measured, and assumed it was rectangular. That should have been the first red flag.
I loaded it on my longarm, floating it down the front of the machine as I usually do. I didn't really see anything too fishy. Often if a quilt has "flutter" or "lettuce ruffles" it is obvious immediately. Half of this quilt pooled on the mat at my feet so it was not even visible.
The top 12 or so inches of the quilt stitched just fine. It was not until I rounded the corners that I began to see a serious problem. Let me show you a full shot of this quilt. This was made by Jo Timko, and I just pulled it from the internet.

What I want you to notice are the vertical setting triangles. I am not sure if the pattern is written poorly, or if Robyn just made them this way, BUT the triangles had the long side on the bias. If you starch the heck out of the fabric, you can get away with doing this. I have been known to if I am short of fabric or time. The step I never skip is basting that edge to hold it's intended length. Unstarched bias fabric will stretch significantly. I believe that both of those triangles were easily part of the reason that the borders were 7-8" longer than they should have been.
Another way borders, especially wide borders, can be attached and "grow" is when they are just strip cut and sewn on. If you don't measure the interior of the quilt in 3 places, then cut the border to the average size, you will almost always over-do the needed length.
When a border is plain fabric, it is simpler to "tweak" this on the fly if it has too much fabric. Often, I take a perfectly perpendicular tuck, baste it down, and then quilt normally. The tuck can be hand stitched down after quilting. Tucks are only needed when there is a significant excess. Frequently, steaming the border or starching it will cause it to pull in enough to lay flat.
The borders on this quilt had another issue though. They are laden with an absolute TON of applique. Steam and starch would have done nothing, and there was no place to put a pleat without mangling the applique. Further, it became apparent quickly to me that the inner sashing (blue/brown) ALSO had too much fabric and was not going to lay flat either.
This is the point where the quilter wants to cry.


What I did to help her was to go down the three borders I had not already SID, and I pinched fabric in the two borders. I treated the blue/brown borders as one unit, and the applique wide border as the other. It is typical that the amount of fabric needing to be removed increases as you move further outward on the quilt. By pinching the excess, and pinning I got a good handle on how much needed to be taken out. It was more nearer to the triangles, but I hoped that taking it out as a lump amount would do the trick.

I instructed Robyn to remove the borders, but to leave them attached at the corners. This would keep her from having to redo applique at the corners. There were places with less applique that were good candidates for where extra fabric could be eliminated. She had target amounts to take out of the borders, then to reattach them and "fix" any appliques that needed repair. I won't say this was a small job, but it could have been much worse.
Before I removed it from the frame to ship to CA, I ditched the remainder of the middle part of the quilt - yup, all the center applique blocks. I was very reluctant to leave it just basted for her to do the repair. I have had too many bad experiences removing quilts that have insufficient quilting puckering and pleating. Other longarmers know exactly what I am talking about.
About 3 weeks after I mailed it home, it showed back up at my door! Unfortunately I cannot find a picture to show how it looked, but suffice it to say, the side borders were WAY better. They layed almost flat, as they should.
It was a big job dealing with totally unquilted 10" borders and a totally stabilized quilt body. I spent a goodly amount of time loading this quilt, basting the borders every 3-4" to stabilize them and ensure that they were going to be flat with the backing. We'd gone to too much trouble to fix the top only to have a backing full of tucks. No thank you. I worked my way down from the top to the bottom. Some of the SID had been removed to facilitate the fix, so that had to be restitched. When I reached the bottom border, I immediately started there, stitching around the appliques. The less I needed to roll this quilt, the better. I then worked back up, ditching. The next photo shows the fully quilted bottom border, but the details were not quilted until ALL of the SID was finished on the entire quilt. Then and only then could the fun, decorative quilting start.


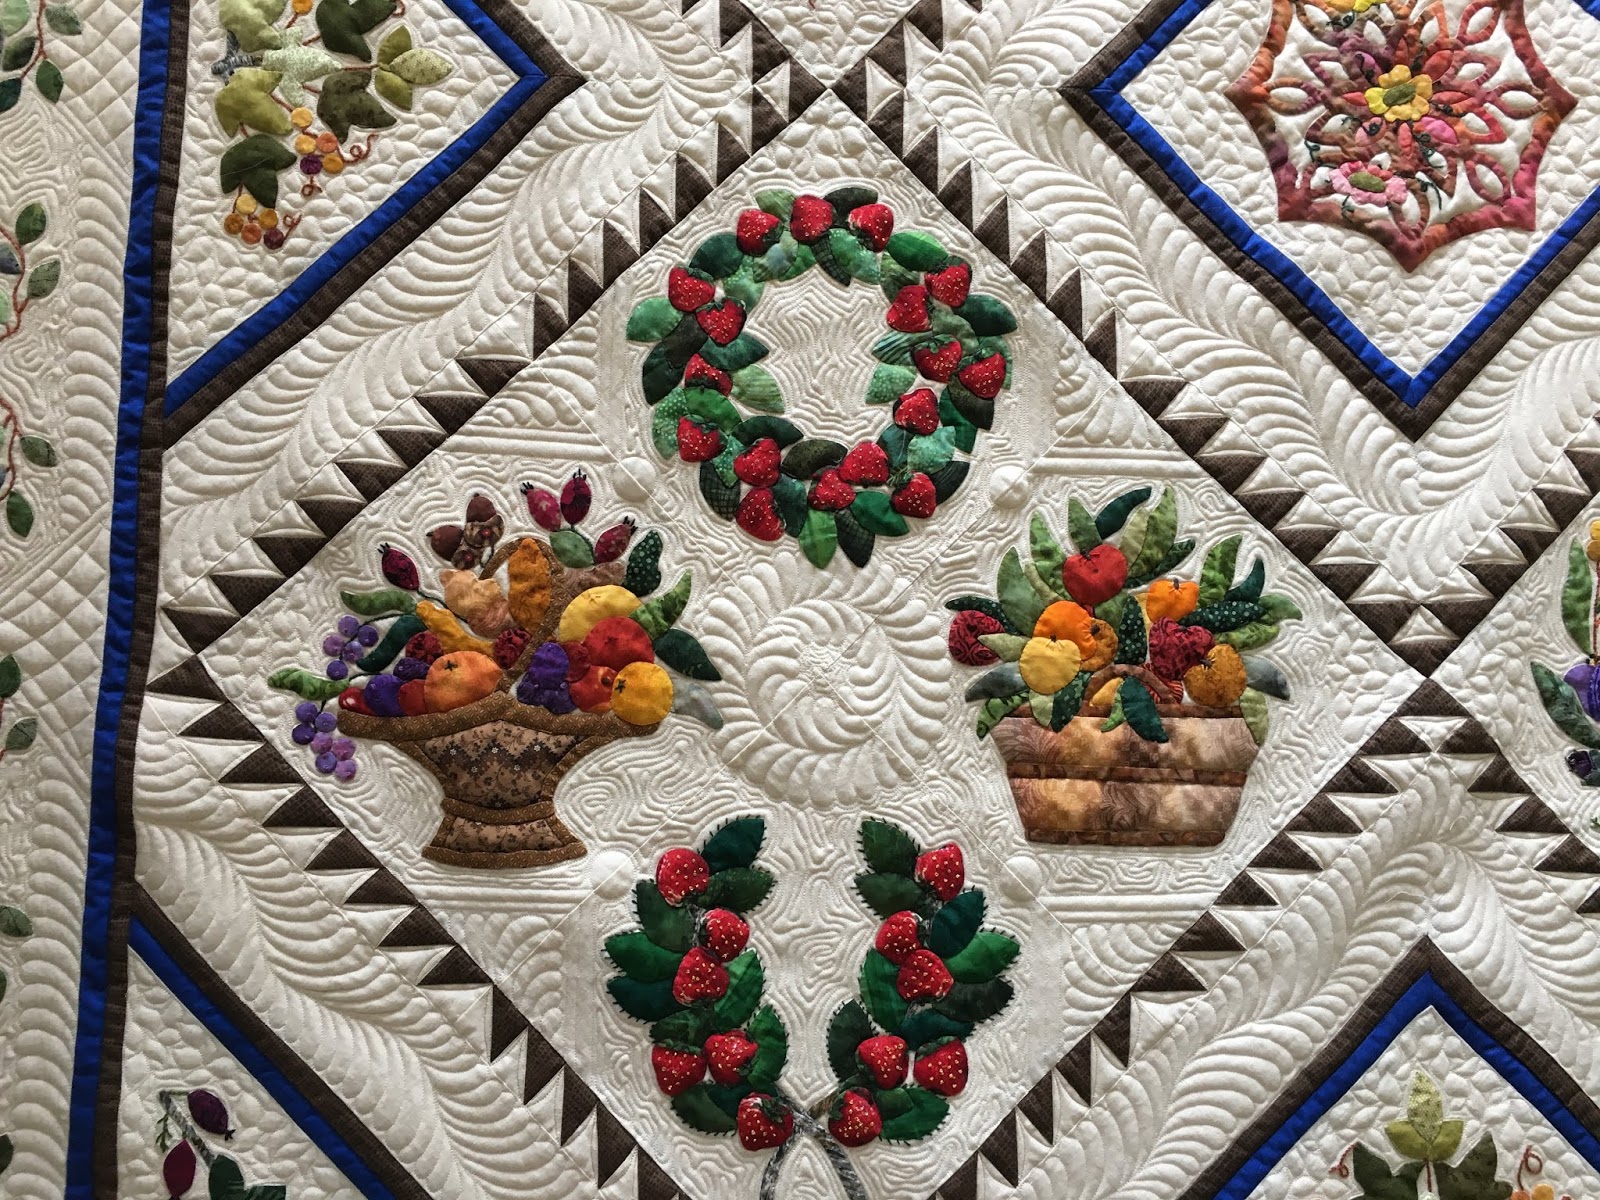
Here's the left half of the quilt. The feathers are a dominant motif, and seem perfectly chosen for such a traditional quilt. I also like them because they don't take days to stitch. Just mark the spine, stitch the spine, and quilt. The worst part is that these are such huge squares that I was constantly rolling the quilt.


There are 9 of these 4-block applique sections. They are like 20" on point, so HUGE! I like to repeat fills and motifs that have been used because this promotes cohesion within the design. That is why these have a little bit of feathers, a little of the leafy fill (on corners) that is on the triangles and 4 central Hawaiian-style blocks, and more of the echo-meander. The feathered wreath at the center is the quintessential traditional motic, and IMHO, perfect for this place.


Hope you all enjoyed this lovely quilt, and that you have a better understanding of how improperly pieced borders (ie, not measured) can affect what your quilter can ultimately do to your quilt. This was a fun quilt to work on and I hope Robyn fully loves all of her great work!


12 comments:
Wow, what a huge job. So pleased for you that the client was able to work with you to find a solution. Fabulous result!
That is amazing! I am just in awe of what you do; the quiltmaker made a beautiful quilt; but you really put the polish on it! I am a longarmer as well; and I get quilts that make me so frustrated because of the borders ruffling or blocks that are too big, so I appreciate you and the quiltmaker for telling the story behind this gorgeous quilt. I am nowhere near your talent, but maybe one day I can get close! You are magnificent!!!
Wow!!! What a beautiful quilt to have worked on, but especially well done on your amazing quilting expertise that saved it!!
Holy Moly. What a behemoth of a quilt! It is stunning, and it is amazing how much work went into not only making and quilting it, but fixing it to get it square. All very good lessons learned, here. I cannot imagine having to do all of this. I commend you both for such care and hard work, it turned out so beautifully.
Stunning work by both of you. Taking the time for the proper border fix was the right call. A true labor of love!
I am in aw of the quilting on this piece. The story behind the fix would have me in tears... Thank you for showing us the process and the need for a "fix".
Oh, my GOODness, Margaret!!! You just can't get any better; and then you do!! Thank you so very much for sharing.
maggie
This is a most amazing post! I've learned so much from it and I really appreciate it. Thank you and Robyn for sharing this and helping me to understand more about the bias, borders, appliqué, and quilting. Thank you again for taking the time to post this!! Beautiful job Ladies!!!
Too bad that MQU is no longer published because this would be an excellent article! Thanms for all of the details tbat you generously share.
Thank you for taking the time to step through the process to solve the problem of ruffled edges. We've all been through that and tear our hair out trying to arrive at a good solution. Robyn's quilt is spectacular and your quilting is gorgeous and so admired!
What stunning work!
Thank you....I learned alot in this post. Robyn is such a master appliquer her quilt deserved to be quilted by a master quilter. You never cease to amaze me. As a means of encouragement to all new longarm quilters, they should go back and read your earliest posts. Your skill and precision have increased exponentially and you have shared so much over the years in this blog. I think there is a "book of quilting tips" to be found in your collection of posts. Blessings....
Post a Comment