Monday, January 11, 2016

Hexagons in Silk

You don't know how much I appreciate all of the comments!!  Some days I think that there are 3 people that read this blog.  Nice to know otherwise.

While I sort of knew the direction I needed to go with these borders, adding black into my design did not come without a fair bit of trepidation.  Black is just not a color I use, ever.  Why and how the zebra print made it into this design is a huge question!  One day I woke up and told myself I was going to find some zebra stripes, as though the fussy-cut hexie blocks were not wild enough.

So, as you can maybe see, I did add a tiny micro-piping of black into the design.  It is small and subtle, but I thing that is all this needs.  I may also use it at or for the binding (if I get that much courage twice).  The photo below has nothing stitched; it is all just glue-basted into place.  Today I started stitching the first 4 of 12 plates into position.
The piping follows the line between the orange and the ivory silk, even when it goes into the braid. This was my avant-garde twist on this design choice. It was easier than I thought it would be to attach the piping to the individual braid pieces before they were stitched to the background.  I know that the piping isn't a whole lotta fun to longarm quilt beside, but I will manage.  I love the look. No pain no gain, right?!
You just don't know how stoked I am to get quilting on this thing.  I know it won't be finished before the fall most likely, but I love this quilt nearly as much as I loved making her predecessor, Bouquet Royale.  These are true hexagons, whereas that quilt had the elongated hexies.  Both share my favorite colors though.
While I am busily bouncing quilting designs around for the background areas of this quilt, I can share one concept for the hexie plates.  I am not entirely certain what direction I want the quilt to take, but it feels much like it's predecessor did, garden-like.  I see flowers in each of the large hexagons, even though I finished them as stars.
The print is challenging to quilt, so geometric designs are often more effective, as is a heavier weight thread.  Save those prettier patterns for areas like the silk where they will show better.

It is hard to believe that I made 3 more of these than I actually need!...They take something like 6-8 hours to hand stitch.
 No papers here...just a nice tracing line and running stitches.  It enables me to press the seams to one side, which keeps the possibilities for longarm quilting endless.  I never know when I might want to ditch stitch somewhere, and a pressed open seam makes that a total PIA!

This is from early summer...that is about half of the blocks.  There was really no plan yet, just blissful piecing.
 This one didn't make it's way to the front of the quilt.  As much as I hate to not use blocks, an 82" quilt seems better than a 99" quilt!  Maybe it will go into a charity piece or a label (or my "who knows what to do with this" box).
 Somewhere around September, I pedaled backwards.  I had a dozen or so of these framed with pink/orange and black, which is very striking.  BUT...these were the blocks that looked best in pink and orange, and the other 12 really did not, and I just couldn't find a cohesive color that blended well. Back to the drawing board.
I had a fat quarter of a wasabi-colored green silk and sparks started to fly...I contacted the person that hand-dyed the first piece, and ordered 2 yards of this green.  It was the perfect color with nearly all of the hexagon plates.  I would make these cohesive by using just one color for the star points.  Happily, I believe it worked, and the rest is history.

Time to get drawing!!

Thursday, January 07, 2016

Stack-n-Whack Fans

Getting back to client quilting now that the new year is here.  First one up had been put off for a bit while I searched for inspiration.  Large masses of blank, open fabric take planning (and a bit of courage).  It feels good to have it finished, and I hope she likes the end result.
This quilt has a single Hobbs 80/20 batt and is stitched with gold Glide, and dark blue & green So Fine threads.  I was told that it is going on a bed and that it does not have to be as dense as another I did for her before Thanksgiving.  The blue border is a whopping 10" wide!  That width of border takes either a nice large feather, as I chose, or a good bit of subdividing (time, marking, and cost there).  The feather is a bit more organic, to tie in with the leaves of the outermost border fabric.
 The fans are simply stitched, mostly because nothing really is going to show on them.  The place to get bang for your buck is on the plain blue squares.  I chose a stencil.  I believe I have used this a couple times before (I like this one that much!).  The stippling around the stencil, which is stitched in gold, pops the design.
 It's a pretty bed quilt.  Next up on the weekend is a baby quilt, then onto a Neimeyer star of some kind.
 I have been puttering with just about every possible combination of border colors for this top this week for the last month.  I have bought everything from these two colors, to a custom dyed lighter orange (which matched the champagne silk horribly), a deep green and a black.  I am having a hard time getting on board with the black, but may still incorporate some black in the border/binding.  It's time to move this top along, stop consternating about every possible color, and get the dang applique done.  A lot of quilters I know are choosing a word for 2016.  My choice word is this phrase "No Procrastination" !
or perhaps you line this variation better (he he, said as I procrastinate!), with just a touch of the black...Leave me a comment with your preference :-)

Sunday, January 03, 2016

Welcome 2016

To anybody wondering about comment moderation on this blog...
Comment Moderation has been enabled for YEARS on my blog.  I don't want spam, and if you find the fact that I moderate what is commented offensive, then my apologies.  I don't appreciate comments from sales organizations and crazy people.  It's my blog, and my rules.
-----------------------------------------------------------------------------------------------------

Hard to believe 2016 is here.  Seems that yesterday was just 2005.  Time flies.

It's been a good, but long 12 days with everybody home.  The moans of having to go back to school have been flying through the house all day.  Despite actually working on this quilt some during the vacation, I am hopeful to return to a reasonable work schedule, barring any barfing kids or snow days.  We all know there will be more of those.  I have a growing list of things to tend to - an article, class preparations, clients quilts, and a quilt top of my own that I finally got the custom dyed silk for. I am most excited to get that top completed.
This is my Carpenter's Star...my pattern, designed and drafted by me, really...just like ALL of my quilts -- another Margaret Solomon Gunn original.  I know many of you have seen this type Lone Star before; that is the beauty of certain blocks & patterns - they are used and reused, not copied.


While it has felt good to go at the quilting of this quilt without too much overplanning, it has not been quilted without it's share of challenges.  Lesson #1 - I never want to quilt a dark background again! It's harder to mark, and so much harder for my aging eyes to see.  Though not evident from this photo, much of the filler work is stitched with a 100wt matching dark navy thread.  It drives me nuts to stitch, and requires several lights at odd angles to illuminate what I am doing.  Hopefully these corners really show, even when the lights are at normal angles!  I should note that the only things marked on this are the dragonflies and placement for the curved swags.  I am a free-hand quilter. Feathers, cross-hatching, and every other detail just don't need to be drawn onto the quilt before quilting.  The natural variations should be viewed as beautiful

I have mostly done the quilting in a "just for fun" manner.  It is apparent since I waited 4 years to finish this top that I lost my commitment.  I fell in love with silk and this poor batik quilt just fell to the sidelines.  I tend to create 2 quilts a year, and they often take 12-18 months calendar time to finish.  This one was just put in a box and all but forgotten.  It feels good to have almost finished it, but I am not really sure what it's destiny will be.

For the first time, I tested a Hobbs wool/cotton batting.  A Hobbs rep sent me several sample batts in November to try out.  This is my first.  Normally I use 80/20 under the wool, but I love the loft and density of the wool/cotton.  I will definitely buy more.  I also used lots of different threads.  The batiks are challenging to get thread to show.  If I wanted it to show, I went with the 40wt Glide.  If I wanted it to blend, I used Invisifil and silk 100.  There are also places where I pulled out the rarely-used metallic.  Like I said, this quilt was my therapy quilt, so I played with and altered just about every one of my consistent choices from past quilts.

Is it going to be a show quilt?  I don't know.  While I did many of my usually-careful techniques like knotting and burying, and being very neat, I just don't know if it has what it needs to have.  I also know that my piecing and applique of 4 years ago don't hold a candle to what I do today, and more importantly what my standards for execution today are.  My mojo and determination have taken a hit. I greatly appreciate the many messages about my previous post, and letting go of hurtful, jealous, hateful people.  I still find the entire experience very challenging emotionally.  I can know beyond a shadow of a doubt that my work is the design and execution of my efforts alone, but all it takes is the crazy ranting of one lunatic to derail things.

I got to spend some time this week with my 9 year old while she works on her next quilt.  She's working on a sewing machine that she won at a show in June.  All kids that entered were given a machine.  It's pretty cool to imagine being 9 and having a machine in your own room!  It enables her to make 3 blocks and then fly off to do something else.  I don't have to drag her stuff out each time because she keeps it all right there.  She hopes to have this ready for MQX, but that really depends on finding time to get it quilted.  Who knows when you are nine!...there are so many interesting things in your life!  Her quilt again this year is Paris themed...she bought this Eiffel tower fabric and a bunch of green and pink fabrics when we went to Paducah together last April (she's a well-traveled 9yr old, having attended nearly 15 quilt shows!).  While the colors are bold, they are totally her.  She wanted to make something that would fit her bed -- it'll take a bit of time for her to quilt this!


Tuesday, December 22, 2015

Santa time is almost here

...and as far as I am concerned, that day just can't come soon enough!  All of the hype and anticipation of Christmas drives me crazy.  Heck, the holiday candy goes into the stores the day after Halloween, and we're doing pre-Black Friday sales in October.  My kids are junked up on xmas cookies, wildly excited, dying to not go to school...it all makes my head spin too fast.  

If you are still looking for that nice and modest gift for the quilter in your life, Machine Quilting Unlimited has a lovely 2016 calendar (www/mqumag.com).  My Bouquet Royale quilt, which will be at Road to California next month is on the cover too!

The plan all along had been that December would be when I reload this quilt (above), and get it finished.  I had planned the timing of the quilting well, so that my client work would be slowed, and the quilt could actually get finished in time to enter this spring.  But then the facebook bomb dropped. A quilter that you all know accused me of copying both her piecing and her quilting.  It is the biggest load of shit I have heard, excuse my French - but I am still incensed by this.  I consider myself to have more than enough creativity and talent to create my own designs.  Furthermore, if I were going to copy someone's quilting, it would be a better quilter than her.  Seriously, have you seen anybody else quilt the motif above?!?...No.  She's imagining it, because that swirly thing I stitched in the triangles was drafted by me.  Some people think that if you quilt anything that is slightly different from the style that you usually use, that you are taking it from another.  Simply ridiculous.  I was LIVID, and angry and hurt.  It completely took the wind out of my sails the last month.  I never use other people's patterns, not even for  simple use quilts.  So with my motivation to touch this quilt zapped, I think that is why I pulled the next one out of moth-balls.

I have spent the last week puttering working on this quilt.  Though I told myself I would quilt it with a "who gives a bleep" attitude, just aiming to get it done, that does not seem to be how it is going. Today is the 7th or 8th day, and I am just seeing the bottom of the 72" quilt (and there are many large holes still to quilt).  While I don't know if I love it, since my tastes have definitely changed in 4 years since it was started, it is looking reasonably decent.  It's no best of show, but it will probably go to at least a couple shows to see how it does.
Batiks are a PIA to quilt.  That is why I have largely gotten away from using them.  Hand-dyes are nice, but batiks have too much print to obscure the quilting.  As a result, I am using heavier threads like 40wt Glide (with a sheen), and even a few very fine threads just to get dense textural quilting (silk).
 This is the center.  I actually really like how this looks (even if there is a large unquilted space still!).  Using several sets of parallel lines sets off the design nicely.
I am still working (more like waiting) on the silk hexagon quilt.  I have worked out a design for the outer border and block layout.  It needed a custom dyed orange silk.  I thought I ordered it nearly a month ago, then it took like FOREVER to arrive, and did not match.  I have since sent a swatch to someone else to dye me a yard.  After the holidays (probably when I am swamped with class prep and client quilts), I will get back to finishing the silk top.  Goal is to have this quilt set to enter at MQX midwest in October.  Seems overly ambitious.
Have a good holiday, whatever it may be.  Maybe I will just blow off everything and just go to see Star Wars on Christmas.  Seems like a good idea today :-)
What?...don't you make Yoda gingerbread cookies?!?

Monday, December 14, 2015

Playing in the Swamp

Playing in the Swamp is the name I affectionately gave this quilt when it was started nearly 4 years ago.  February 2012 are when the first photos of me strip piecing the center star.  I took a few days in August 2014 to assemble the units into 2 large pieces (minus the mitered borders), but nothing has been touched in nearly 1-1/2 years.  A couple weeks ago I sold a top I made around the same time, in an attempt to clear out the clutter of my studio.  I figured if I hadn't quilted it yet, it probably wasn't happening.  While I considered selling this one too, as my interests have more turned to the silk quilts rather than batik, I knew it would be a hard sell to make if it were in pieces.  Last week, when I finished the Ladies of the Sea quilt and was waiting on fabric to arrive for something else...while I was cleaning up pot after pot of 11-yr old barf every hour, I decided to try to get this together.  I managed to assemble the pieces and borders, and then something clicked.  It was really pretty interesting.  But if I was going to bother to quilt it, it would have to have the points of 16 intersections fixed.  That was my Thursday.  
Via Facebook, I queried folks on what color diamond points would be best between a red, teal and blue.  Almost unanimously, the response was red.  So I went with my first instinct - royal blue. While I am intrigued to hear what others will do, I felt that the blue drew the eye to the center of the quilt best.  Finding visual center is an important goal for every quilt.
With the top done (and mind you, you'll hear me fuss plenty while I am quilting this, as it is far from great piecing.  The applique blocks have more cleavage than I do), I decided to ponder the quilting. This will absolutely NOT be one of those quilts I overthink.  I am not that vested.  But, I do want it quilted.  Since the quilt reminds me of a swamp (the greens are textural like frog or alligator skins, and the water lilies seem appropriate), I wanted to add dragon flies into the outer border.  There is a good amount of blue background to fill, and make more interesting, and this is one way I will break up the space.

Here's a picture from a dragonfly I used on a recent silk whole cloth.  I pulled out the pattern, and scaled it up a little to make it better sized for this space.  The one below is painted to increase it's visibility, but I don't think that will be necessary on the Swamp quilt.
I traced the outline onto template plastic, and cut it out.  I will need to make 8 of them and this is the easiest way to get them all the same.  A lightbox isn't really possible because the background is so dark.

I uploaded a shot of this quilt to Photoshop and drew away yesterday.  This is 1-2 hours of sketch time -- about all I really plan to devote to this quilt!  The dragonflies will be stitched in the corners.
I have a couple more templates to cut for the butterfly blocks.  Someone asked me a month or so ago about my Press-n-Seal method.  This is it... Place Press-n-Seal on a block you like, and trace the design with a Sharpie pen (very carefully so as not to mark the fabric).  Now place this on a piece of cardstock.  I use file folders or used cereal boxes.  Cut out the piece you need a template for - in my case, I wanted this scrolly thing that represents the flight of the butterfly.  The cardstock is easy to trace onto the quilt with chalk.

 Another peek...
I did get this loaded late morning today.  I will post pictures as I progress.  Hopefully I will make good progress before boredom sets in :-)  Usually I like "no think" quilting projects, but I wonder if I can stay that way throughout the entire quilt?!?

Wednesday, December 09, 2015

Ladies of the High Seas

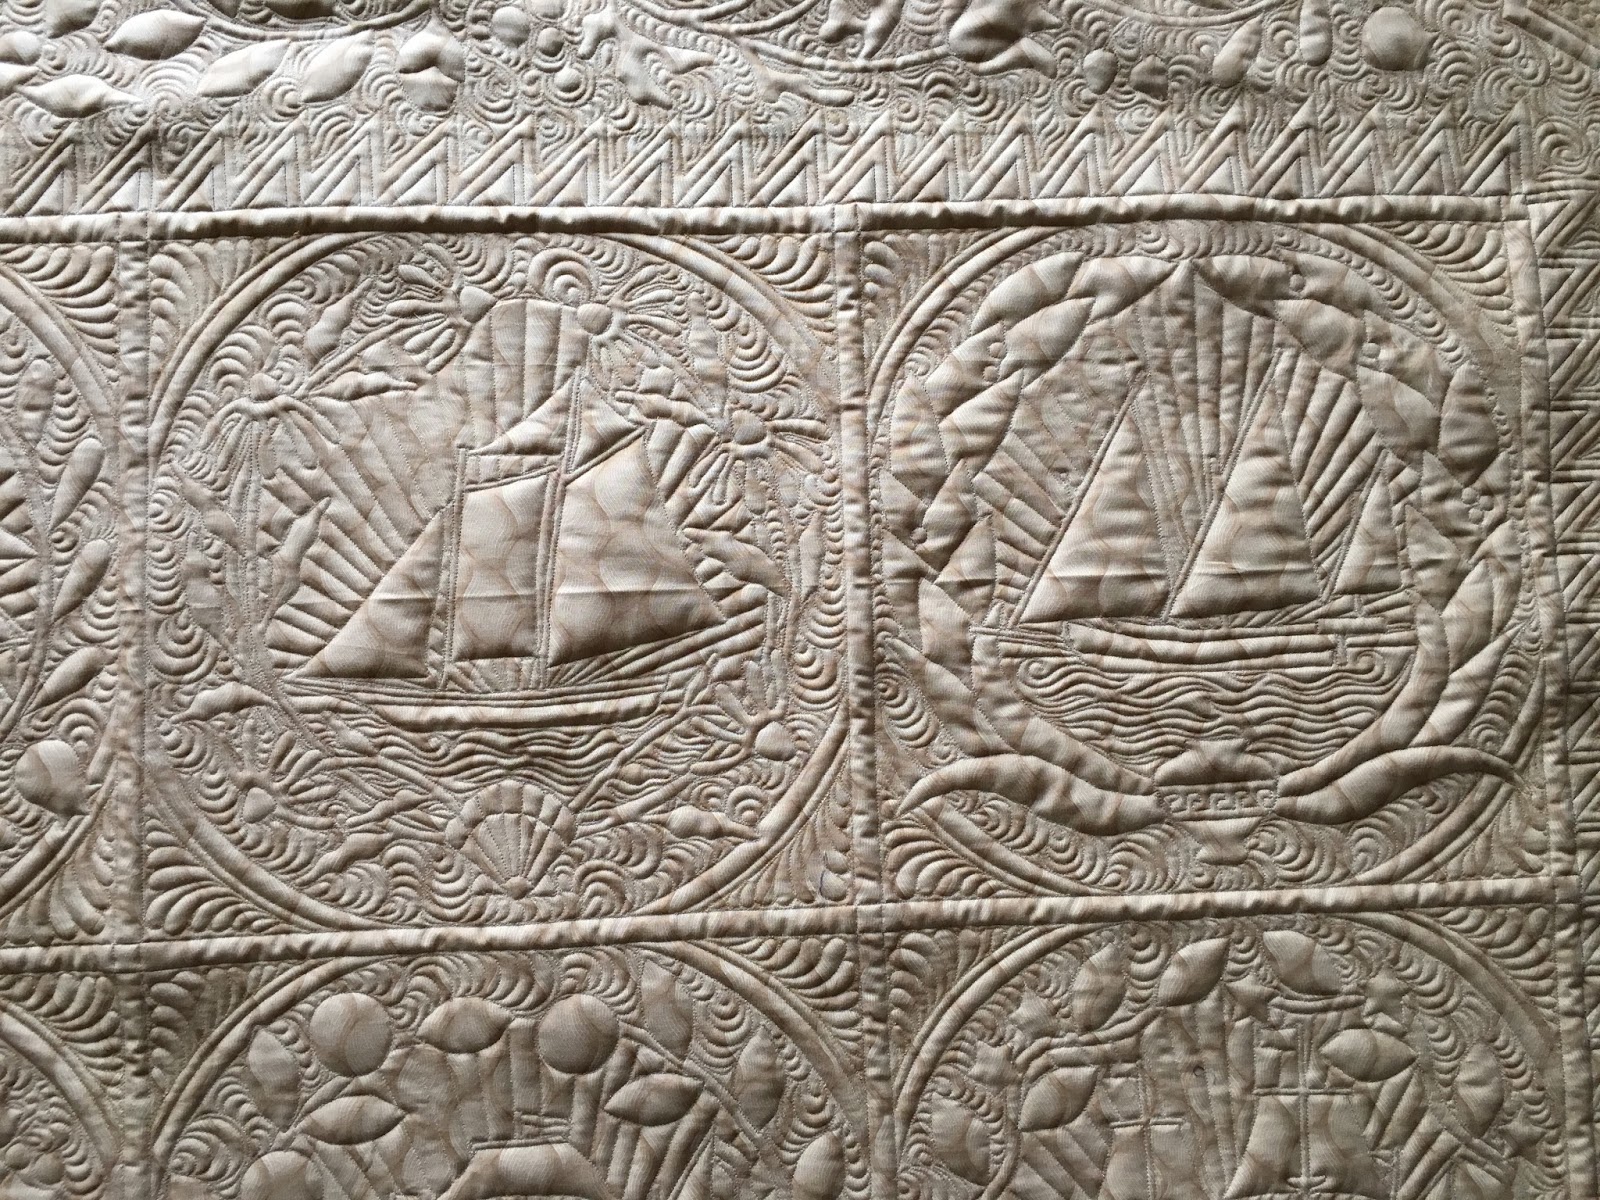
 Sue Garman's Ladies of the Seas is the most incredible applique quilt I think I have ever seen.  The number of patches, and the immense detail of the designs is mind-boggling.  As much as I think I love applique and am relatively good at it, I am humbled when I get a quilt like this.  It scares me to be privileged to quilt it.  It is that good.

 Remember back in January of this year, I did another variation of this quilt.  It had 15 boats and did not have the massive borders.  It still took what seemed to be an eternity.  After posting photos of that, I received 2 requests to quilt the same quilt again.  This is one of them.
 I spent over 13 hours just ditch stitching all of the appliques using a Madiera Monolon nylon thread.  When done correctly, this thread is essentially invisible, especially along the lighter toned fabrics.  Darker colors do give a subtle sheen if you are not completely in the ditch.  On this quilt, as compared to the last one I did, I omitted ditching all of the ship's riggings.  This enables all of the sails to retain their poof.  I like this decision considerably better.
 The borders are massive, and they really don't leave any space to do much that is terribly creative on my part.  It is all about the applique, so I stitched a dense fill that is easy to get into all of the many nooks and crannies.  Background fill stitching is done with a Bottomline thread, which is 60wt.  It matches the background fabric, and leaves only texture behind.
 I used a heavier weight (40wt) thread along the corners of every block, as well as along the triangles and the corner stars.  It is a gold YLI polished poly thread.  It doesnt show in the photos, but in real life the color and weight make it more visible.  It would have been too much thread for the dense fillers though.  I am always secretly seeking ways to create secondary patterns, even in the tight spaces of these blocks.
 Look at these gorgeous borders...Each one is over an hour to ditch, and then another 3 to do the rest of the stitching !
 The boats are so fascinating, as are all the flowers.  I always seek to create quilting that compliments such designs without overwhelming them.  The inside of the wreaths is very much like what I did on the last Ladies quilt.  Obviously I still love this design of simple waves beneath the boat, and the appearance of a sunrise/sunset behind the boat.
 If you are wondering how I do the rays, here is a quick tutorial.  And yes, they are marked.  It is kind of hard to get this effect with all the sails without marking.
I created a template from a file folder with 10 degree rays cut out.  It is placed over the boat, and marked.  I then go back and mark the 5 degree lines too.  It is oh so easy, and very effective.  Just takes some patience and a straight template.
I'll leave you with just photos because this post is taking me forever to write (on account of one child that has had a double-ended intestinal bug since 2am...and we all know dads are useless in the middle of the night).
 This will be shipping home to it's owner in a few short days.
 And the mostly solid-looking backside...lovely texture.

Hope your week is going better than mine :-)

Thursday, December 03, 2015

Christmas preps

I officially have finished all of the quilts needed to be done before the holidays.  I had a call about one last one about 10 days ago, but she never called to schedule a drop off.  That window of opportunity has sailed, as I loaded a big quilt a few days ago that is not destined to be done for another week.

Here's two from a long-time friend of my mom's, and a prolific quilter.  The first one is a panto I have had for years but never quilted.  It's sort of dense, but quilted up reasonably fast.  Sure wish more edge-to-edge quilts came in because the break to not have to design custom quilting is nice.  It's like the Italian Fresco painter who gets to paint walls with a roller now and then :-)
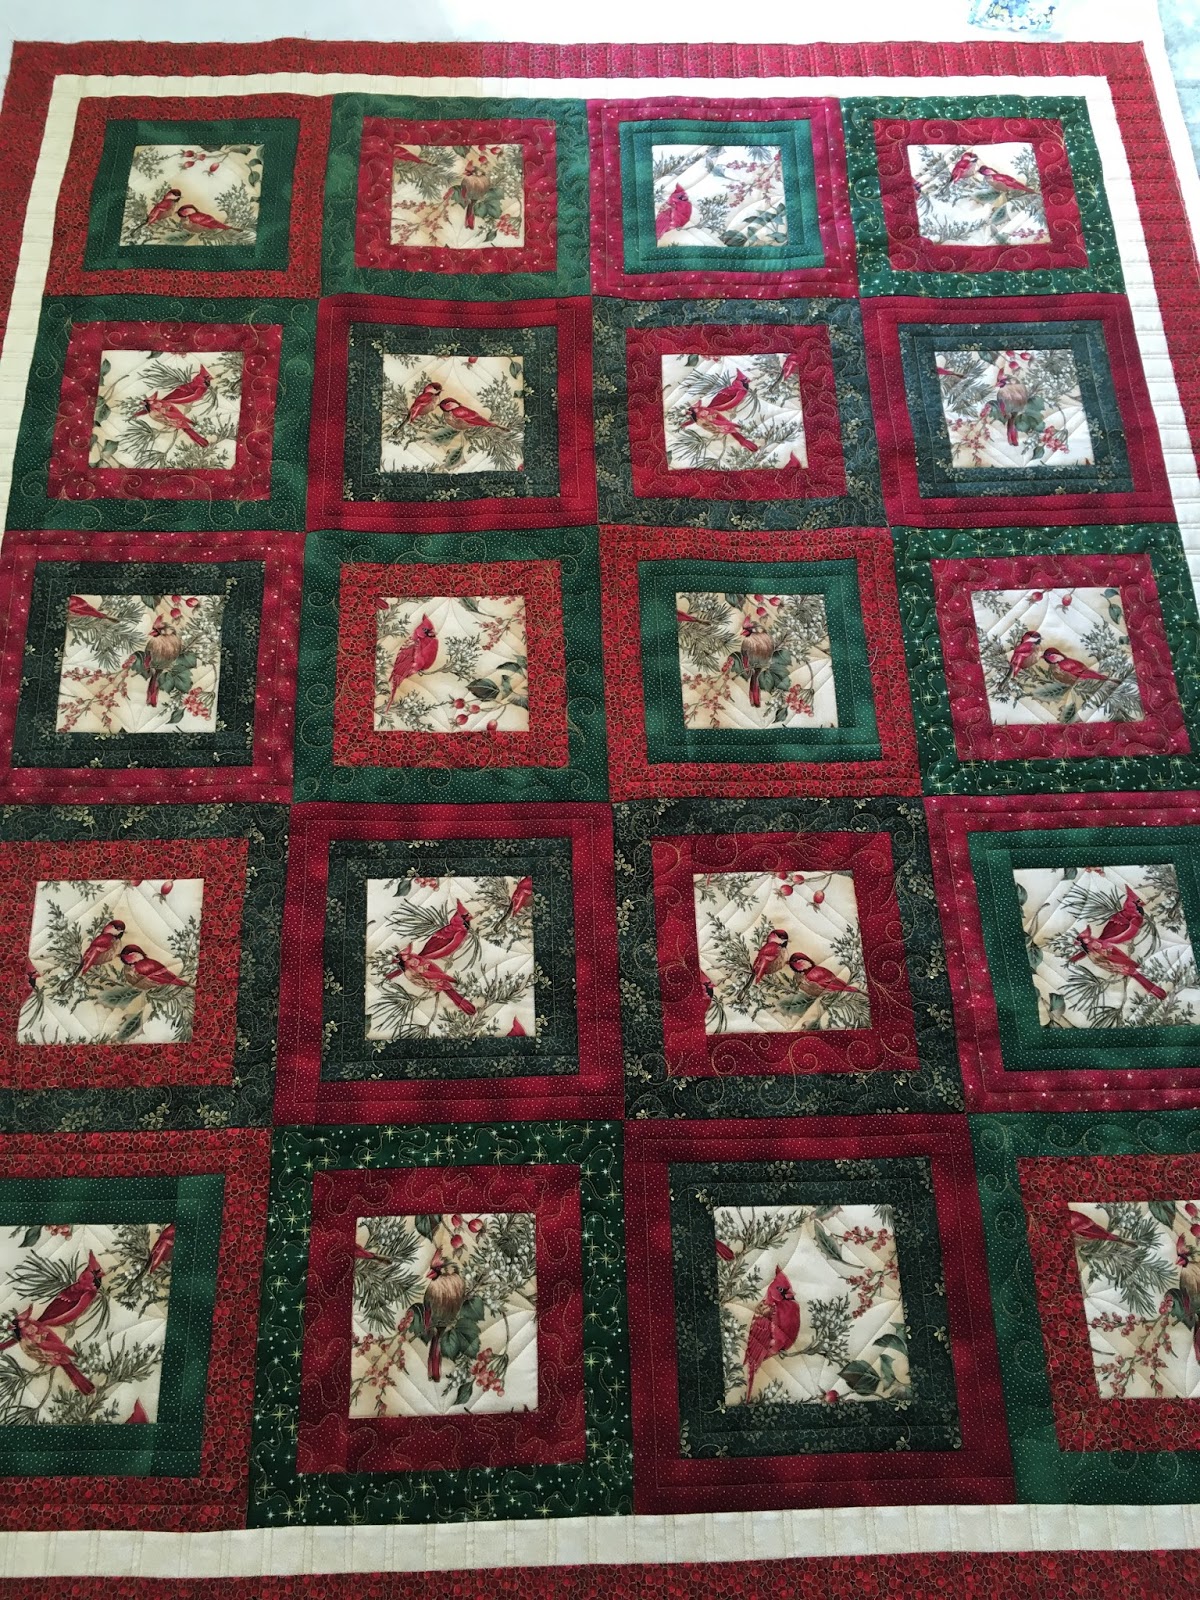
Joan also came with a second quilt.  She never comes with an agenda.  She's happy to have me do what I think best.  Most often, her quilts get edge to edge quilting because they are busy with prints, but this one was different.  The piecing was simpler and the fabrics could handle showier quilting.  A month ago she showed up with a pile of red and green small cuts to ask me what I would do.  This is kind of what I drafted, and go figure, she had it done within a few weeks!  When she dropped it off, I knew it had to get into the "finish before xmas" pile.
 She fussy-cut the bird fabric to frame 6" blocks with birds.  The frames of red and green are 1-1/2" wide.  I treated the two borders together when I did the quilting.  This keeps the quilting simpler, faster, more economical, while not losing any of the softness for the lap quilt.  I really just didnt want to do excess ditch quilting.
Three quilting designs were used - parallel line frames, swirls & holly leaves, and a ribbon meander.
 The Gold glide thread was perfect for a holiday quilt.  Most of the fabrics had a gold gilding on them too.
 The beast I have loaded is another Ladies of the Sea.  This is 88" square and has the very detailed appliqued borders.  I cannot fathom making one of these quilts.  This is absolutely the best applique I have ever seen.  Curves and points are perfect, and there is not a stitch to be seen.  Quilting it makes me nervous!
 So far, I have done over 13 hours of ditching every applique, and some of the other areas.  I am awaiting a thread order that BETTER arrive today (it has my background thread in it!).  I am a sitting duck until it is here.
Off to get busy...