Saturday, October 27, 2012

Blogger's Quilt Festival

Today's post is for the fall Blogger's Quilt Festival.  This an awesome online display of quilts brought to us by Amy (since if we are here browsing these, we aren't in Houston with all of quilting's lucky elite!).  We get to stay home and await Hurricane Sandy in the coming days.

My quilt is entitled Zen Garden.  This was finished this past winter.  I'll confess right off the bat to being a longarm quilter, and one the loves to make quilts for shows.  This was my 4th such quilt.  It had the pleasure of hanging in 4 or 5 shows this past season, bringing home a few ribbons.  Similarly, it's even made it into Quilter's Newsletter magazine.  But, enough with the boring stuff, you came here to see pictures.  Am I right?...
 
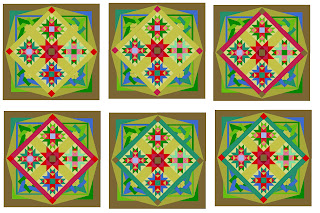
This quilt finishes at 65" square.  It's a traditional pattern called a broken star or Carpenter's star.  The applique all around the border almost disguises this.  It's deceptively easy to construct because the diamonds constructed of 25 pieces are actually made from strip sets.  The trick is just getting all the fabrics of the strips in the right order!  
One of the things I limited myself to when I made this quilt was to ONLY use fabrics from my stash.  So, there goes the possibility of this looking too traditional.  I have quite a bit of bolder color, larger print fabrics, and despite the size of these pieces being fairly small, they all seemed to work nicely at creating a visual colorburst effect.  
 
The majority of the quilt is the fabric used on the outer border and inner setting squares.  I knew since this was a Kona fabric (solids, though nice, are kind of dull and boring and they don't bring a lot of life to the party), I would need to make it interesting somehow.  As you can see, the setting squares were jazzed up by appliqueing a purple and pink flower to the inner corner, and then more applique.  The tan is just dull by itself.  The border around the star received a lot of Asian-inspired floral applique.  I love working with the bias strips, and the curvy-ness of this distracts the eye from the bland tan.  I was able to use flowers that are basically constructed from the same shape as the star is, and then brought many of the same green prints back in for leaves -- all 85 of so of them.   And I can't forget the butterflies.  They are my personal favorite.  A small feature that helps to define this as a garden.  I fussy cut them from a piece of fabric I had, then colored them with sharpie pens to make them the colors I wanted.
The part that I really love in the process, though, is when the quilting starts and the quilt is brought to life.  Design details can be added to the boring tan areas to make them visually stimulating, like the checkerboards shown above.  Rays were quilted into the inner star to bring it outwards.  I enjoy all the fun fillers that make the finished quilt an I-Spy of sorts.  Approximately 75 hours was spent on the quilting (did I mention that I am insane too??!)


 Here's a closeup of the edge...a small (yes, micro) micropiping gives the quilt interest, but also provides a little added stiffness to help it to hang straightly.
 Here's just a few more photos...

Thanks to Bonnie Hunter.  I posted 4 of the ones that she sent me after MQX.  And what fun would it be without one of the back?...  The backing fabric is a Laura Ashley print.  It shows the texture, but not all the stitching lines.  And that's my artistic muse, Picasso, eyeing the binding clips as potential toys!.
I love all your comments, and I hope that you have a great week looking at the Bloggers Quilt Festival quilts.

Stats...
size 65"x65"
techniques: machine pieced, hand appliqued
quilted by me on a longarm
Categories: wall quilt, professionally quilted, applique quilt

Friday, October 19, 2012

 I did three quilts recently for a new client.  They are all really pretty, different quilts.  I'll show you two of them today.  They'll be on their way back to her early next week.

This first one is small, something like 30x40 or so.  The fabrics are SO gorgeous.  Almost every one of the fabrics has a sheen or metallic flecking.  It almost reminded me of an Asian look.  She asked for an E2E, and since the piecing (see next pic) is practically miniscule, it seemed like a good idea.  When the quilt arrived and I saw the fabrics, I knew it needed just a little bit more.  I used a gold glide thread, which is perfect for the fabrics.  It has a lovely sheen.  Then I chose to feather the ivory narrow border to give the quilt a little personality.  The rest of the quilt was filled with an E2E.
Not sure that the fabrics are visible even here, but maybe she'll tell me what they are and I can add that to this.
The second quilt is a variation on a Dresden plate.  She's turned them into sunflowers, and a fall wall-hanging.  The fabrics on this were all extremely busy.  I had a bit of difficulty selecting quilting motifs that worked with the prints.  As a result, I ended up picking out a couple of things that just weren't effective.
She told me that the pattern is from an Edyta Sitar (I know I probably butchered the spelling) book.  The inner part of the sunflowers are "flappy".  There must be a fabric folding technique used here.  Because I stitched petals on the gold part of the sunflower, the flappy part stands out nicely.  The backfill has a dense yet simple leaf filler.  She'd asked for leaves on the quilt, but with all the print, much of which was leafy, it was not really feasible to do, and have it show.
Again, I used a gold Glide thread.  It runs well, looks like fall, and shows up on the heavy print.  The quilting has a bit of straight cross-hatching, and then some feathered swags and bead-board on the outer border.  I was able to get the leaf motif in on the narrow border, which was mostly solid in appearance.
 Here's the popping sunflowers...
I have one more to show another day.  It's time now to reorder some thread and get ready for the kids.  I've just spent 3 days with my big green Dresden on the frame, trying to knock off the details that were bugging me when I stopped working on it 3 weeks ago.  It now has all borders done (except for one that still needs 1/4 of it ripped out).  I'm in the process of securing the pesky piping so it all lays smoothly.  I expect it will be off in 3-4 days, will undergo a little more pickout, and then go back on the frame (sigh...another hour wasted) to be wrapped up.  Now, how on earth do I block something this large???

Tuesday, October 16, 2012

Colorweaves Top is done

I am finished with this little 38" quilt top.  Though I like the look of the pure solid colors, I am SO ready to get back to working with batiks, or other fabrics that are thin and non-ravelly.  I appliqued the curved mustard-colored section down by hand so that I could piece the outer 2 borders in a way that the stripes remained perfectly straight, but the crazy fabric nearly raveled off in my hands.  I am 50-50 with whether I really love this.  Since it shouldn't take a huge amount of time to actually quilt it, I will finish the project and hope for the best.  I had been designing the quilting all along, and now just need to tweak a few things, finish a few client quilts, then I will quilt it.

Tomorrow I finish a client's 3rd quilt and I hope to have some great eye-candy to show.

Thursday, October 11, 2012

Indecision Brought to a Forum

For the most part, my little Crossweaves solid quilt has been on hold for a week.  I have been quilting away on several client quilts, and I hit a brick wall on the quilt's construction.  I had gotten the quilt to this point a week or two ago, and like the look of the rose and red border.  You all know me well enough to know that I have too much trouble taking the easy way out.  Why I didn't do a single color border initially is not known.  I had a 1/2 yard of many different colors, and really wanted to bring the variety of these colors into the quilt. 

Problem is this, though.  This quilt will only finish at about 38-39", and these are thicker fabrics.  So the more I piece them, the more I get bulk.  I had the top all layed out with the next triangular sections, but after hand sewing (yea, long story short...I couldn't get proper alignment of the narrow 1/2" borders, so I glued it and hand stitched the diamond to the triangles.), I discovered that it just wouldn't lay down at the seams.  I was ticked.  I had dealt with the bulk acceptably on all of the pieced blocks, so why not now?  

So the clearest solution seemed to be to take it all apart and eliminate the pieced pink border, which I really liked, and make it a continuous/solid border.  Boring, my mind thought, but easier.  The next step was to select the border color, cut and sew.  Seemed simple and fast.  Ha!  It was anything but fast. I had an idea what fabric I'd choose, but instead, I posted some possibilities to my facebook buddies to get some other opinions.  The first six posted had solid borders.  Not to my surprise, most either selected the red or the aqua.  A few chose the brown, despite my knowing that I didn't have enough brown fabric.  What was my inclination, you wonder?... (or not wonder)...#1, the beige.
 But before making up my mind, I decided to add some corner stones, just so I could add a pop of a different color.  Some folks disliked these right off.  The overwhelming favorite, though, was the bottom right one  - aqua with red.  Ick.  I do not care for aqua and red together whatsoever.  It's too trendy-retro 50's for me.  Each color is great by itself, but not together.  As I said initially, I got lots of opinions, and that is what I wanted, hoping one of them might spark a design choice I had not thought of.
 My last effort involved streamlining the corner stones to a more refined shape.  Since lots of people liked the aqua, I showed this one.  And because I preferred the beige, I added it.  To twist it a little, I made the corner diamonds in a deep rose, not the red.  By this point, I think people were falling asleep on my indecision, but I'd made up my mind I'd go beige.  I'd have more blank space for quilting.  And, I really didn't care for the aqua because the triangles seem to blend in with it too much.
Today, after 4 hours of quilting, it was time to mess with this border.  I got out my fabrics, and to my horror discovered that I did not have enough of the beige.  DRAT.   What I settled on was a fabric I had not even considered before though.    These are crossweaves -- so the warp is one color and the weft is another.  The fabric I chose appears red in some situations, and peachy in others.  It has a red warp and a tan weft.  When  it is beside red, it looks like a paler red.  I did use the red diamond points, instead of the pink and they look good.
All put back together, and happily I can report that triangles came in perfect alignment the first time (using the machine too!).  One more border to figure out how to get on with decent lines, and it is DONE (or I should say, ready to be quilted)! 
 It is always pleasing to get a finished product that I like better than my initial designs were!

Thursday, October 04, 2012

A Scattered but Productive Existence

This has been a busy month for me.  I adjusted to the kids all being gone 7hrs a day rather quickly.  I have to keep up the productivity today, as they'll be home until Tuesday (husband works Monday), so the amount of quilting will be minimal after noon tomorrow.  Despite all the time I apparently have, it always seems to go fast, making me wonder how and when I will ever complete all that I have to do.  

I have a good amount of client work right now.  Mind you, I seem to backlog only what can be done in a few weeks.  I will never be the type of quilter that will continue to take client quilts when I know it will be 6 months until I actually get to them.  I know how to put my own quilting on hold to keep the client work up to date.  This week I have been working on some rather mundane and very large quilts.  I don't mean that the quilt itself is boring, but quilting an E2E on a 110" quilt (or two of them) does get mind-numbing after a while.    To keep me interested, I have been running 2 passes of the pattern, then taking a break to do 30 minutes of piecing on this solids quilt.  I have 2 more corners to piece and then I will probably show something.  After doing that, I decided I would sit down and sketch on the quilting plan for this quilt with Photoshop.  I'm getting psyched to quilt it -- nothing like diving into a nice small 40" custom to get a quilter excited!  In the evenings this month, I am focused on only one of my applique projects.  That way, maybe I will actually make enough progress to start putting the sections together on this quilt.   Gosh, I can't believe it was mid-summer when I worked on this last...talk about scatterminded.  And lastly, I have had the Giant green Dresden out, with the seam picker, removing the errors.  The silk thread is a bitch to remove, especially if it is tensioned well (which most of it is, sigh!).  Once I have client work caught up, I will put this on the frame for a week of finishing.  Hopefully that will be before Thanksgiving.

In the meantime, here is the 3rd custom quilt I did last week, and appropriate for the season.  I did one of these 2 years ago, so I had some of the same ideas, and cardstock templates still.
I added some fun things (hope the owner finds them fun...) in the Jackolanterns...the cat gathered some fishies, while googly-eyes below him just got candy.

 The next guy has lots of bubbles, but the owl has some fun feathers.  I think they are playful, and hope she does as well.
 The bottom embroidery just says "Boo", with some fun fillers.  I don't have a good shot of the top embroidery, but it got a few bats and a full moon, with flames below the banner"Halloween".
And in each corner of the quilt is a spider web, with a very prominent green spider.  ONLY for Halloween will I allow spiders, anywhere!
 I will have more to share next week, provided I actually get out from behind this computer and work!  So, have a good one-