
My days are needing a distraction, so I thought I'd get back to the posts I have envisioned to do on the making of The Value of Violet. This post discusses the quilted scallop binding I put on this quilt.

I tried to take photographs throughout the making of this binding edge, but I do know (in retrospect) that I did not capture all of the steps quite as thoroughly as I would have liked.
***added...
When I initially wrote this post, I failed to mention the importance of this step. When embarking on creating a new (or in this case somewhat experimental) edge treatment, making a mock-up is really important. Below I am showing both the mock-up I did for a previous quilt, as well as the one done for The Value of Violet. At this point in my thinking process, they were very similar. I was unsure of how the narrow lavender 1/2" strip of silk Radiance would behave, in the latter case.

********
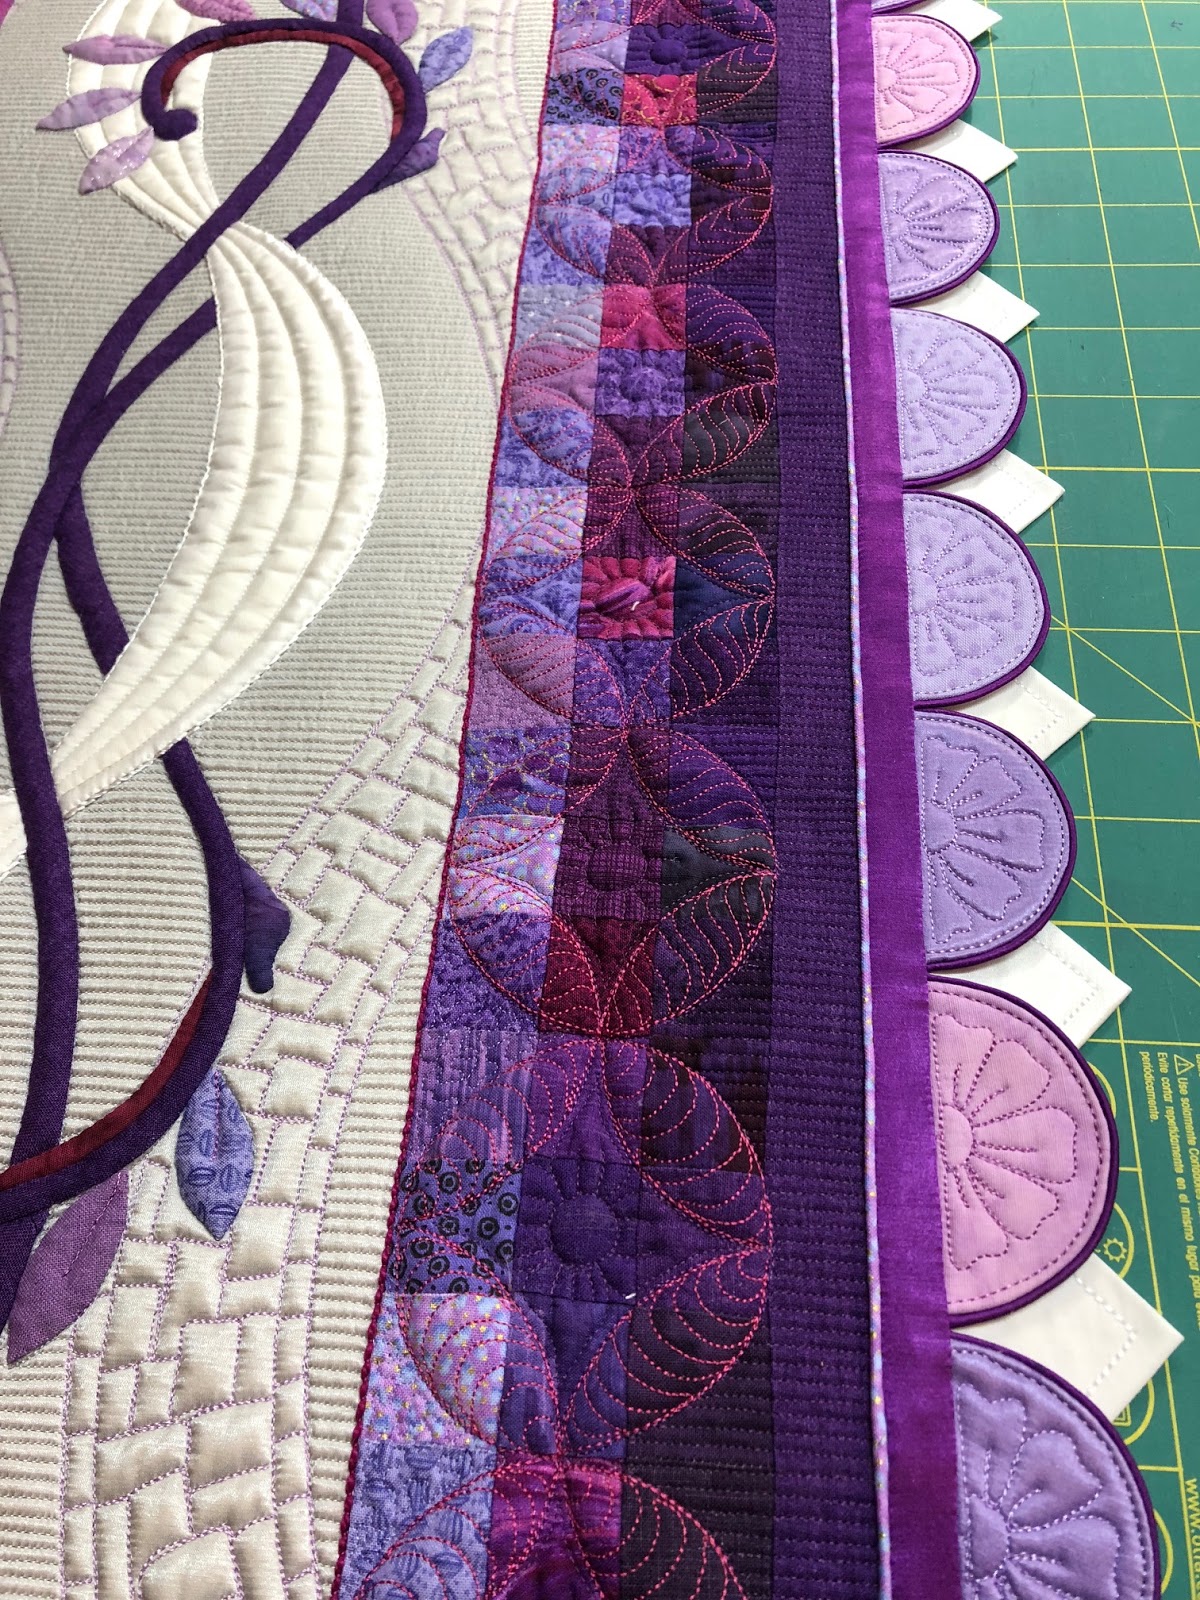
As you can see from the first two photos, the scallops are made from several different shades of the lavender fabrics. There are also some done from the silk Radiance (below). I just did not have enough of the Radiance to do all of them. The first step is to determine what size/diameter scallop will be used. The pieces of fabric are cut a bit larger than this, but I always mark a boundary for where the finished seam will go so that quilting does not extend further than there. These are quilted on my long arm -- this is mostly because I find it easier to do, and I am really not a very good domestic machine quilter.

I made 104 scallops. The initial quilting on the scallop just has a cheap muslin on the backside and Hobbs 80/20 as the batting. Each color scallop has a thread that best compliments its shade. I quilted a simple half-flower design on each, after first playing with several other options.
Below, the quilted scallop is seen from the backside (muslin side). The plastic gig is centered on the quilting, traced, and then the scallop is cut out.The soft fabrics distort and stretch some, so using the original marking on the front of the shape is not the most accurate way to end up with a semicircle.

Here are some of these cut out, seen from both the back and the front.

I made up several samples before delving into the actual scallops. The one on the left is just finished as I would have done a previous quilt (Taking the Unmapped Road), while I the one on the right is amped up by the addition of a micro-piping. Adding the piping was complete craziness, but I loved how it completed the look, making it appear more finished. Chaching...this was bound to add at least 50 hours to the project!...

As luck would have it, I had a yard or two of this grape Radiance which had not yet been used on the quilt. I cut strips of bias about 1" wide (if memory serves correctly). The Radiance is wrapped around a piece of very fine cording, and is stitched with a zipper foot using a matching silk thread. I don't know how many yards of this stuff I made, but quite a few.

Next, it is trimmed using Susan Cleveland's trimming tool to have a consistent 1/4" seam.

Now I get handy with the iron and Elmer's glue. Pieces of the piping are glue set around the perimeter of the scallop. The glue is heat set with the iron. You could pin them, but the presence of the cording makes pins a pain in the rump to deal with.

I immediately stitch the piping down, again with the silk thread.

The next step is blind. These scallops are backed with the same fabric I used for the backside of the quilt, for a continuous look. I cut 104 "backs" using the same gig shown earlier. the backs are pinned onto the top of this piped, quilted scallop. The pieces are carefully stitched together with a zipper foot. I use my fingernail to locate where the piping is so that the stitched line is right beside it. It is a slow process, and often required going back and moving the stitched line a bit closer as needed.

Turn the scallop right-side-out to inspect, and "tweak" as needed. If it was ok, then a second line of stitching was placed 1/8" outboard of the first. Note, in both cases I am using a very short stitch length and a 50wt poly thread.


And now from the front -


It was not enough to just create perfect scallops. Now they have to be turned into the binding.
I measured the edge of the quilt, going one side of the quilt at a time. A 1" strip of the grape radiance (this time interfaced) was cut, marking the exact length. Scallops were placed along this and stitched on. For several weeks, I puttered with ways to jazz this simple binding just a little, each time really wanting to bring some of the white into it. Call me a nut, but my eye wanted to have a dash of white at the outer edge. I played with using a cording (below). Interesting, but too much finicky hand work was my final assessment.


13 comments:
My GOSH Margaret! No wonder you win prize after prize. Your work is spectacular and what a thrill to get to "follow" you through some of your process. Thank you so much for sharing!
maggie
I had the pleasure of seeing this quilt at MAQF. Indeed, I stood and studied it for some time. It is extremely beautiful, and I was really pleased you got the viewer's choice ribbon for the quilt. Well done. You almost always do a wonderful quilt, but I think this is one of my favorites of yours.
This is absolutely stunning detailed work. I love fine, thought out details. I appreciate you talking through your design process and decision making. I really love your work. Thank you for sharing.
Wow, thank you for sharing your progression, hiccups and all. You have so much imagination and I admire the way you just kept on going knowing what you wanted and finding ways to get it. Congratulations on such a lovely finish.
It really is eye-opening the amount of thought, work and trial and error that goes into your designs. It must be so rewarding to have them recognized with awards at so many shows.
Thank you for your explanation of your process for the binding and all the quilting you do. Your patience, design esthetic and skill is so very admirable.
Your quilts are so very beautiful.
Insane, but magnificent... thanks for sharing
Thank you for sharing all of your photos and your process. Your work is stunning.
This quilt is stunning and it is so interesting to see your process. Not many of us would be willing to do the work required to end up with this result! I am way too lazy myself! The award was well deserved and I'm glad you received it! Thank you so much for continuing to inspire me! (Purple is my favorite color and this quilt represents well!)
Simply fabulous!!! Thank you for walking us through how you created this amazing binding!! I'm definitely saving this post...I don't know if I'll ever create a binding like this, but it is a goal to aim for!!
This is my favorite binding that you've done so far! It's so over the top and gorgeous-GORGEOUS - - how anyone not completely love it? Thank you for showing us the details of how you engineered it and carried out the stitching. You're always so generous that way. <3
OMG, the detail in the binding is incredible. Took almost as long as the main body of the quilt, no doubt! Just a head's up about Kaufman Radiance: I've been chatting with Robert Kaufman - specifically Sandie McCann. I have asked (more like begged) her to please put in a word for all of us quilters to please, please bring back Radiance. They felt they had to discontinue this incredible fabric line due to the rising cost of the silk they were sourcing, to make the fabric. I told them SO SO many competitive quilters us this specific fabric, and pretty sure none of them (and the rest of us regular quilters) would balk at a small price increase, if we could still purchase this gorgeous, one of a kind fabric. She was going to put in a word and request, but if we can spread the word amongst competition quilters, and send a request to Sandie McCann at Robert Kaufman to please bring Radiance back, that might sway Robert Kaufman! Her email address is: smccann@robertkaufman.com
Patty S.
Thank you for sharing your process and magnificent quilting....so much beauty.
Post a Comment