Monday, February 26, 2018

Fun at MAQF

Mid Atlantic Quilt Festival has been on my short list of shows I have wanted to attend for some time. Though I have entered it many times, I have never attended. This is the second year that they have offered longarm classes, and as luck would have it, they invited me to teach! I was delighted to jump at the chance, even though it adds to my crazy winter.

I taught six 4-hr hand's on long arm classes over 3 days. I knew it would be an exhausting week, which it was. Three of my classes were 12-person classes, and three were 24-person classes. It's the latter ones that keep you moving the entire class. Twelve students is busy, but in a controlled manner. Twenty-four just leaves you needing a nap when the class is done!

I taught my two favorite fills classes - Dense & Dainty (the freehand fills) and Beautiful Backgrounds (grid based fills) on Thursday. Here are my students hard at work in the well-cared-for Innova room. Matt and Keith keep the machines humming right along.
 I don't usually take a full-class staged photo at the end of class, but I did manage to catch a few of my students showing off their lovely samplers of gridded fillers.   Both classes are freehand, but this one utilizes a marked grid on the fabrics.
Dense & Dainty had 24 students (the other 12 non quilters were busy drawing when I snapped this photo). When I split the class into groups, I send 12 to the longarms, and keep the other 12 at the desks. A timer is started to keep things fair. Then I continue to present designs and concepts for about 1/2 of the session. During the other half, the sitters get to draw while I go around to each machine helping each quilter. It seems to work well.
 Here's a better look at one of my samples that was quilted for this class.
On Friday, I had a beginner Feathers class as well as Templates 101. These are both intended for those who are truly newer to quilting feathers (or templates). The feathers class is the 24-quilter class, which works well because there is a good amount of drawing.

Here are two of my Templates 101 quilters working with a straight template, a 12" diameter arc and a 4" circle. Patterns are relatively simple at this level, but are the foundation for all more complicated designs to come. The ladies did wonderfully.
I used to teach a templates class called Ruler the Roost which was a good class, but the true beginners struggled a bit. Splitting the class into two distinct levels worked much better. 

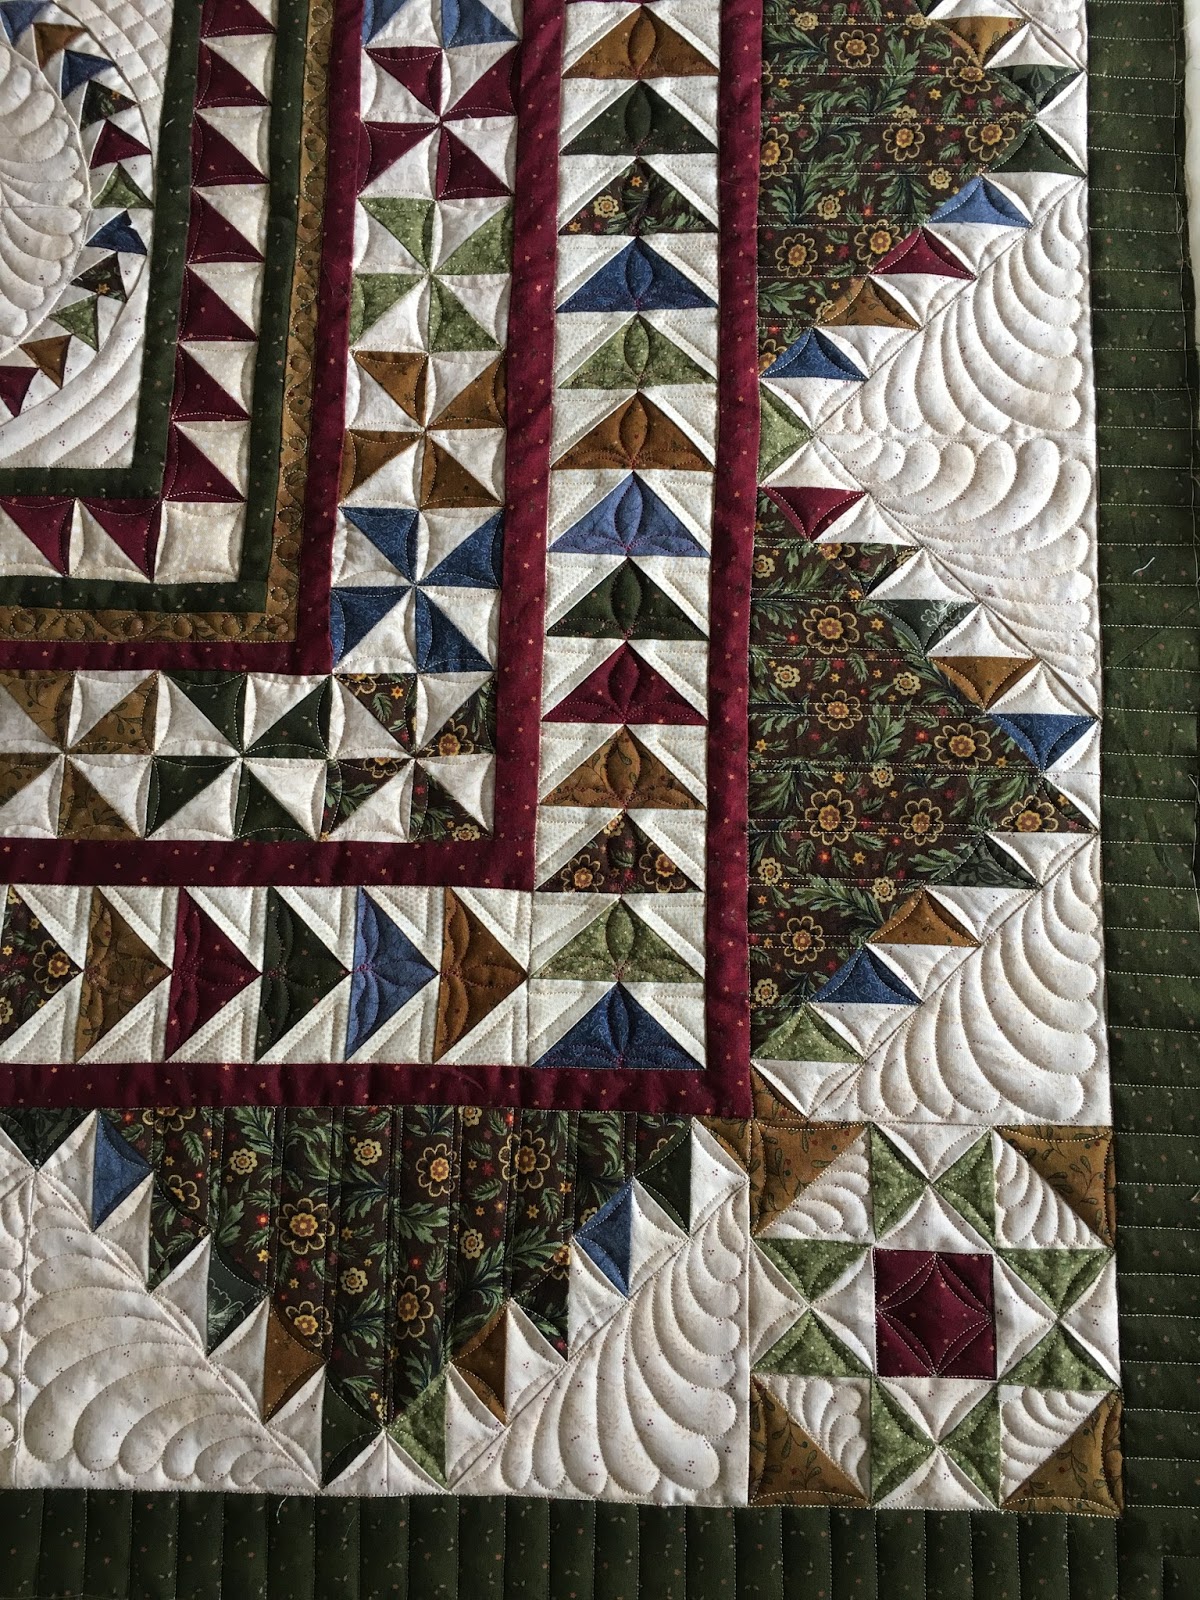
My classes Saturday were Narrow Borders and the Creative Templates 2. Narrow Borders, the large group, quilted about 24 borders suited nicely to borders 3-4" wide or less. These start simpler and get progressively more complex as borders get wider. Most quilters did great with them.

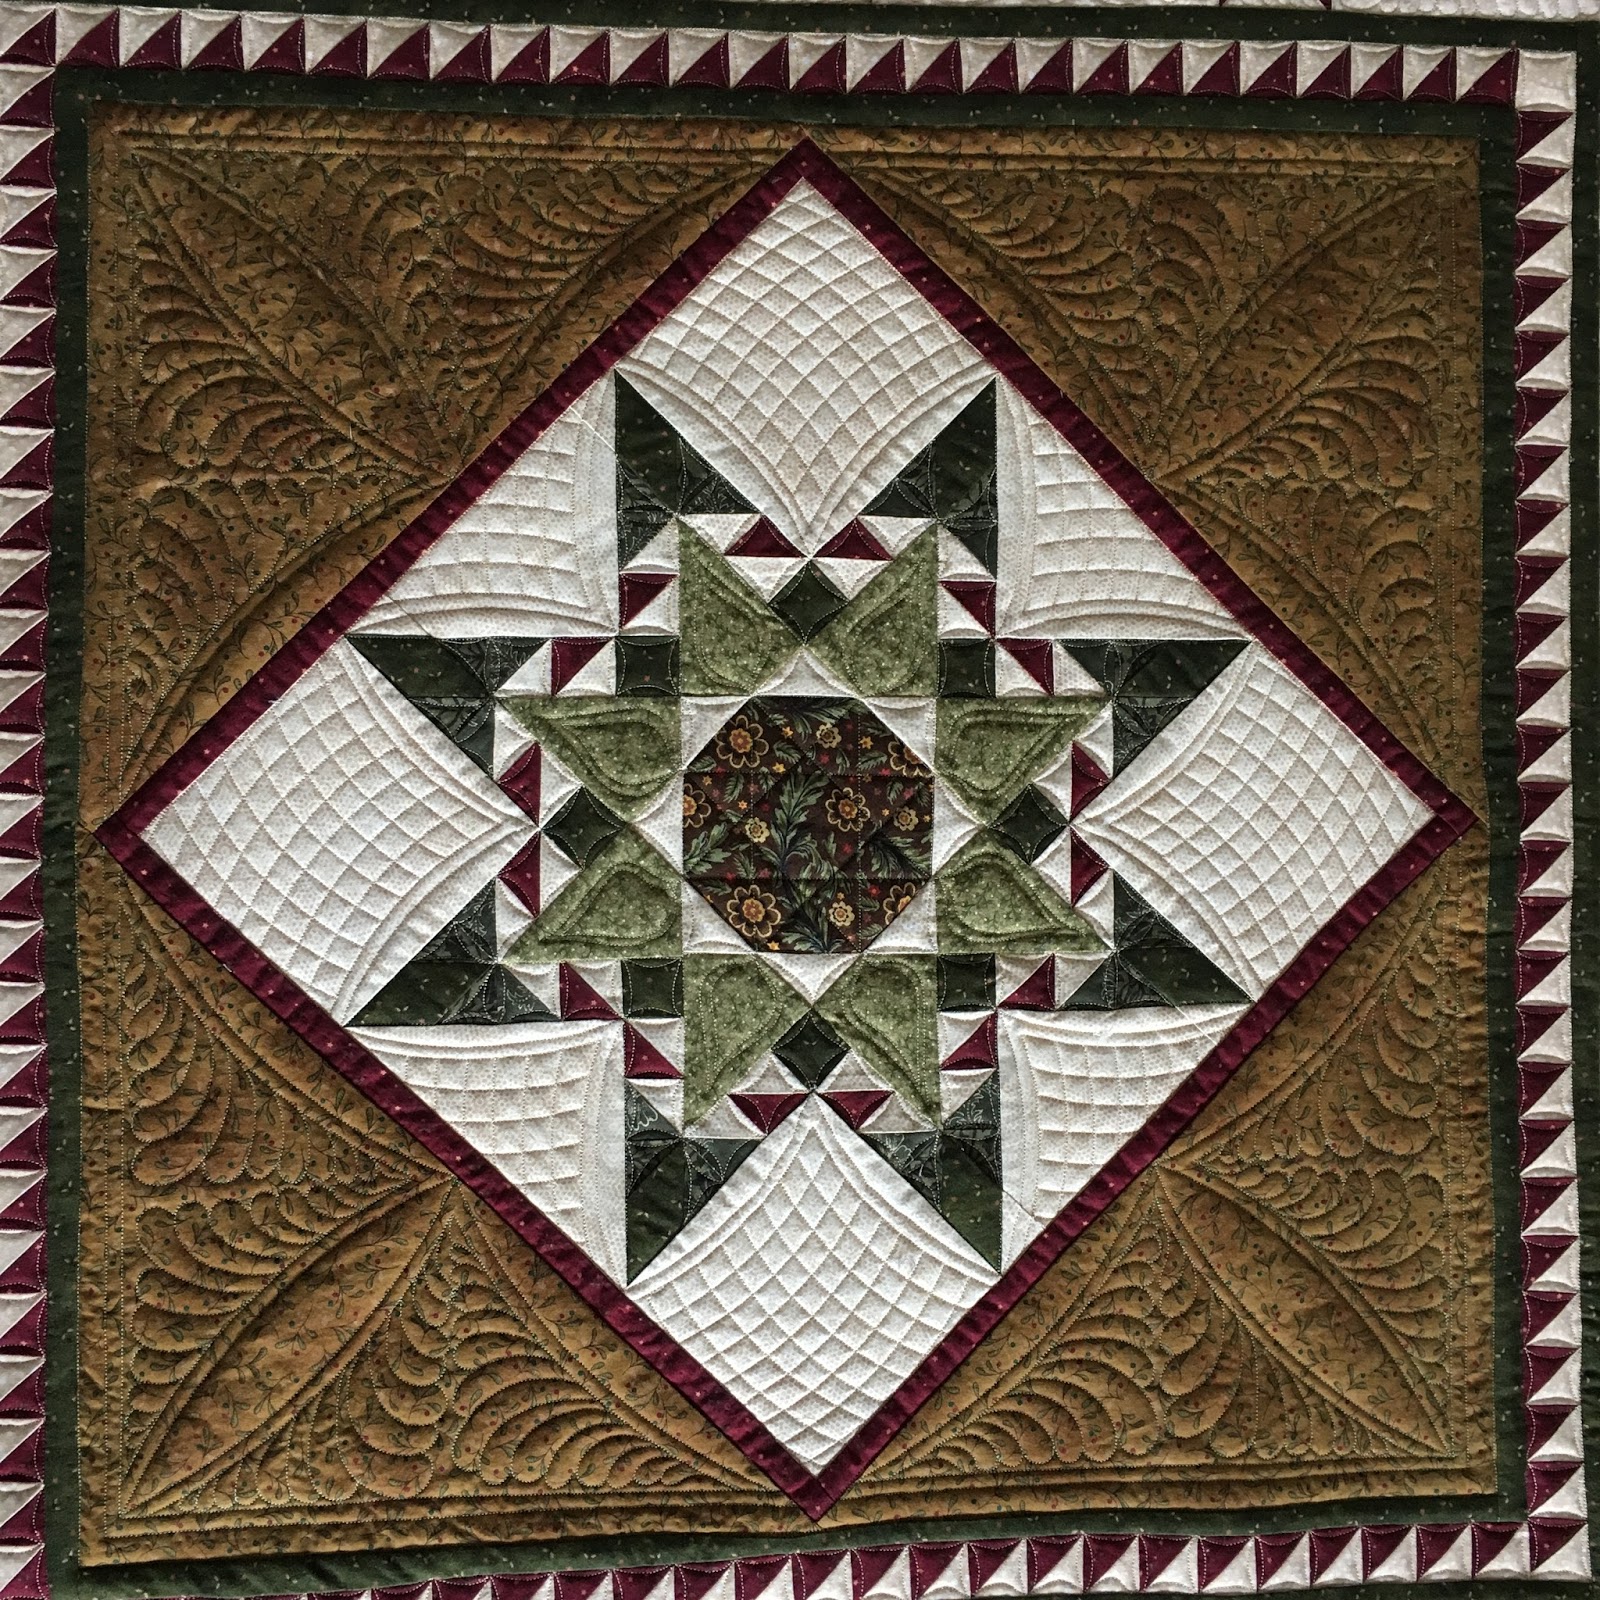
Creative Templates 2 is the second templates class intended for those who already do basic template designs like line work or crosshatching. I was so worried that the sampler I had planned for this class would be way too complicated, but the students rocked it.  I taught them how to make mandalas, and how this design may be altered with small changes. We did cathedral windows, as well as a couple of fun background designs that are implemented with a stencil and a template.
 Here is the other background design quilted with a 4" circle.
 This quilter had the cursed blue thread which hides nowhere, but she still did a great job!
It was a good teaching experience. The staff has been well-coordinated and excellent to work with from the first communication. I am definitely impressed. Thanks to my 108 students...you all did a fantastic job too. Keep me posted on how you use what you learned!

Friday, February 16, 2018

Others' Renditions of my Quilts

Over the years when my quilt Zen Garden was showing, I received numerous requests about if I had a pattern. At that time, I was not really interested in patterning it. I really was not sure that I wanted other people making "my" quilt. Time passed, that feeling faded, and then AQS asked me to do the book shown below. This was their last published book, although it was initially conceived to be a series of books where there would be other similar quilter's stories also published. The book contains patterns for three quilts, as well as many large color photos of the quilts. 
I fought hard to have the interior of the book be something that I am proud of. It is all color. The patterns detail how to make the quilts using both paper-piecing and regular piecing. There are lots of instructions and line diagrams for the quilting motifs that I chose. This book has 160 pages! 
 detailed piecing instructions and quilting diagrams
That said, I really was not sure how realistic my quilts would be with the general quilting public. They can be complex, and getting what was inside of my brain at the time of their making into a book was truly challenging. 

Never the less, in the past 2 months, I have heard from 2 quilters who have endeavored to make one of my quilts. I am so blessed that they chose to share their creations with me.

The first one is Molly's rendition of my Zen Garden quilt, shown below.

She did a remarkable job matching the star to what I did in terms of colors. It just blooms! Her outer borders were altered a bit. This photo has the quilting finished, though I suspect it is difficult to see without the ability to zoom. She did a great job!
The second quilt is by Tracey B., an Australian quilter. She has made my Bouquet Royale quilt (shown below). 

Her color scheme is considerably different, but it looks like some of the hexie blocks are still fussy-cut. Being a huge fan of purple and aqua, I could have seriously seen myself using these colors (if I was not completely smitten with orange at the time!).

A couple of weeks ago, she also sent me a couple pictures of the quilting in progress. She's using some of the motifs I designed for this quilt, as well as choices of her own. I cannot wait to see this finished. It is absolutely stunning at this point!

 
Where can you get your copy of this book?...on my website (right sidebar) as long as quantities last or on the AQS website. If there is anybody else out there working on any of these quilts, please feel free to email me and share your work. I love to see it (and only post it socially if I am told it is ok).

Happy Friday!

Monday, February 12, 2018

Its a beautiful day in the neighborhood

Here is another stinking cute wall quilt sent to me by a long-time client. It's about 42"x42" and has some cottons and some wools for applique.  For lack of it's appropriate name, I call it the Neighborhood quilt.  She sent a thin cotton batting, but I added a layer of wool to really pup the appliques. Additionally, these reproduction prints are known for being "busy", and busy prints hide the quilting designs.  Having added batting makes the relief of their quilting designs that much more visible.
I pulled a soft yellow variegated thread by YLI for the background. The rest of the houses got either pink, green or purple thread - whichever type matched best. Although it is not really visible, there is also some stitching in black on the windows and doors.  I just wanted to give the appliques some definition -- window paning or an echo on the door. 

 The stitching on the houses is often very simple, so as not to compete with the prints. Linear designs are usually better for these fabrics.  Every now and then, though, I threw in a brick or block pattern though.
 I just love the scalloped roofs. These are freehand clamshells. Most of the designs are detailed in my Dense & Dainty book.
 Making some of the lines go horizontal, while others are vertical makes the houses more visibly interesting.  When there was room, puffs of smoke was quilted coming out of the chimneys. It is a whimsical village with hints of realism.
One last pink house...
 Backs are always fun to see when they are mostly solid.
  
Today was a "fun" day, and I use that word loosely, packing up teaching things and books to ship to Virginia. I have a whopping 140lb of stuff, AND I plan to check 2 very large suitcases. Teaching 6 classes takes a heck of a lot of stuff. I have a bit of prep still to do for one of my new classes, but the others should be autopilot by now!

This weekend I get to shift gears and help my daughter quilt her newest quilt. All I can say is thank goodness it is nice and small!


Tuesday, February 06, 2018

Client Medallion Quilt

 My client Doris spent much of last year piecing this quilt from the Quilt Show. It is a medallion style design with a whopping 17 borders!  There are more 1/2" narrow borders than I care to remember, and miraculously, it laid pretty straight and square after I was done quilting.
Here are the threads I pulled for this job. Most of it uses this tan Magnifico thread. It showed just a tad on all the ivory fabrics, but not too much. The other two colors were for more localized work, when the tan was just too light. They are similar to the Magnifico -- Glide.
The quilt has a single wool batting. Though Doris plans to enter it in the Vermont Quilt show next year, it will ultimately go on her bed. Double batting just to enhance the quilting for one show seemed silly. Most people don't want a double-batted bed quilt. I'm the rare exception because I am always cold, and I just love the added weight.
I tried to maintain some consistency of patterns from row to row to row. There are several places where the continuous curves are used. It's not because I couldn't think of something different, but because they do work nicely, they are continuously quilted, which makes it a cost-efficient motif to use when budget is a concern.  Places that benefit from more time-consuming designs, like these rounded geese - well, that is where I put more time. It's all about getting the most bang for your buck. Spend time where it will show. The feathers are pretty; most clients like them. But for me, they are not usually an overly time-consuming element. The crosshatching, on the other hand, does take more time. Together, though, they are a nice combo.
The same is true for feathers and linear work. Nice together. The feathery fill (above) around these stars is not the fastest, BUT I am able to quilt the fill and the ditching around the stars and the details on the stars continuously, without stopping. THAT to me, is reason to choose this. Stopping and starting is like the devil's work. No thank you.
 You always seek to create a center motif that has a little drama -- something to draw the viewer's eye to the middle of the quilt. There's a little bit of feathering, a little crosshatching, and a little continuous curves. Repeat, Resize, Reuse. It may be hard to see, but I quilted on the tan print with the deep green thread, just to make these feathers show a little bit more.
 ...and a little more close up.
The little rings of geese were initially like this, but I decided that was just not right. I don;t really like the puffy goose look, and I didn't have time to ditch and backfill around all of them.
I came back with the red thread and did a small-arc continuous curve design through the geese. It's just enough to lay it in place better.
The larger geese also got a similar design. These are probably 2-1/2 or 3" geese, and again, I did not have budget to ditch all of them. This ribbon-like continuous pattern quilts relatively quickly (and by quick, I mean probably an hour to do the entire loop of geese!).
So, I hope Doris likes her quilt as much as I do. They always undergo a transformation when they convert from flimsy to quilt! I love the grand reveals.

Here's my shameless plug...If you'd like to learn how to quilt all of the feathery motifs shown on this quilt (and dozens more), they are all individually shown in my book (available from the link on the right sidebar). They are fun and beautiful, and can be learned by all quilters.
Happy Tuesday...Quilt on!