Thursday, December 13, 2018

Book Sale

Over on my business Facebook page, I am running a holiday book sale. This is not something I do often. My books are chocked full of great information. On top of having more pages and designs than most, they are priced on average about $5 less than other quilter's books too! Never the less, I am running a holiday sale through midnight Monday. The dollars saved depends on the number of books ordered. US orders only.

Buy any two , save $3. Buy any 3, save $5, Buy any 4, save $6. Buy all 5, save $7. The sale ends in 5 days so I can get them priority shipped to everybody (in the US) by the 24th.

Treat yourself (you know you want to...!) or get a great gift for the quilter in your life.

All books are at MainelyQuiltsofLove.com or just click the links on the right side of this blog.
------------------------------------------------------------------------------------------------------

Come back next week when I will give the details about a stash-busting giveaway! Somebody's studio is overflowing, if you catch my drift.

Wednesday, December 05, 2018

Still Dreaming

I haven't hardly sat still all fall. I haven't written a blog post in over a month either...My bad. It is certainly not because of not quilting. I have spent considerable time getting a couple of new classes -- their content, hand outs and custom fabrics prepared. Nothing is truly quick.

In the last 2 weeks, I have quilted two more of these beautiful Dream Big panels. This blue/purple colorway is stunning. It is hands down the hardest one I have done in terms of marking though. Neither the blue or purple pens show very well, and the fabric has enough texturizing in its coloring that using chalk is even pretty hard to see. There are a few grid-based designs, but not as many as I might have done had marking been simpler.
Like all of the Dream Big panels I have done, both of these quilts have wool and blend battings. The combo gives so much more to the texture of the fill designs. 
 The threads are all variations of 40wt thread - some Superior Magnifico, some YLI Polished Poly and some Glide. Which one I pick depends on the color needed.
I try to vary which fills I place beside one another so that linear designs go beside more flowy patterns, and vise versa. It helps all patterns to show up that much more. 
Both of these quilts had solid fabric backings. This is a pale lavender that did not photograph well.
It sure shows the patterns though!

The second quilt is the pink variation. I did one of these for myself to use teaching.
This panel has many of the same fills as the purple one, but several are different too. It is a liberating process of quilting these!
This variation has mostly backfills, but I always throw in 4-6 petals of feathers too. About 6 of the fills also use the marked grid. It makes for a lovely mix of textures.
 Some fills are very traditional, while others are edgier and more modern.

If you have one of these panels and might like it quilted, give me a shout (msolomo1@maine.rr.com). Likewise, steps for how you can quilt these patterns and feathers are included in my books (the green books are the fills, and Fearless Feathers) - just click on the icons on the right sidebar. 

I'm about to load a lovely wool applique quilt next :-)
Quilt on!


Tuesday, October 30, 2018

Dreaming Big x 2

Happy Tuesday! This week is about dreaming Big. A client sent me two of these gorgeous 44" panels to quilt. I did two earlier in the year to showcase fills and feathers from my books. I use these in my classes when teaching. I have a lineup of quilters interested in having me quilt panels for them similar to the ones here. It's a fun quilt to stitch - who doesn't love a job that is finished in just a couple days?!

So without further adieu, here is the aqua panel.
Here are the 40 wt threads I used...starting at the center with the lime, going to the deeper shades at the outer edge.
Both quilts have 2 layers of batting, 80/20 on the bottom and a wool on the top. This gives the intense texture that each pattern needs. I quilted a different design in each petal, after outlining the petal. I try to keep linear designs beside more swirly patterns so that each shows better. As I near the end of the panel, I find myself consulting my samples for other fills not used. It's a fun process, but sometimes it is hard to find a 47th unique pattern!
 I am always amazed how creative and unique these patterns look when quilted this way, even if many people might not use some of them often. It's the "variety is the spice of life" in action!
 These are a combination of purely freehand fills as well as fills that rely on a premarked grid. I have used square grids on this blue panel as well as a hexagon grid.
 Some of the patterns also need a small bit of marking to execute - it's my secret crutch. The bricks design (below) would be a pure disaster without some premarking!
 There are also some fills in these samplers that will debut in a new class next year, as well as a new fills book (assuming I get off my firmly planted lazy butt and get it started!).

 Seen enough blue?...
OK, then, let's move on to the orange panel. I just love orange, so this may be my favorite.
I ran into a bit of a "oopsie" on this piece. To make it more frustrating, I didn't notice the severity of the bumble until the panel was off and laying in my hallway being photographed.

The center of the flower just looked wonky. At first I tried to rationalize that the center IS awkward, but in the end, I grabbed the seam ripper and made a modification.
 Here's the finished "tweak", looking much more au-natural, and less like one petal was on steroids.
 Like the aqua panel, several threads were used. These are all 40wt, and are either YLI Polished poly (my personal fave) or Superior Magnifico/Fantastico or Glide. They stitch out very similarly, but the YLI is slightly lower sheen and seems to tension easier. It is the larger yellow cone below.
Many of the patterns will look familiar, but I know I used several that were different too.
 Quilted texture is just delicious!  Outboard of the petals is a tight 1/8" matchstick quilting in the deepest color. It frames the quilt nicely. If you are curious how I do this, I uploaded a short video to my facebook business page today.  I am not a skilled videographer, and only have my iphone as a camera, so don't expect ultra-high quality. I do think that the video addresses many of the questions I have received over the last few years.
 Feathers, flowers & leaves  OH My!
 Bamboo, modern checkerboard, ribbons and more!
Hopefully you enjoy seeing the many photos as much as I struggle to pick just a few photos of these pretty quilts to share. Remember... Most of these feathers and fills are taught within my books (see the right sidebar...the green fills books and the gold feathers book). I show photos as well as detailed and numbered illustrations. You, too, can quilt your Dream Big panel similarly.

Or if you prefer to have me quilt it, just drop me an email msolomo1 at Maine dot rr dot com.

One more bit of excitement hit our house last week...we got a new baby. At first, "he" was named Simon. On Friday, the vet informed us that Simon did not have all the male kitten parts we thought he had.  A-hem...Simon was going to need spaying.  Begrudgingly, we came up with another name, Bella. We're pretty smitten. She's a mighty lovable 9 week old kitten. I could most definitely become the crazy old cat lady. LOL!


Tuesday, October 23, 2018

Quilt Catchup

It is not that I have not been sufficiently busy. I have become poor at posting to my blog since the advent of facebook. That app has become the time-suck of life!

This post is a wrap-up of some quilts I have done in the last couple months (not counting work I have done on at least 3 of my own quilts).

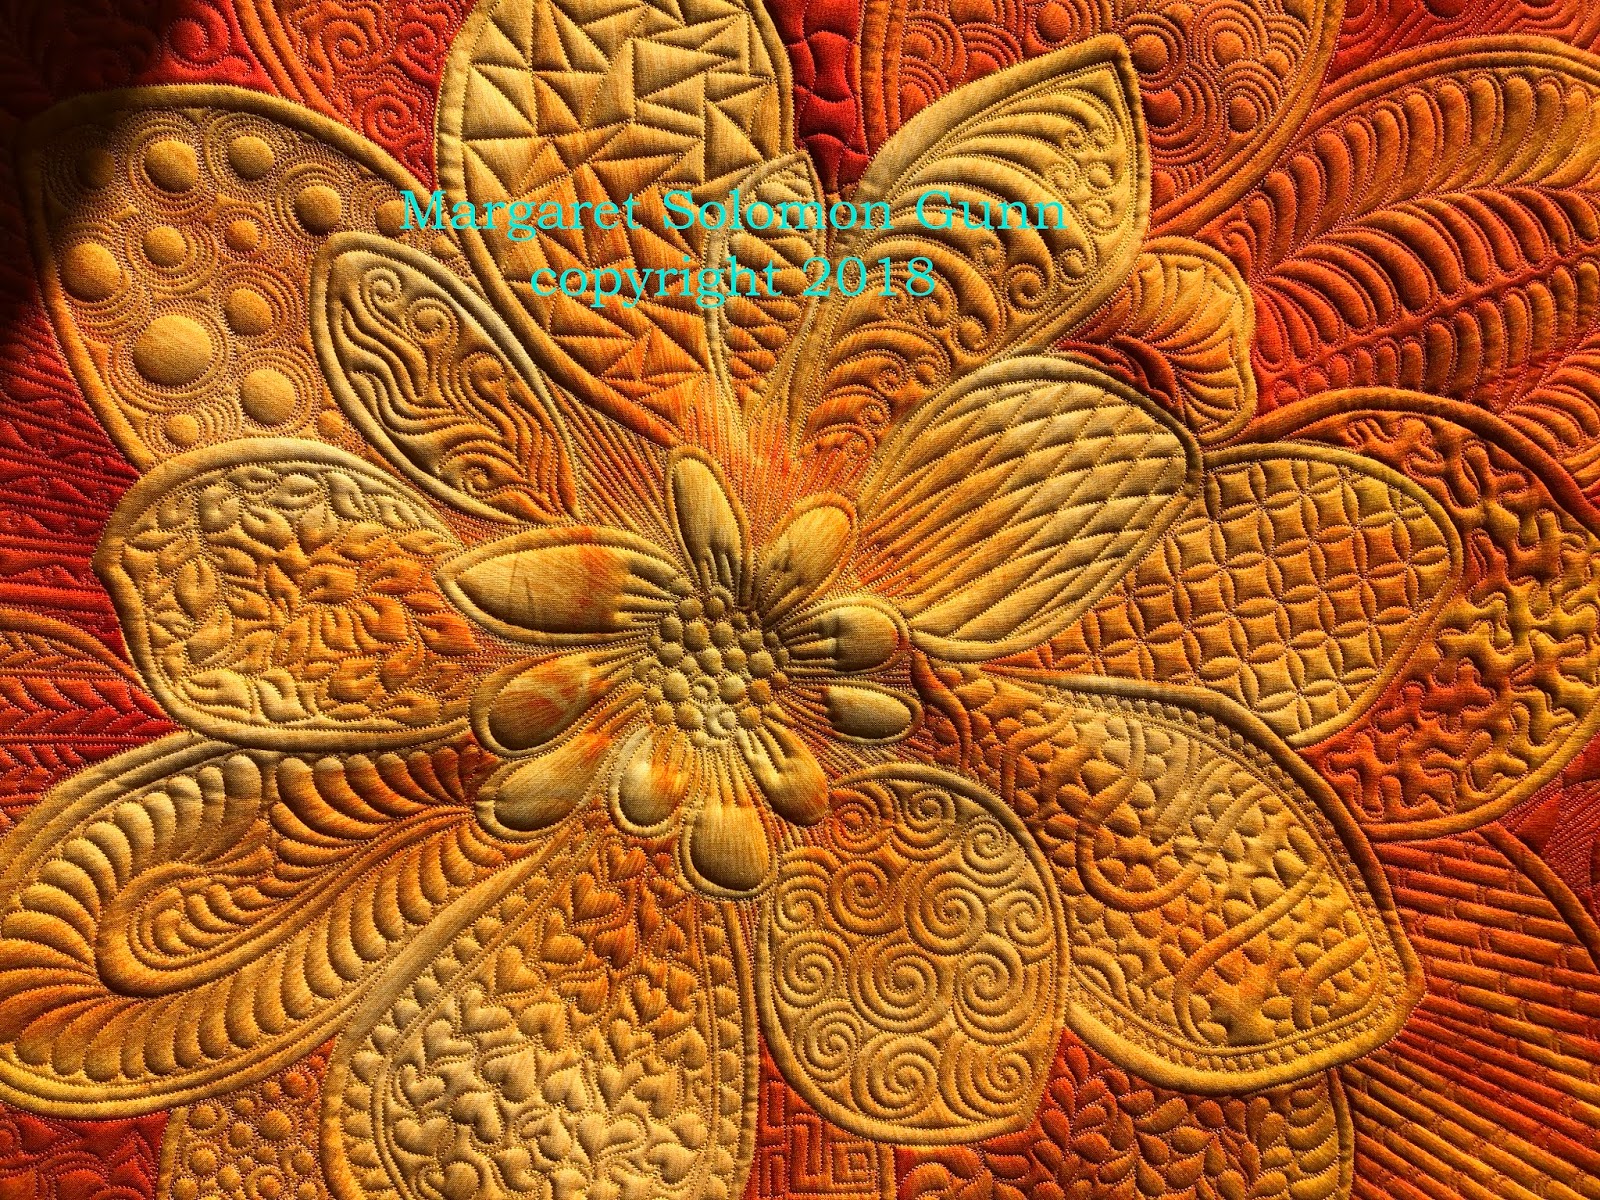
This first one was brought to me by a local woman. She'd made this for her son and daughter-in-law for their wedding. As her story goes, her son had a stuffed elephant as a child and the DIL had a stuffed worm. The quilt was supposed to depict both of them, in her own original way. She initially had another quilter longarm quilt it (first photo). She was very dissatisfied with the quilting because some of it was very open and didn't fit the piecing. Other areas of the quilting were poorly thought out, having wide open stippling instead of something a bit more visually interesting. Scales of quilting from section to section were not at all similar. 
 (original quilting by previous quilter)

The owner ripped out a lot of the original quilting before I got the quilt. My job was to make the elephant more interesting, replacing decorative quilting where wide open stippling had been. I also ditch stitched all applique seams to make it lay better.
 The other thing she had me do was add something into the background to fill it in more. I never would have chosen what the previous quilter did. It was computerized and did not fit the piecing at all. This type of piecing has so many options for easy continuous quilting with way more interest, but since I didn't want to rip out what was there, all I could do was add to it, as continuously as possible. It sits beside that fairly dense stipple, so leaving as is was not happening.
 I don't really love what I added, but it fills it in better, and the hearts keep with the "wedding quilt" theme. Regardless of what I think (and it probably stems from the fact that it does not fit the piecing), the owner was happy.
 The elephant was fun. The tusks previously had no quilting, so the addition of echo lines made them pop. The elephant's legs had a stipple, so I made quilting in this area better match the ears (which had a variety of fills). There was not a lot of rhyme or reason to the previous stitching, but at least now he is cute and more cohesive.
 The little worm got detailed too, right down to her cheeks.
In a perfect world, the client would have removed all quilting and let me start over, but that seemed unreasonable to ask. I also would have used a wool batting not this ultra-thin cotton which is flat and does nothing for the applique. In the end, she was much happier with the wedding quilt, and that is what matters.

Next up...one of the few edge-to-edge quilts that I did. Admittedly, I quilt predominantly custom quilting, but 10-15% of the jobs I get are really best suited to an edge-to-edge, like this one.
Next up is this very cute baby quilt made by a long time and great applique quilter. It's a baby quilt for somebody.  Who can predict what animals will be all the rage?...Earlier this year and last year I quilted several elephant quilts. Now, llamas are in.
 The trick with them is to give them semi-cute features - like eye-lashes. I also tried to give the fur some swirls for character.
Much of the background is quilted in a swirly feather freehand. It is a front-side edge. This particular pattern is one of many that "starts with a swirl" that are in my Dense & Dainty book. They can be stitched much smaller for a dense background fill. They also scale up for a nice edge-to-edge.
  And of course the backing is a super-soft llama flannel too!
This quilt was done last month after I returned from MQX Midwest. It is a large Neimeyer design. Earlier this year I quilted a Bali star, which is similar. It has the rings and no applique, but it also has the additional star points with the rings. I like this better. It is simpler and more true to a traditional wedding ring quilt.
The pattern actually only has 2 open corners, so these fan and feather motifs were very pretty there. To balance the curved crosshatching on the corners, I opted for putting CCH in the center of the quilt too. This is a location where I have done differently in the past, but I really love how it settles the quilt and brings a very-traditional look to it.
 I then put the feathers in the smaller melon shapes. The ring of framing and pebbles takes forever because of the stopping, knotting and burying but it is a lovely frame.
 This quilt is double batted with 80/20 and QW wool. That helps to bring out the texture.
 There are 3 colored threads used between the 4-patch centers and the continuous curve on the rings. I needed to choose threads that would not disappear on any of the materials.
 Because solid backings are lovely, here are a couple pics of this quilt's backside...

 Really pretty!

This last quilt was going to be a custom, then it was going to be an edge to edge. I even ordered a new pantograph to use on it. Fast forward through a few issues, and the client and I settled on a modified hybrid of edge-to-edge and custom. The clamshells are really a custom treatment because they are fairly time-consuming, but they are quilted in an edge-to-edge fashion. It does a great job of melding the 100 very different blocks.
 Here's the backing...It is a sateen I have never seen.
 And lastly...here is a quilt I quilted in the spring for a CA client. You might remember it because it took forever, or because I wrote a blogpost about how I dealt with the fact that the borders had WAY too much fabric in them -- a problem I deal with far too often. Anyway, the finished quilt is amazing, and my client entered it at PIQF, a very competitive quilt competition in CA. Her quilt won an honorable mention out of nearly 50 entries!

Time for me to get to work trying to finish the binding on my next show quilt. I'm about ready to throw try #3 into the fire and leave it without a binding at all!