Saturday, September 29, 2012

I'm not ready for Christmas

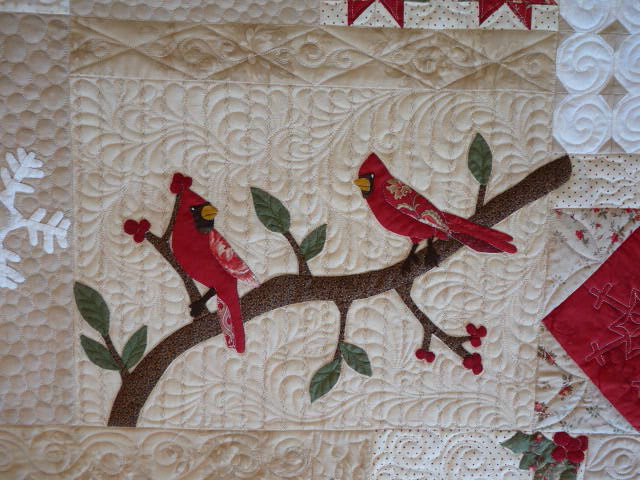
but one of my clients is closer!  She sent me this quilt.  It's a beautiful winter holiday sampler with lots of applique.
Samplers can be fun, because you never quilt enough of the same thing to really get bored.  This one I chose a few backgrounds to use and repeat to carry the design through.  To avoid changing thread colors many times, I selected an off-white Glide thread.  Because of it's shine, it was just fine on the white and the tan fabrics, giving a great wintery feel to the entire quilt.  I really love the block backgrounds where I did the free feathering.
 This is a rouched snowman.  He was a little tricky to quilt next to on account of his girth (no pun intended).
 A little mistletoe...and a snowflake.
 And some pretty poinsettias, with more feathering.  The quilt turned out really pretty, and I am sure that it will be liked.

Wednesday, September 26, 2012

Bordering

I puttered a bit as I came up with this graded pink border.  Problem is, I think I puttered too much, and completely over-thought how to do the corners.  Tomorrow, I will remove the red, and replace the 3 pieces with a single triangle.  It will (1) be simpler, (2) have less seams, and (3) stand a change of having the corner point match well.  Aside from that, I think it is coming along.
I have a ton of client work right now, and much of it is custom.  As a result, I have been hitting my limit of how long I can stand to quilt at about noon or 1pm each day.  That is 5 hours of quilting for the day, which is plenty.  Then I get a walk (a little forced fresh air before we have snow is a good thing!@), and then I am free to play with some piecing.  This solid quilt is at 25", and will end up at about 40", eventually.  Time to go cut some foundations while my youngest whines some more over doing any homework...sigh


Saturday, September 22, 2012

Solid Play

Yesterday, since the big green monster is of the longarm, and I was awaiting the arrival of 3 new quilts to quilt, I took the day to play with something new.  I know, what on earth am I thinking, another project???!  Yea, I hear ya, but who cares.  I have been thinking about solids for a while and wanted to play.  The color of the picture is horrible - the background is somewhere between celery and light taupe.  There are several other tones of this background color that will be in the quilt, making it look better.  These fabrics are from Moda's discontinued crossweaves collection.

My blocks are just under 9" finished, and were a bit finicky to make.  That's mostly my doing, being the anal retentive quilter when it comes to points.   Now, I have been a quilter and a piecer for a very long time.  I have made more than a hundred quilts, and I know quite a bit about how to piece accurately.  Or so I thought I did.  This project as taught this old dog a new trick though.
 My blocks above look pretty good.  The points are there, all shapes look like they are in good alignment.  But in the quilt I had designed, they would be placed on point, as below.  It is there that I have discovered I should have done something differently.  I should have devised the piecing so that diagonal rows were sewn, not the crossways ones (ie, making the block as a square).  Any slight meanderings of the diagonal seam are evident.  Live-n-learn.
I have played with what to do with these a lot.  I wondered if I could redesign the 40" quilt to have then not on point, but it just loses so much interest to do that.  That small of a quilt leaves no space to dither around; everything counts.  My final thought is that I hope that when the blocks are quilted (on point) that they look good, and don't show the things I see here.

Now, onto figuring out the rest of the quilt.  This is, afterall, supposed to be a "simple" quilt.  We all know, though, that I don't really know how to do simple :-)

Thursday, September 20, 2012

Week's End

It's nearing the end of the 3rd week I have been working on this quilt.  On Tuesday, I'd had enough.  I was getting upset.  The green border was not coming out quite like I wanted.  I had a tension snag, had to unpick stitches, and silk thread is hard to remove .  Then I found a small pleat.  The vertical borders were not stitching as well as the ones across the frame.  Live and learn.  I should have quilted them AS I WENT, not after I got to the bottom.  It just seemed that the problems were happening one after another, and I was tired, and in no mood to deal with them.  When I went to bed Tuesday, I decided the quilt was coming off the following morning, and I'd deal with it in a few weeks.  When I awoke on Wednesday, I had changed my mind and dove right in on the red quilting.  I sort of look at this as mindless stitching.  The Dresden plates were SO simple - just follow the lines in the print of the fabric. Clever and effective.  The other dark cranberry shapes took a little thought, but aside from there being 24 of them, they were not very hard.  They look good, though, don't they??!
One thing I did on the red that I have never done is use a wicked thin bobbin thread.  The best matching thread I had is a Master Quilter 40wt poly by Wonderfil.  This company is from Canada, so not as many Americans probably use their products.  They are also a bit pricey, but my cheap thread standards.  I won this last year and have 15 cones of the thread, and I really like quilting with it!  That thread and the Invisifil are my favorite Wonderfil threads.  Anyhow, I have never used smaller than a 60wt in the bobbin.  In fact, I often encounter difficulty winding 60wt Bottomline, so I buy it in the prewound bobbins.  The best match I had for the thread I wanted on the top was either 50wt poly or 100wt Invisifil.  I stitched one Dresden in the 50wt and hated how thready it looked on the backside.  It got ripped out, and I learned how to wind a 100wt bobbin.  The end result is that the red is superfine on my green backing, barely showing at all.
 Here's my mostly round circles -- good enough for me.
I did get the quilt off of the frame today, and as I expected, it looks amazing.  The designs that are hard to envision on a large quilt, are most evident when it lays on the floor.  I'm not saying it is not without a few things to fix and tweak, but I'm more relieved now about the quilt than I was a few days ago.  Pictures???...not right away.  I expect I will get it finished to send it to MQX and other shows next spring/summer.

I got fantastic news today from the Quilting with Machines show in Ohio.  All three of the quilts I entered have received ribbons -- two third places and one second.  Maybe you can recognize them here...

I predict that life will calm down a bit now that the stress of quilting my own quilt is off for a while.  I have half a dozen client projects, and more on the way, but there is no stress like knowing YOU are holding up everyone else's work.  I'm going to take a day to play tomorrow with some new fabrics I have had for nearly a month now.  They arrived just before I started Monster Dresdens (it does still need a righteous name), but I couldn't justify doing anything with them with this looming quilt on the frame.  I have designed a small quilt with some Moda Crossweaves.  They are discontinued, as I understand it, but I found a vendor that still had some for about $5/yd and I got a bunch of pieces.  This quilt was (aren't they always) supposed to be simple, but I loved too many of the colors too much not to get them.  It will be under 40" finished so it can go to the small quilt category at shows (unlike the Intertwined quilt at QwM that is 40.5"!).  I wanted it simple with elegant quilting.  Hopefully I can pull off decent piecing considering how small those blocks are finished.


Monday, September 17, 2012

69 Hours and counting

Finally, after 2 weeks of quilting like a mad-man, I am on the bottom border.  It is coming along.  It took about 4-5 hours to get this much done today (it is a 5" space).  It's hard to get excited about the remaining 3 borders that need quilting when one takes this much time!
 The quilt will come off the frame at the end of the week, done or not.  I know it will still be incomplete, but I should have all 4 borders finished by then.  None of the deep pink has been stitched yet.  It's time to get going on some client work :-)

Wednesday, September 12, 2012

water lilies

Despite having kids at school for 7 glorious hours each day (which I have been mostly longarm quilting during that time), life just seems so incredibly crazy all of a sudden.  We have soccer practices twice during the week, band is about to start up after school, and Saturdays, well they are so crazy that it makes your head spin...two soccer games, one of which may be away somewhere else, swim lessons for one, and tap for her too.  What all the craziness and waiting around while they have sporty fun affords me though, is time to hand applique.  I am again working on this quilt.  It may be 6-8 months or more before it's ready to quilt because I am too slow and too distracted with other and new projects.
 Last weekend, while we were apple picking, I saw this pond that had a bunch of these.  Water lilies are one of the most perfect looking flowers.  I always knew I wanted a row of setting squares on this quilt to have appliqued water lilies, but now I actually know how to quilt them too...they need the yellow stamen doe in thread.  I now have 5 of the 16 needed appliqued blocks.  The blocks are all pieced, and have the deep pink bias piping already.  They are just awaiting me to hand stitch the petals onto the block.
This, of course, is not my only applique project in the works.  Go figure!  And it's not the one I have been telling myself I want to finish first either.  Maybe once I get these flowers out of my system I can move on and finish the last corner of this quilt.  Then it can be assembled. And then there is another applique quilt too, but I'll spare you my scattermindedness with every project.

Thursday, September 06, 2012

Quilting!! and a big win

The Big Green Monster (aka green modern Dresdens) has been on my machine for 5 days now.  The kids are safely off at school 7 hours a day and I am quilting more hours a day than I think I ever have to get this at least to a state that it can be safely removed.  Notice that I did not use the "done" word.  I won't even assume that I can finish it before the client quilts are piling up, but it does need to have the majority of the fill-work completed so it's adequately held together.

I discovered right off the bat that the green thread I had planned to use was too dark for the lime green outer border.  You'd think that I could have checked that sometime in the last month or so and ordered a lighter shade, eh?  Nope.  I figured it out the day I hoped to actually quilt the border.  Today, 4 days later, the paler green thread arrived.  I was not patient enough to wait, so I have to go back and quilt the basted border when I am done with the center.  Pray for no pleats.

So far, there are areas of the quilting that I love, and areas that I might raise an eyebrow and question why I thought that would be good.  I love the silk thread.  It.is.awesome.  Super.duper.awesome.  Want more, Santa...must have!  All 20 of the Dresdens will be quilted as below.  I have not done the pink center yet; will get after the rest is done.  The thread is a heavier-weight so I don't want to be constantly adjusting tension as I go back and forth between Glide and silk.  Note that I echo quilted 1/4" around the Dresden.  Looks nice, I think.
On day 3, though, I was so freaking gung-ho to test out a filler that I failed to outline the top center Dresden!  I could have screamed.  There's no way I am pulling out as much of this silk thread that would have to be removed to outline the plate, so the outlining is reserved just for the corners. That's my story and I'm sticking to it.
I'm using some fills that I have not really used on a competition quilt before.  I'm not really sure about the 1/2" curved-crosshatch.  It's nothing overly original.  I have seen it many times before on show quilts and liked it.  So, tell me why I don't love it here?.  It just seems like a lot of it.  I really wish I'd chosen some free-flowing feathers...except that when I designed the quilting for this quilt I wanted to avoid just putting feathers everywhere.  I want a variety of textures.  Fingers crossed.
Above you can see my "modified prairie points".  I'm a bit of a rebel.  I wanted to try them because they seemed era-appropriate for a Dresden quilt, and the triangles look great, but I couldn't get over the flaps flapping all over the place so I stitched them all down.  Prairie points no more.
There are 9 ivory blocks, and eight of them are exactly like this one.  The center is a little different.  It turned out really well.  The band of pebbles will create a sub-frame within the quilting.  I designed this, and actually traced the pattern onto all 8 blocks with a pen.  I am all about free-quilting feathers, but I really wanted uniformity for these.
Here's a fun fill I drafted for this quilt.  Those cross-hatched frames go up the diagonal of the quilt to frame the patch of 16 Dresdens on pointe.   This is 22 hours into a 102" quilt...maybe at the 30% completion mark.  Maybe.

I got word that my quilt Meet Me at Giverny shown here took a first place at the Wisconsin Quilt Expo!!  It sounds like the quilts there are really spectacular - hand and machine quilted both.  If you are in the Madison area, it's well worth a trip.

Tuesday, September 04, 2012

Primitive wool table topper

I got a couple relatively small quilts from the sister and aunt of a client I have quilted for a bunch.  This one is 35" square and just fell outside of my immediate "comfort box" initially.  Maybe because it is a fall quilt and I am NOT ready for summer to end yet.  Fall is only a catalyst to winter, and I don't like nor need winter.  Maybe it is because I haven't done much with wool.  The design is so simple, and left me lots of open space to free-quilt.
Along the outer border (though not largely apparent due to the light), I quilted free-floating leaves.  There are oaks and some other simpler variety.  They are quilted in dark brown so they show.  I then quilted around them with echo quilting and swirls, like the wind is flying them away.  The patches of curved-crosshatching is just to break up the space.  There is also a leaf at the center.
 To keep with the "primitive" style, I kept the quilting around the pumpkins simple - just diagonal lines.  It makes the pumpkins and stars pop.
I like this peacock filler chosen for the center.  I don't use it often, but always like the finished look.  The freehand quilting in the dark brown sashings is something I have seen done, but never  used.  It, too, gives a nice almost fall-like texture to the piece.
 The real fall can stay wherever it is until November, but I enjoyed quilting this fall table-topper.

Saturday, September 01, 2012

T-Shirt Quilts

I quilted a tee-shirt quilt this week for a client.  I have done a few of these since I began longarming, and the quality of the shirt preparations seems to vary a bit from quilter to quilter.  I thought I'd show this one and talk about how best to prepare your quilt so as not to stress out your longarmer (and to get the best quilting possible!).

Let me start by saying that this particular quilt was perfectly prepared.  I had no issues whatsoever.  Typically, the mere mention of "tee-shirt quilt" sends me halfway to the hills though.  This quilt has 15 different shirts.  The person that brought the quilt to me adopted the project from a friend of her's.  She's not to blame for these shirts not really being cut squarely on each imprinting design.  She went so far as to tell me that the initial person (who the quilt is eventually going back to) had purchased silk/poly gingham for the sashing.  Oh, dear...  She clearly told her how inappropriate that was, and selected another 100% cotton fabric instead.
The first thing to remember with tee-shirts is that they are knit, and do stretch significantly.  In order to neatly quilt then, the stretch needs to be eliminated.  I suggest cutting out the front of the shirt to create a large, flat area, with several inches around the motif desired to capture.  You can create a quilt with shirt blocks that are all the same size, as I show here, or vary sizes and fit them together with the sashings.  The choice is your's.  What you don't want to do is cut too close to the printing, as was done here.

Next, you will need a lightweight fusible interfacing.  It doesn't need to be fantastic, and shouldn't be overly thick.  The shirts are already considerably thicker than the woven quilting fabrics, and the goal for any quilt should be to have all fabrics of uniform thickness.  This enables the quilting tension to be maintained uniformly across the entire quilt.  Apply the interfacing over the shirt (on the backside), and then cut out the piece to the desired size.  It is fine for the interfacing to go into the seam allowance.
You need to sash all the knit blocks with a woven fabric, preferably 100% cotton.   Do not select anything heavier than a normal quilter's cotton, mid-weight.  A viole or Liberty weight would be inappropriate.  Likewise, so would a denim!   This creates an edge around the knits so that they cannot stretch.  I think that a relatively tight 1/4" seam is adequate.  Press the seam towards the woven fabric for the flattest quilt.  In terms of fabric color choices - obviously anything is possible.  My preference is to use a simpler fabric for the sashing because usually the collection of tee-shirts is in all colors, and just appears busy with a print.  You could do whatever you like though.
 Here's one of my favorite shirts...Leave it to her mom to stick that shirt on her quilt :-)  Once the shirts are stabilized, you can do whatever you would normally do with a quilt in terms of borders.  The backing fabric can be whatever, but it would be my preference not to use a flannel, as that would make for a heavy quilt.  I generally quilt these quilts with regular 80/20 batting.  Any weight other than something excessively thick would be fine.  They can be custom quilted, edge-to-edge quilted as I have done here (I used the Plush panto because it picked up a swirling tornado-like motif that is in the dark sashing), or if you want easy, it could be stippled.  I generally try to minimize the stitching on the shirts because the needle does leave small punch holes in the imprinting on the shirts, and I wouldn't want to need to rip out stitches there.  Less stitching done, less chance for needing to remove.
So there you have it...Isn't the backing fabric fun?  and it shows off the quilting pattern too.


Monday, August 27, 2012

Inspirations

The family and I went to Boston this past weekend.  It's not that we live very far away, only 2 hours, but we just don't bother with the trip very often.  I went many times growing up, and now it is just so expensive to get there and park, etc.  And the entry costs if you do anything are high as well.  But, none the less, we drove down, stayed in a hotel 2 nights and took the kids roaming.  On the first day, I dragged them to the wonderful north end to retrace part of the Freedom Trail.  We went into Paul Revere's home, and visited the Old North Church.  If you've never been to Boston, this area is just splendid - cobblestone streets, old historic buildings, and nearly every restaurant is Italian.  How bad can that be?  Everywhere I looked, there were quilting inspirations...swags, and fanciful wrought iron (not photographed though), and more.
Inside the Old North Church, there was more.  The gold pip organ is gorgeous, but I was seeing nothing but all the carved scrollwork.  I can see applique, lots of applique!

 ...and more applique.  Perhaps I can incorporate some of this on an art nouveau piece that is started.
 The ceiling in the restaurant where we ate had this lovely tin.  If that's not a quilt pattern, then what is??
 On Sunday, we took the kids to the Children's Museum. These were some of the wild ceramic tiles on the wall of the bathroom.  There were several, and they are intended to look like things in nature that have been magnified.
 I think this was a dragonfly's wing.  They were really cool.
Boston was a nice getaway.  But, I am tired of being in a noisy hotel and having to share a one-room existence with my kids.  Dining out does get old, even if it is great to not have to cook.  Today has been a flurry of errands...packed up 3 quilts to send off to QwM, went to the post office, the pharmacy, fitted my daughter for tap shoes, Miss S used her birthday (which was yesterday) gift certificate at the mall, and a few more.  I feel like I need a vacation just to recuperate from the last 4 days, and we haven't even made it to the bank and grocery store yet.  Sigh...  Two days and all will be at school, and I will be back to regular routine.  If there really is such a thing...

Thursday, August 23, 2012

Postage Stamps

I quilted this for a client a couple weeks ago.  It is a lap quilt made from 2" squares -- nearly 1000 of them.  Although they all look different, which was fun for me to spot many fabrics I have used as well  as many I'd love to have had, it did have some repeats.  I can't even imagine having enough fabrics to make them all different.

Because it is very busy, it's quilted with a simple Terry Twist.  It softens the strong geometric lines, yet is still reasonably quick (ie, not a custom) to quilt.
The quilt has lovely, yet simple texture to contrast with the very busy colors and patterns.  I love the idea of making a quilt like this to remember my kid's clothes, but still can't get past the fact that there are 1000 squares to have to cut!
With a mere 6 days until regular school days start again, we are off to Boston for a weekend.  Not really sure I'm ready or in the mood for 5 of us in a hotel room, and all that eating out (love for others to cook and clean for me, but taking the kids into restaurants really takes away the appeal of it!).  It's been a non-vacation summer...I'm totally hoping for next year and a trip to Florida again.  We'll be visiting the Museum of Science and Children's museum.  If I think I can drag them on the Freedom trail, I may try.

Monday, August 20, 2012

Preparations

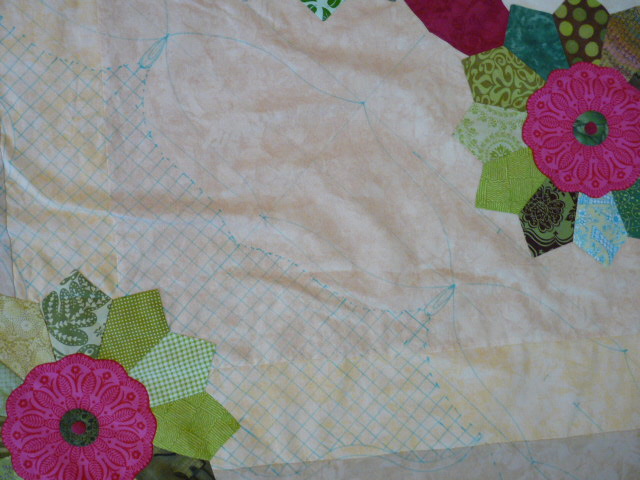
Nine days.  Can you say that?  "Nine days"...that is when I will load this and start quilting.  

I have spent quite a few hours this past weekend, and a couple of the blue wash-out pens, marking this quilt. Normally I don't waste so much time marking, but this quilt is huge.  And I just can't be trusted to remember what I did on the top half when I actually get to the bottom half!

I have several "types" of motifs that I like to use on my quilts.  For that reason, I have spent a goodly amount of time trying to dream up different things for this one.  I am creative, afterall, and I know that I don't have to quilt the same old thing every time.  It is challenging, though, getting away from things that I have seen done successfully, and that I really like.

The 6" outer green border is getting a fun wavy feather, that has a stripe that weaves in and around it.  I'll probably vary up the feather a bit, adding curls and a few leaves.  Somehow, it just looks a bit sterile in the picture.  Once I see how the silk thread looks on the green, I may also do the stripe in another color so that it shows more.
The corners of the quilt are pretty large - nearly 40" on a side.  It's enough blank space to send a quilter running for the hills.  I have subdivided this a little, preparing for a couple areas with fillers, some cross-hatching, some interesting shapes, and all that 1/2" marked area is getting cc'd.  I don't generally do this on a small scale on my quilts, so I opted to do so here.
I also designed the motifs going in the white areas.  These are feathered with cross hatching in the centers, and some other fill around them.  I created this motif a few months ago to go on a whole cloth quilt that I have yet to mark.  They seem like they'll be kind of time consuming (heck, the entire quilt is going to be time consuming), but the end effect of a cool design on light fabric will be worth it.
The center motif is different, to draw the eye inward.  I know, I know...I use rays on quilts all the time.  The fact is, they bring the eye where I want the eye to go.  They add visual interest in a way I have yet been able to replicate.  This is my original design, created by playing around with repeating feather sprays. 
There are pages and pages of scribbles and stipple patterns in my house.  If I see a pattern on something, I start drawing.  I'm taking 2 or 3 of these to use on the quilt in the larger open spaces.  The ones I like best just are not suited for filling tiny areas.
So, 9 more days.

Today, the kids get haircuts.  New shoes have been purchased, and the drawers are being stocked with unstained, appropriate size school clothes.  Do I sound like I am ready??!...Until then, there are a few more things to finish marking and planning, a 3 day getaway to Boston, and of course, a client has called and is dropping off a quilt this week (to be done Monday).  Why is it that right when I am about to embark on a large quilt of my own, I always have another that must be done first??!  Ah, the life of a professional quilter...no complaints.   Then my big green monster will be started.

Friday, August 17, 2012

More from Lowell

One of the great things about the Lowell Quilt Festival was that it was not just a judged/juried show.  The town of Lowell, which is a former textile mill town, gets involved.  They provide a free bus shuttle to get from showing to showing (and there are ~6-8 other smaller shows) -- this year this was great since it started raining.   The New England Quilt Museum has a fantastic exhibit which we went to.  Unfortunately, they don't allow photos so I can't show you the completely awesome Hollis Chatelain quilt that is there.  It will blow your socks off.   The current exhibit has many machine quilted pieces, as compared to last year's very traditional and old quilts.  We went to exhibits at 2 other small galleries, both of which had receptions with food, but the one that was truly the most fun was the one put on by the Boston Modern Quilt Guild.  It was held in the former Appleton Mills building.  The mill has been completely renovated, and is a FABULOUS location - great light, and the architecture is stupendous.

Now, as many of you know, I'm kind of like a deer in the headlights when a truly modern quilt comes to me for quilting.  I generally work through the fear and quilt it beautifully, but if given a choice, I tend to stray more to the conservative side, with the use of modern fabrics.  So I was caught completely off guard liking this exhibit as much as I did.  I came upon the next set of quilts, loving the one on the right.  It has fantastic colors, and I said to my mom "I quilted one of those (referring to the one on the left) last year".  Ha!  Turns out I quilted that very one!  It was one of the wedding quilts my client Andrea made.
 There were a couple displays of small quilts...
 After I saw Andrea's pineapple quilt, I was not shocked to see the pinwheels, which I also quilted.  But the surprise was all mine a few minutes later, because I spotted who I thought was Andrea at the front entrance. I've never met her, but her mother (also a client) has posted pictures of her.  It was great to finally meet - it was indeed her!
 As I came out of the restroom, I saw this, and loved it.  It's such a fun backing.
 This is the front.
I am quite a sucker for orange peel quilts.  It's the taking of an old-fashioned pattern, and remaking it with a modern twist that is appealing.  This quilter modeled her design after a greeting card (attached to the quilt).
 Here's a shot of the venue.  I told you it was gorgeous.  Lots of natural wood, steel and light were everywhere.  It is SO far superior to the auditorium that the actual quilt show uses where lighting is concerned.  Too small to use for the show though.
And a quick look up to see the 3-4 floors of modern art (aka beams, columns, steel, etc!)